
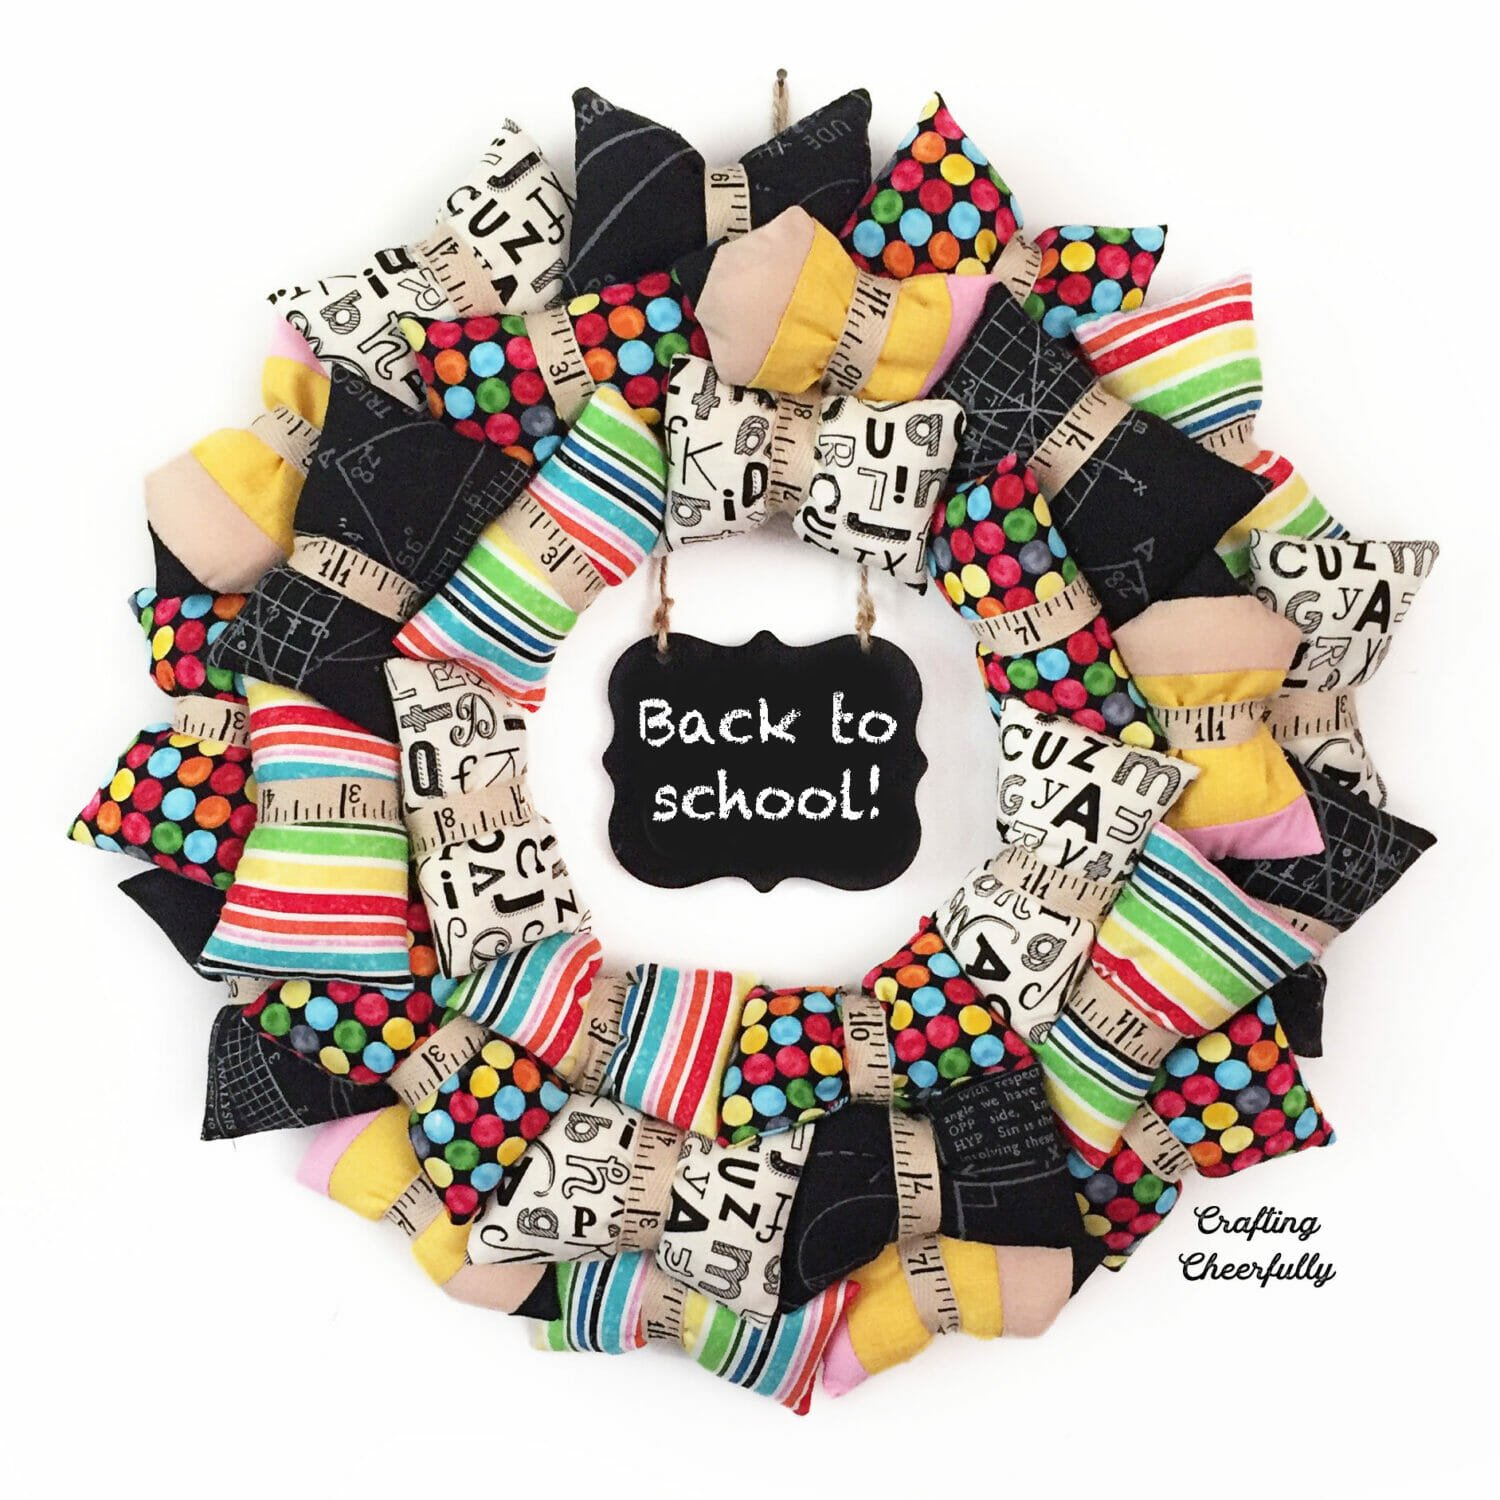
Back-to-School Pillow Wreath
Create this fun and colorful pillow wreath! This makes a wonderful gift for your favorite teacher or the perfect decoration for your home learning space. We hang ours up every September to welcome the new school year. Learn how to make this fun wreath and grab the free pattern for an adorable pencil pillow!
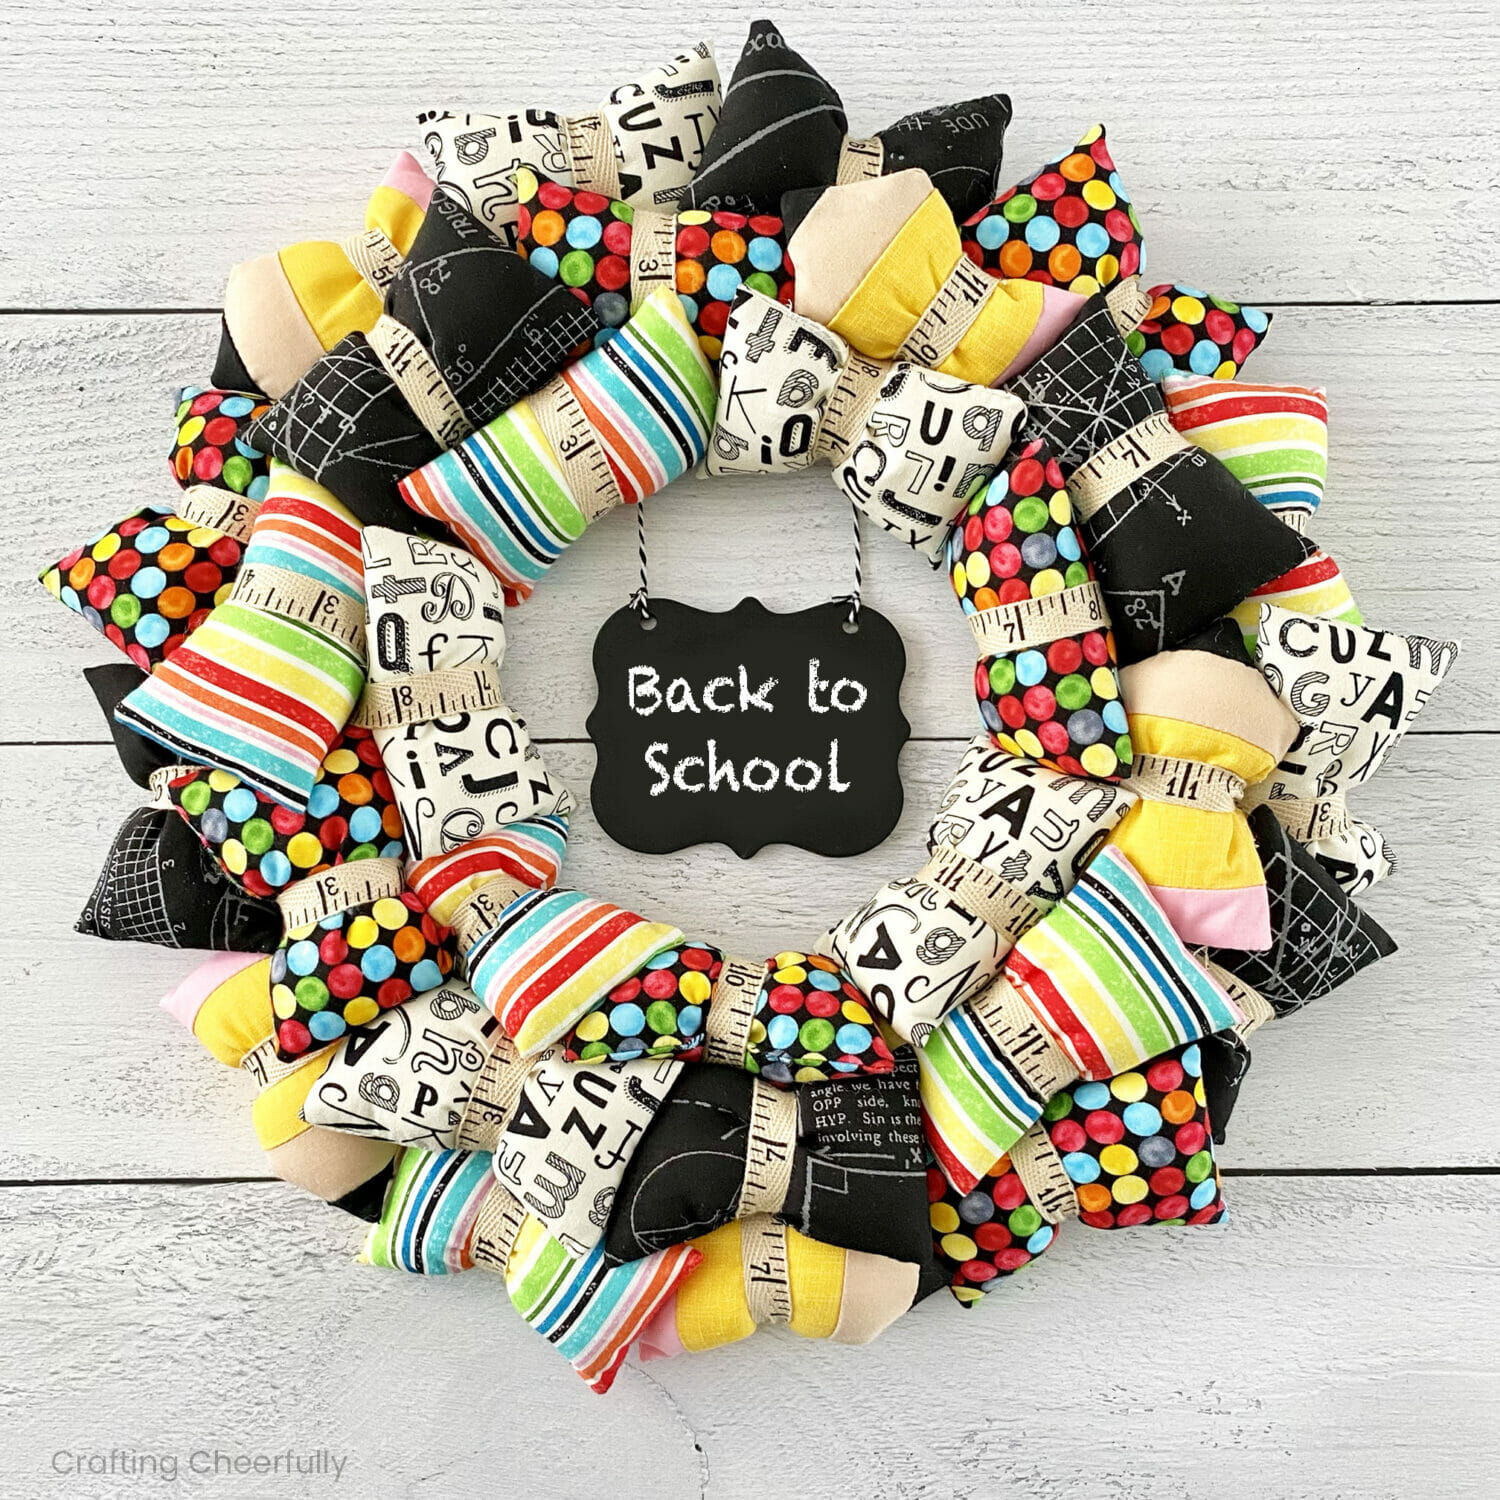
Hello Crafty Friends! Today I have a fun new pillow wreath to share with you! This back-to-school pillow wreath is perfect for the month of September. It also makes a great teacher wreath! I have been slowly working to create a pillow wreath for every month of the year and am so excited with how this one turned out.
I have already made a bunch of pillow wreaths with themes ranging from Christmas to football. I love pillow wreaths because of how versatile they are – you can make a wreath for any holiday or theme imaginable. I attribute my obsession with pillow wreaths to my mom who made our first one around the time I was born. She taught me how to make them and now it’s a fun little hobby we share.

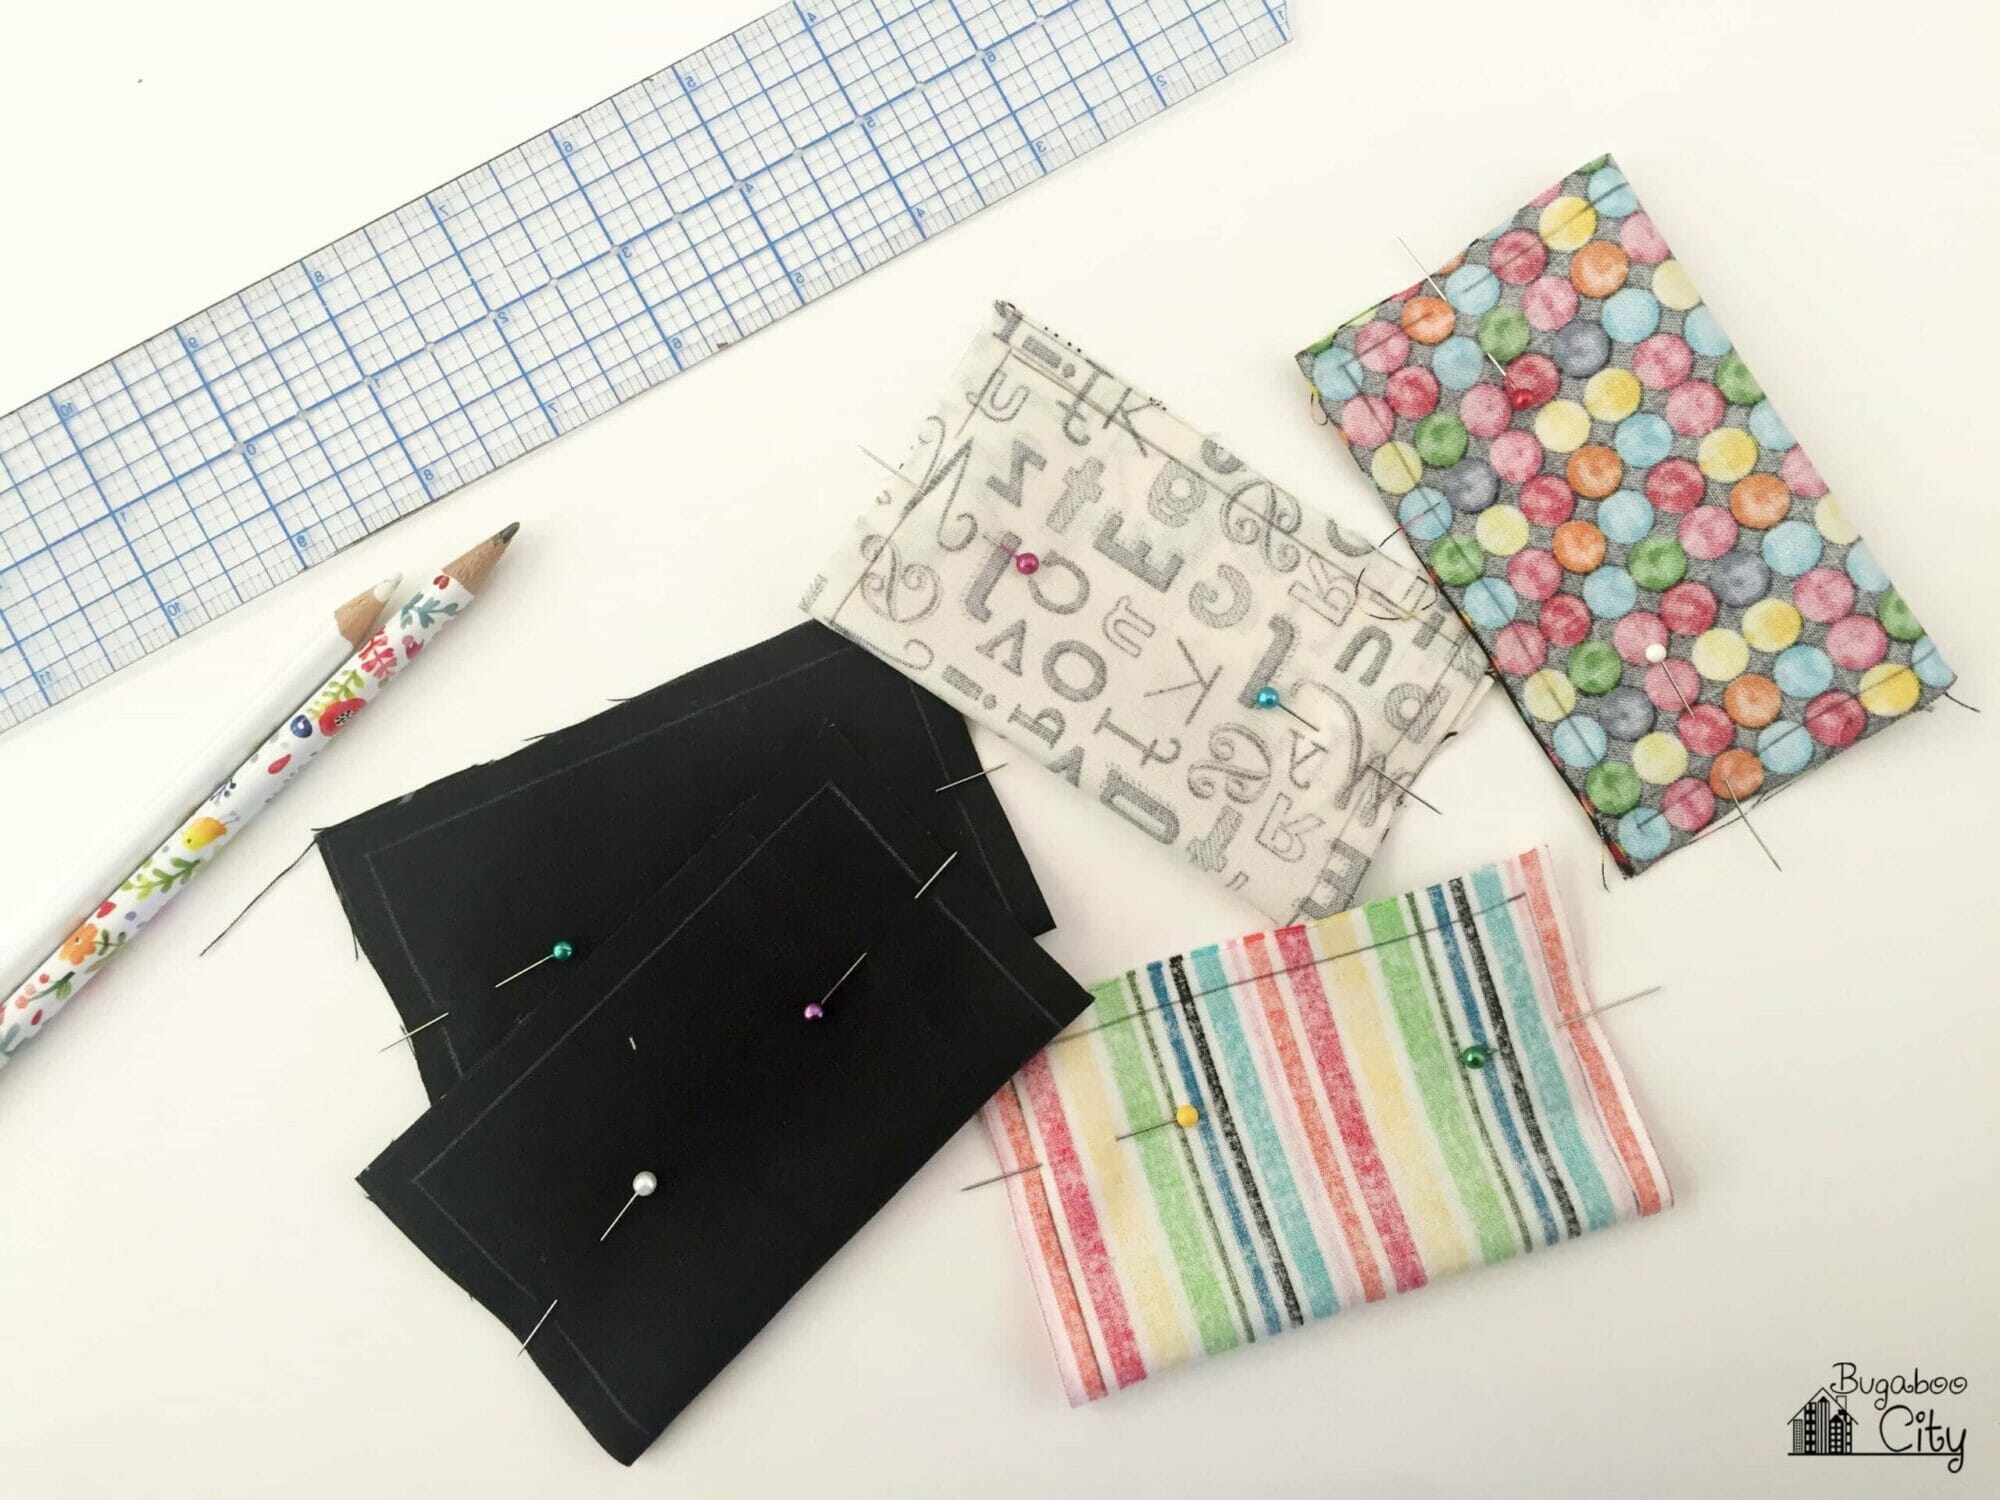
I have wanted to make a school-themed wreath ever since I saw the fun chalkboard and number fabrics at my local quilt store. I paired them with bright polka dots and stripes and made some of the pillows into pencils!
I wanted to tie them with ruler-themed ribbon, which I ended up finding on Amazon. I absolutely love the ruler ribbon. I have a bunch left over so I’ll have to think of some other fun projects to use it on.
You can leave the wreath as is or add a mini chalkboard with a teacher’s name on it if it will be going on a classroom door. Below is the tutorial.
> Check out my Ultimate Guide to Making Pillow Wreaths

How to Make a Back to School Wreath
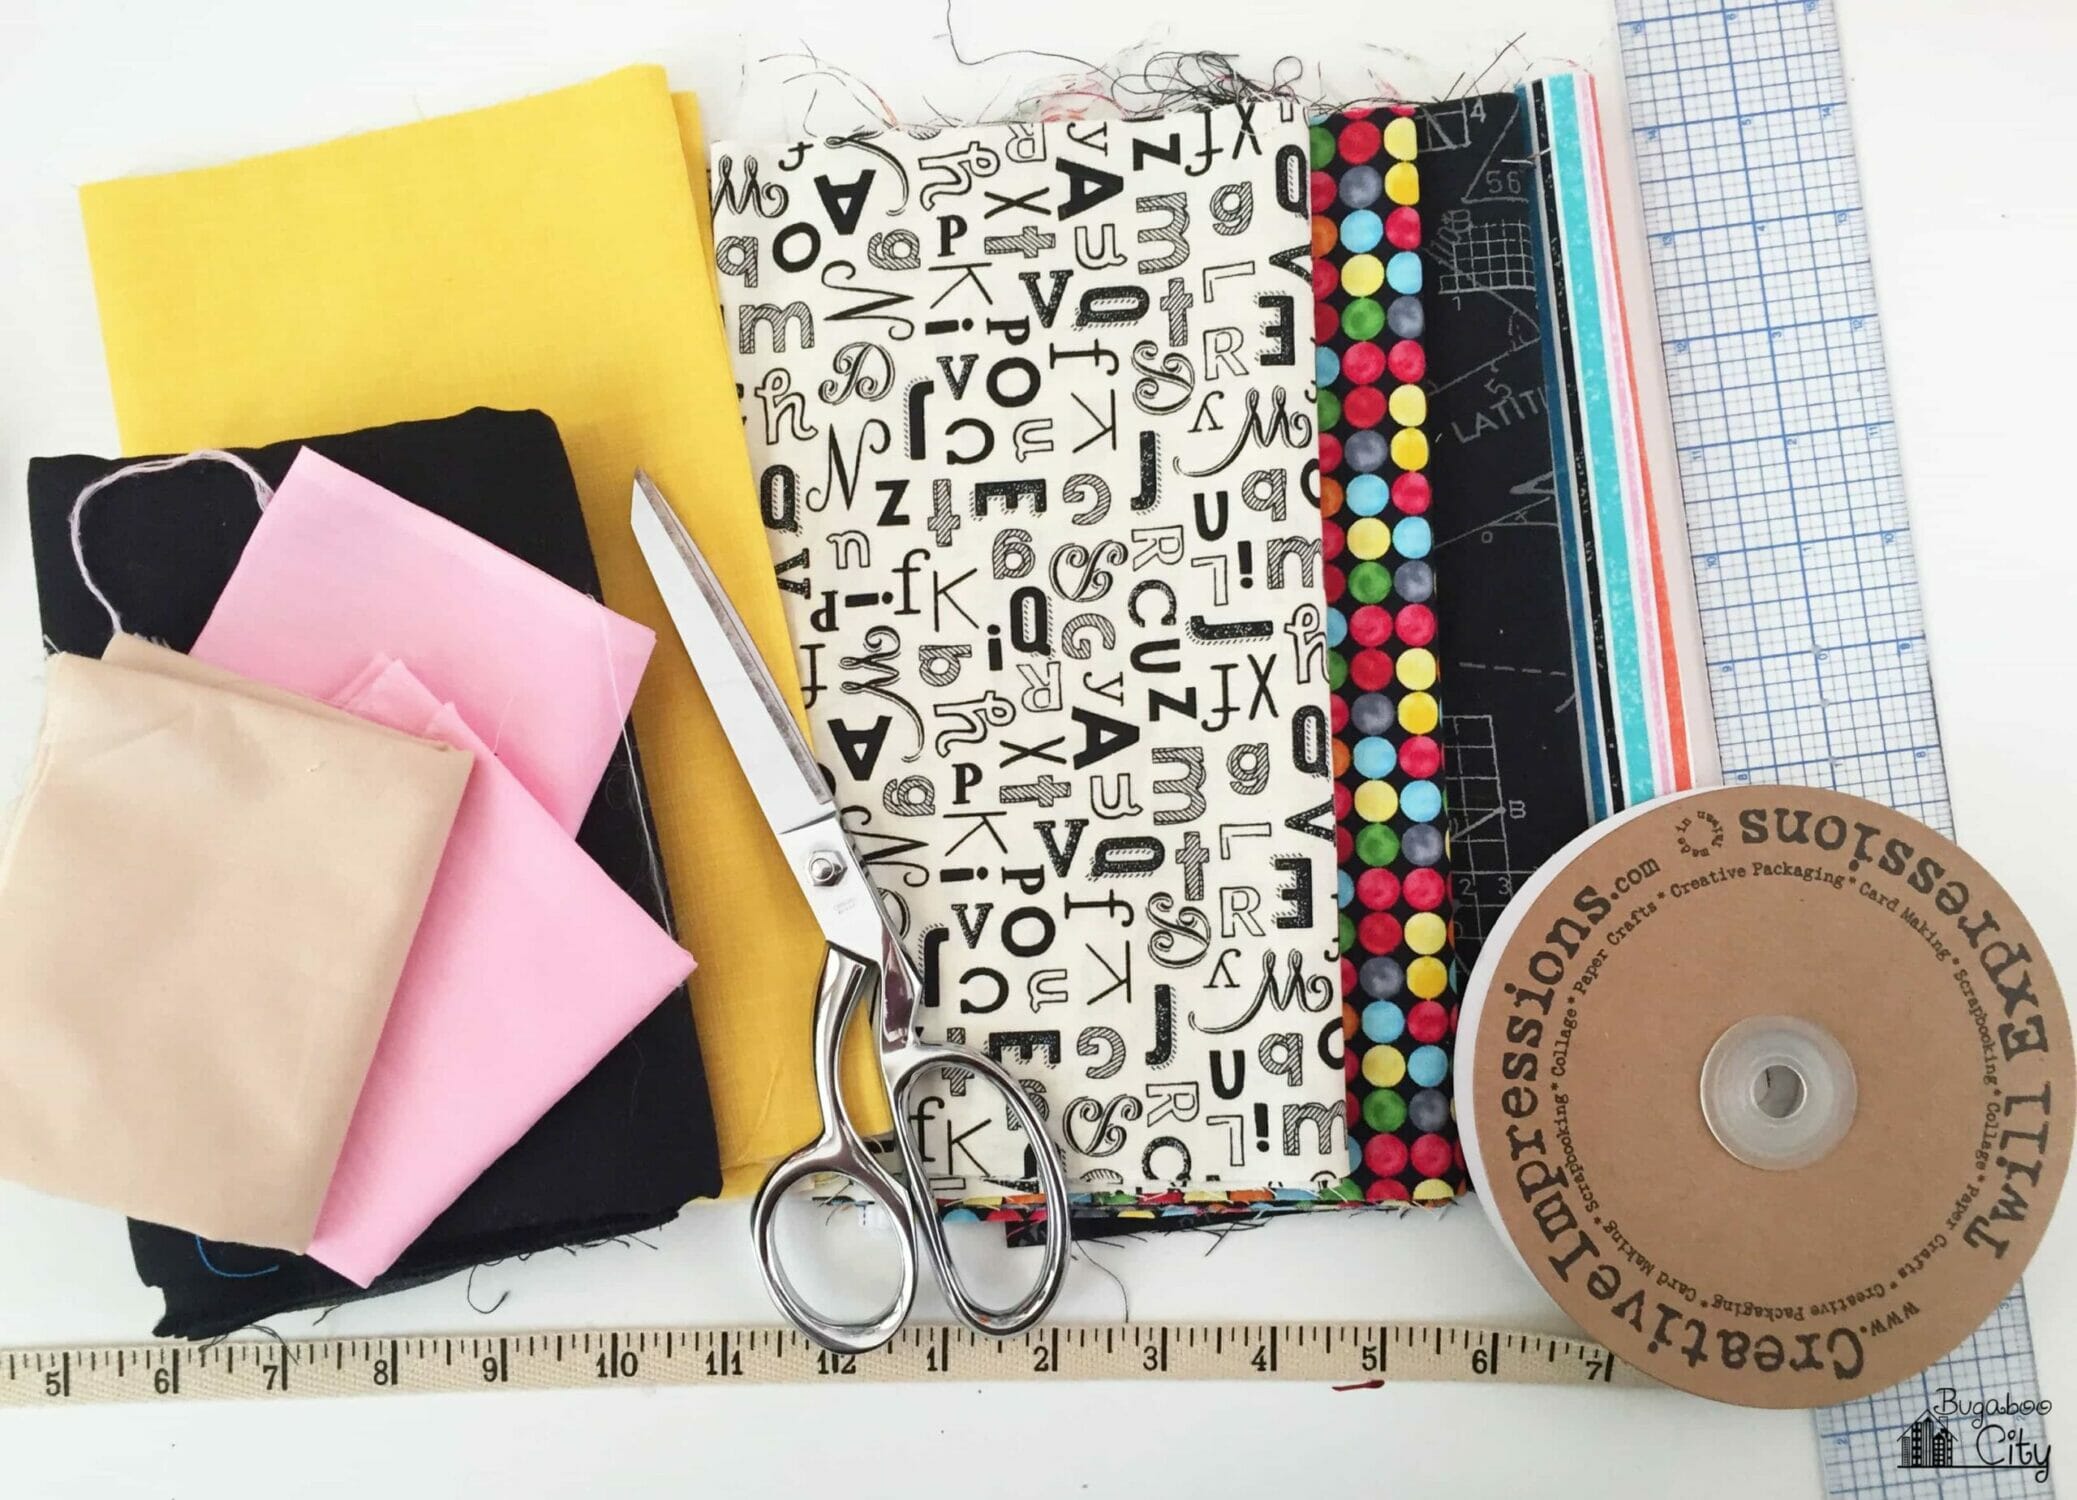
Supplies Needed:
- Free Pattern – Grab the free file by filling out the purple form at the end of this post.
- 4 different fabrics for the pillows – 1/4 yard of each is enough
- Pencil pillows – black, tan, yellow and pink fabric – 1/4 yard of each is enough
- 12″ wire wreath form and heart-shaped wire wreath forms.
- Poly-fil Stuffing
- Ruler-Themed Ribbon
- Thread
- Point turner
- Pins
- Needle
- Fabric scissors (I also find small embroidery scissors are useful too!)
- Mini chalkboard (optional)
Step by Step Tutorial
Step One: Cut the fabric for the little pillows!
Create a cardboard pattern to use for cutting out all of your pillows. The pattern should measure 4.5″ x 5.5″. Cut out the fabric pillows. The pattern is for the entire pillow (it gets folded in half) and includes a 1/4″ seam allowance.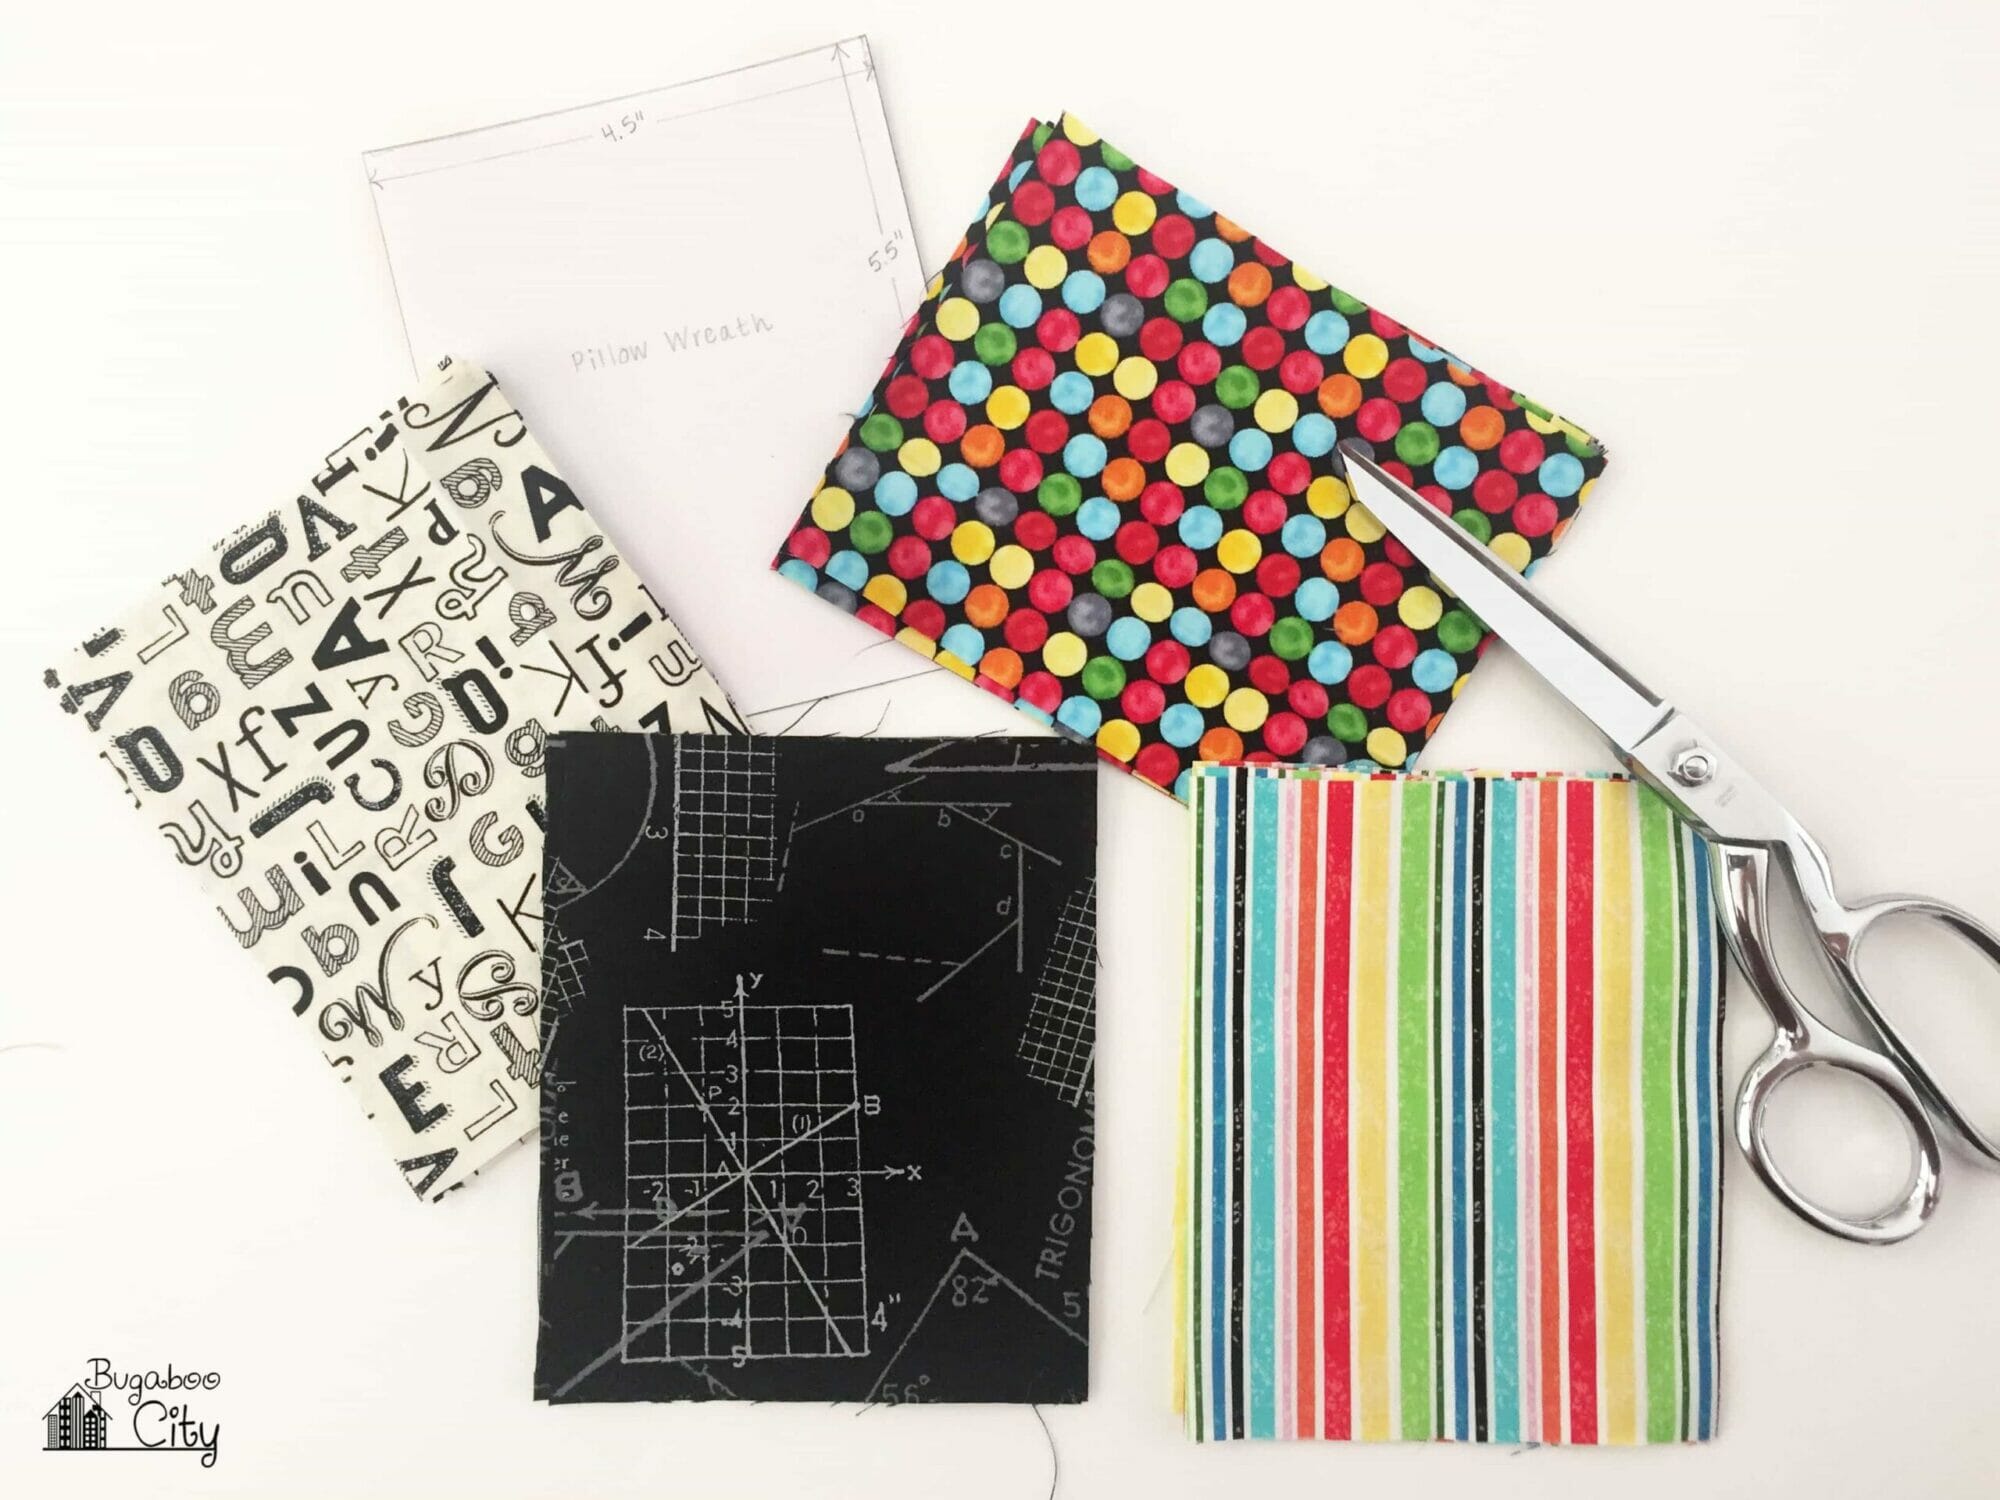
For the 12″ diameter wreath, you will need about 29-35 pillows, depending on how full you want your wreath to look. For this wreath I used 29 pillows made from five different fabrics – four different fabrics plus the pencil fabric I created. I cut six pillows from each of the four fabrics, and five pillows from the pencil fabric.
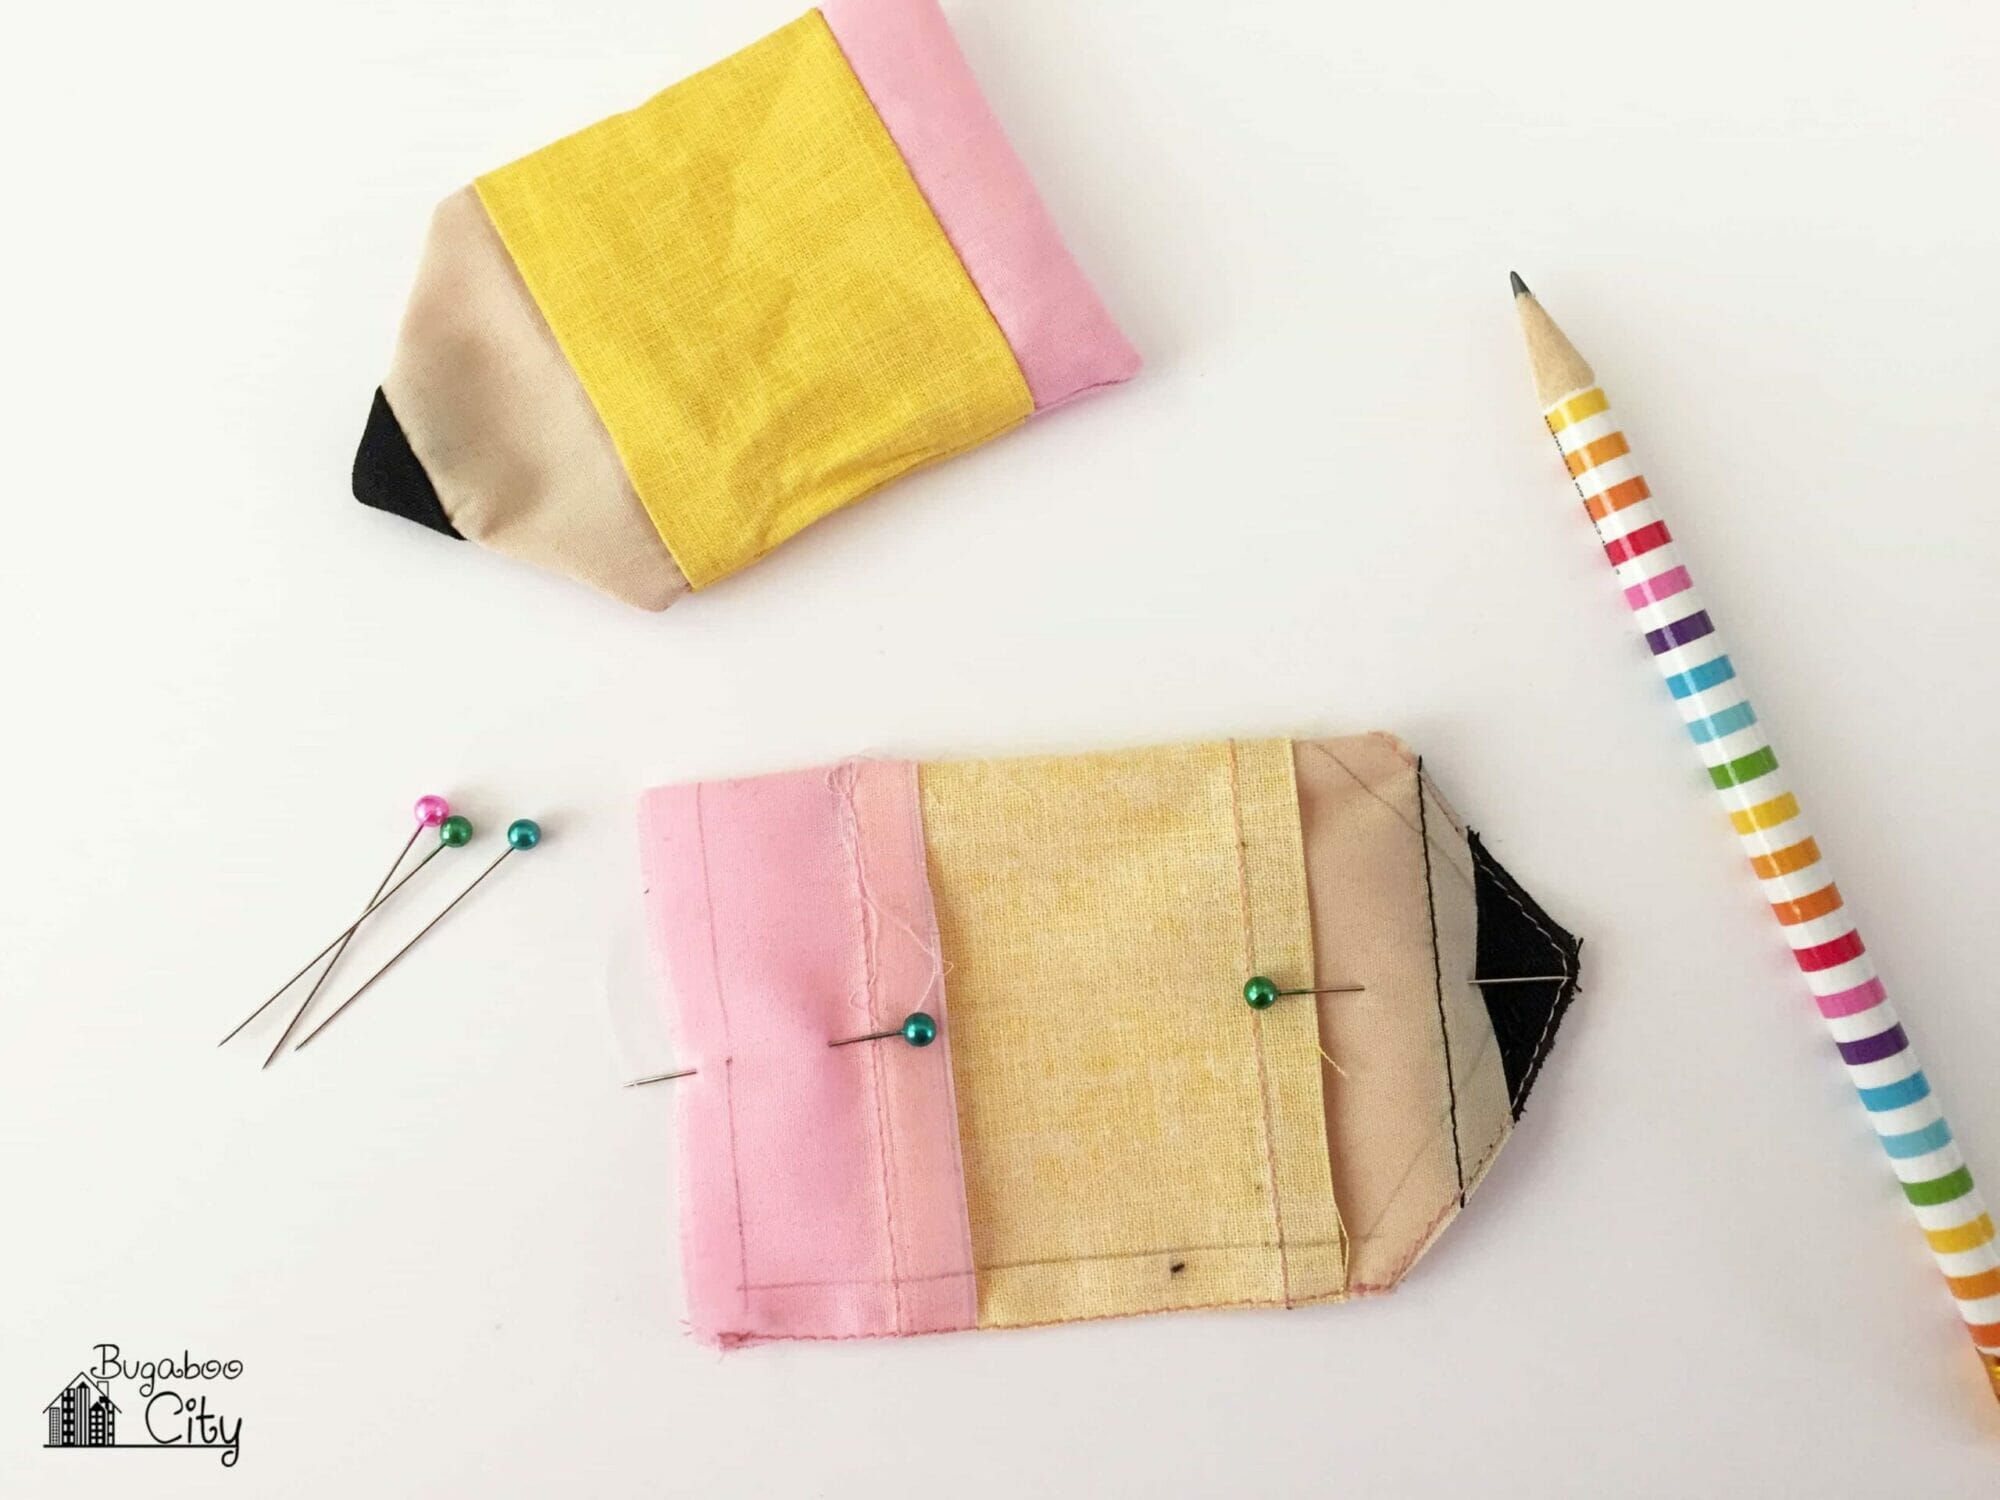
Step Two: Make the cute pencil pillows.
To make the pencil pillows, I created a pencil fabric by sewing strips of black, tan, yellow, and pink fabrics together. I stitched each strip together with a 1/4″ seam allowance and pressed the seams to one side. I used the pencil pattern and cut out 5 pillows. You could cut out 6 pillows like all the other fabrics if you want. I chose 5 because that is how much fabric I had in my stash!
Dimensions for Pencil Pillow (1/4″ seam allowance included)
- Pink 1 1/4″ height by at least 27.5″ wide
- Yellow 2 3/8″ height by at least 27.5″ wide
- Tan 1 3/8″ height by at least 27.5″ wide
- Black 1″ height by at least 27.5″ wide


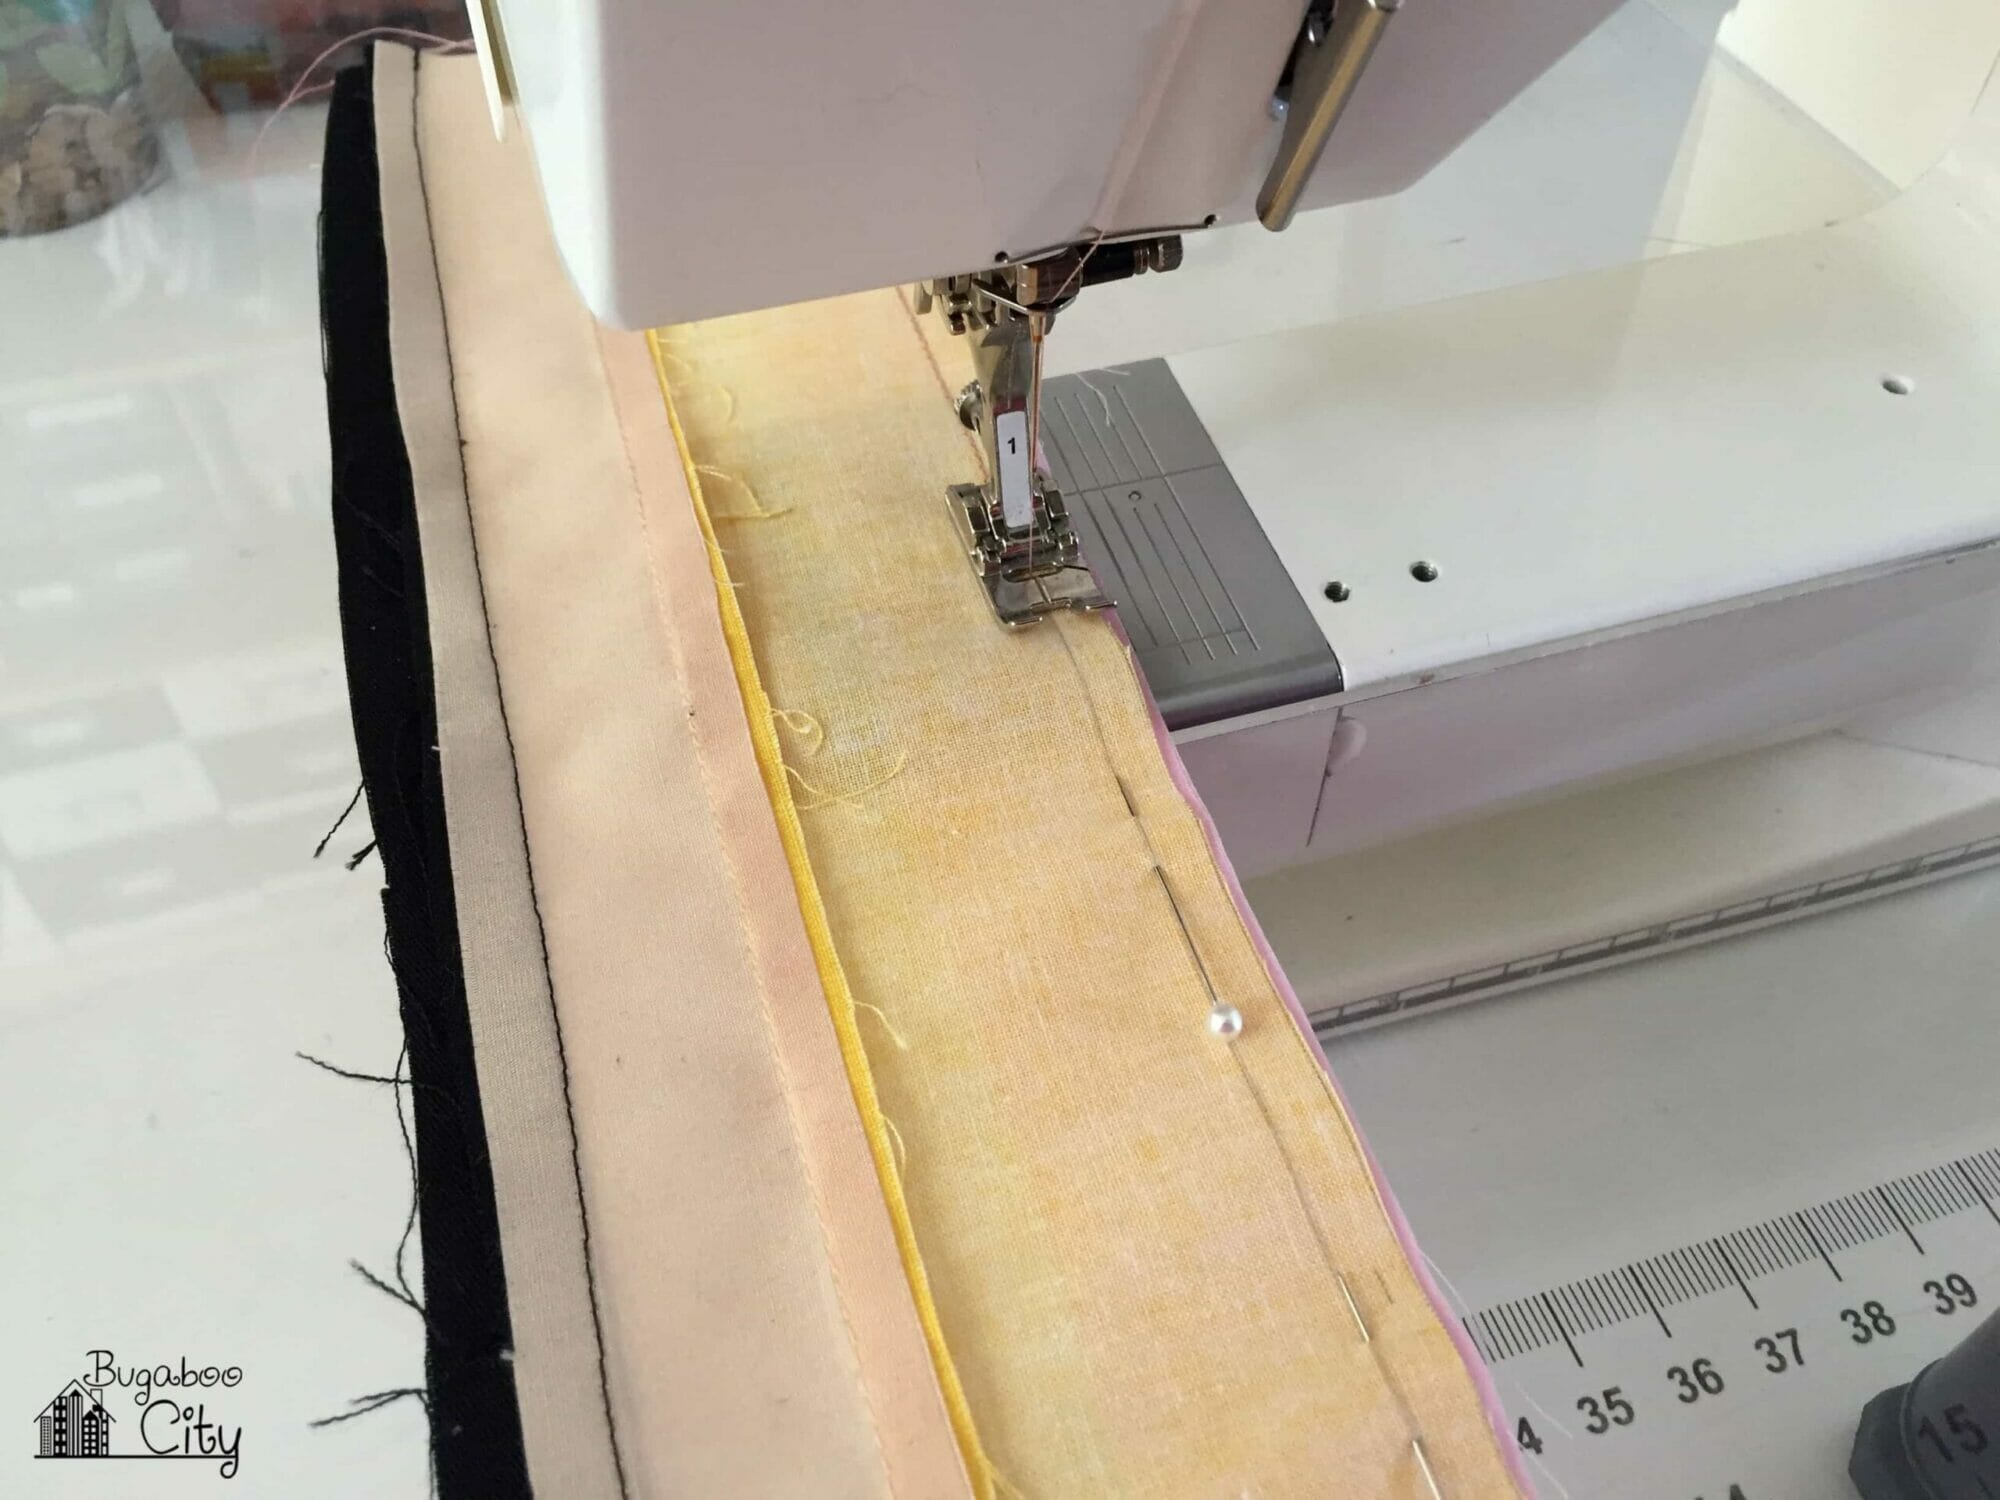

Step Three: Stitch the fabric pillows together.
For each pillow fold the fabric in half, right sides together, 4.5″ side to 4.5″ side. Sew with a 1/4″ seam allowance each side/corner of the pillow, leaving an opening to stuff the pillow. I leave the opening on the long side of the pillow.

Trim the corners, flip the pillows inside out and push out all of the corners.

Step Four: Stuff the pillows!
Stuff each pillow and hand sew the opening close. Don’t overstuff the pillows making them too hard as this will make it harder to tie them with ribbon.


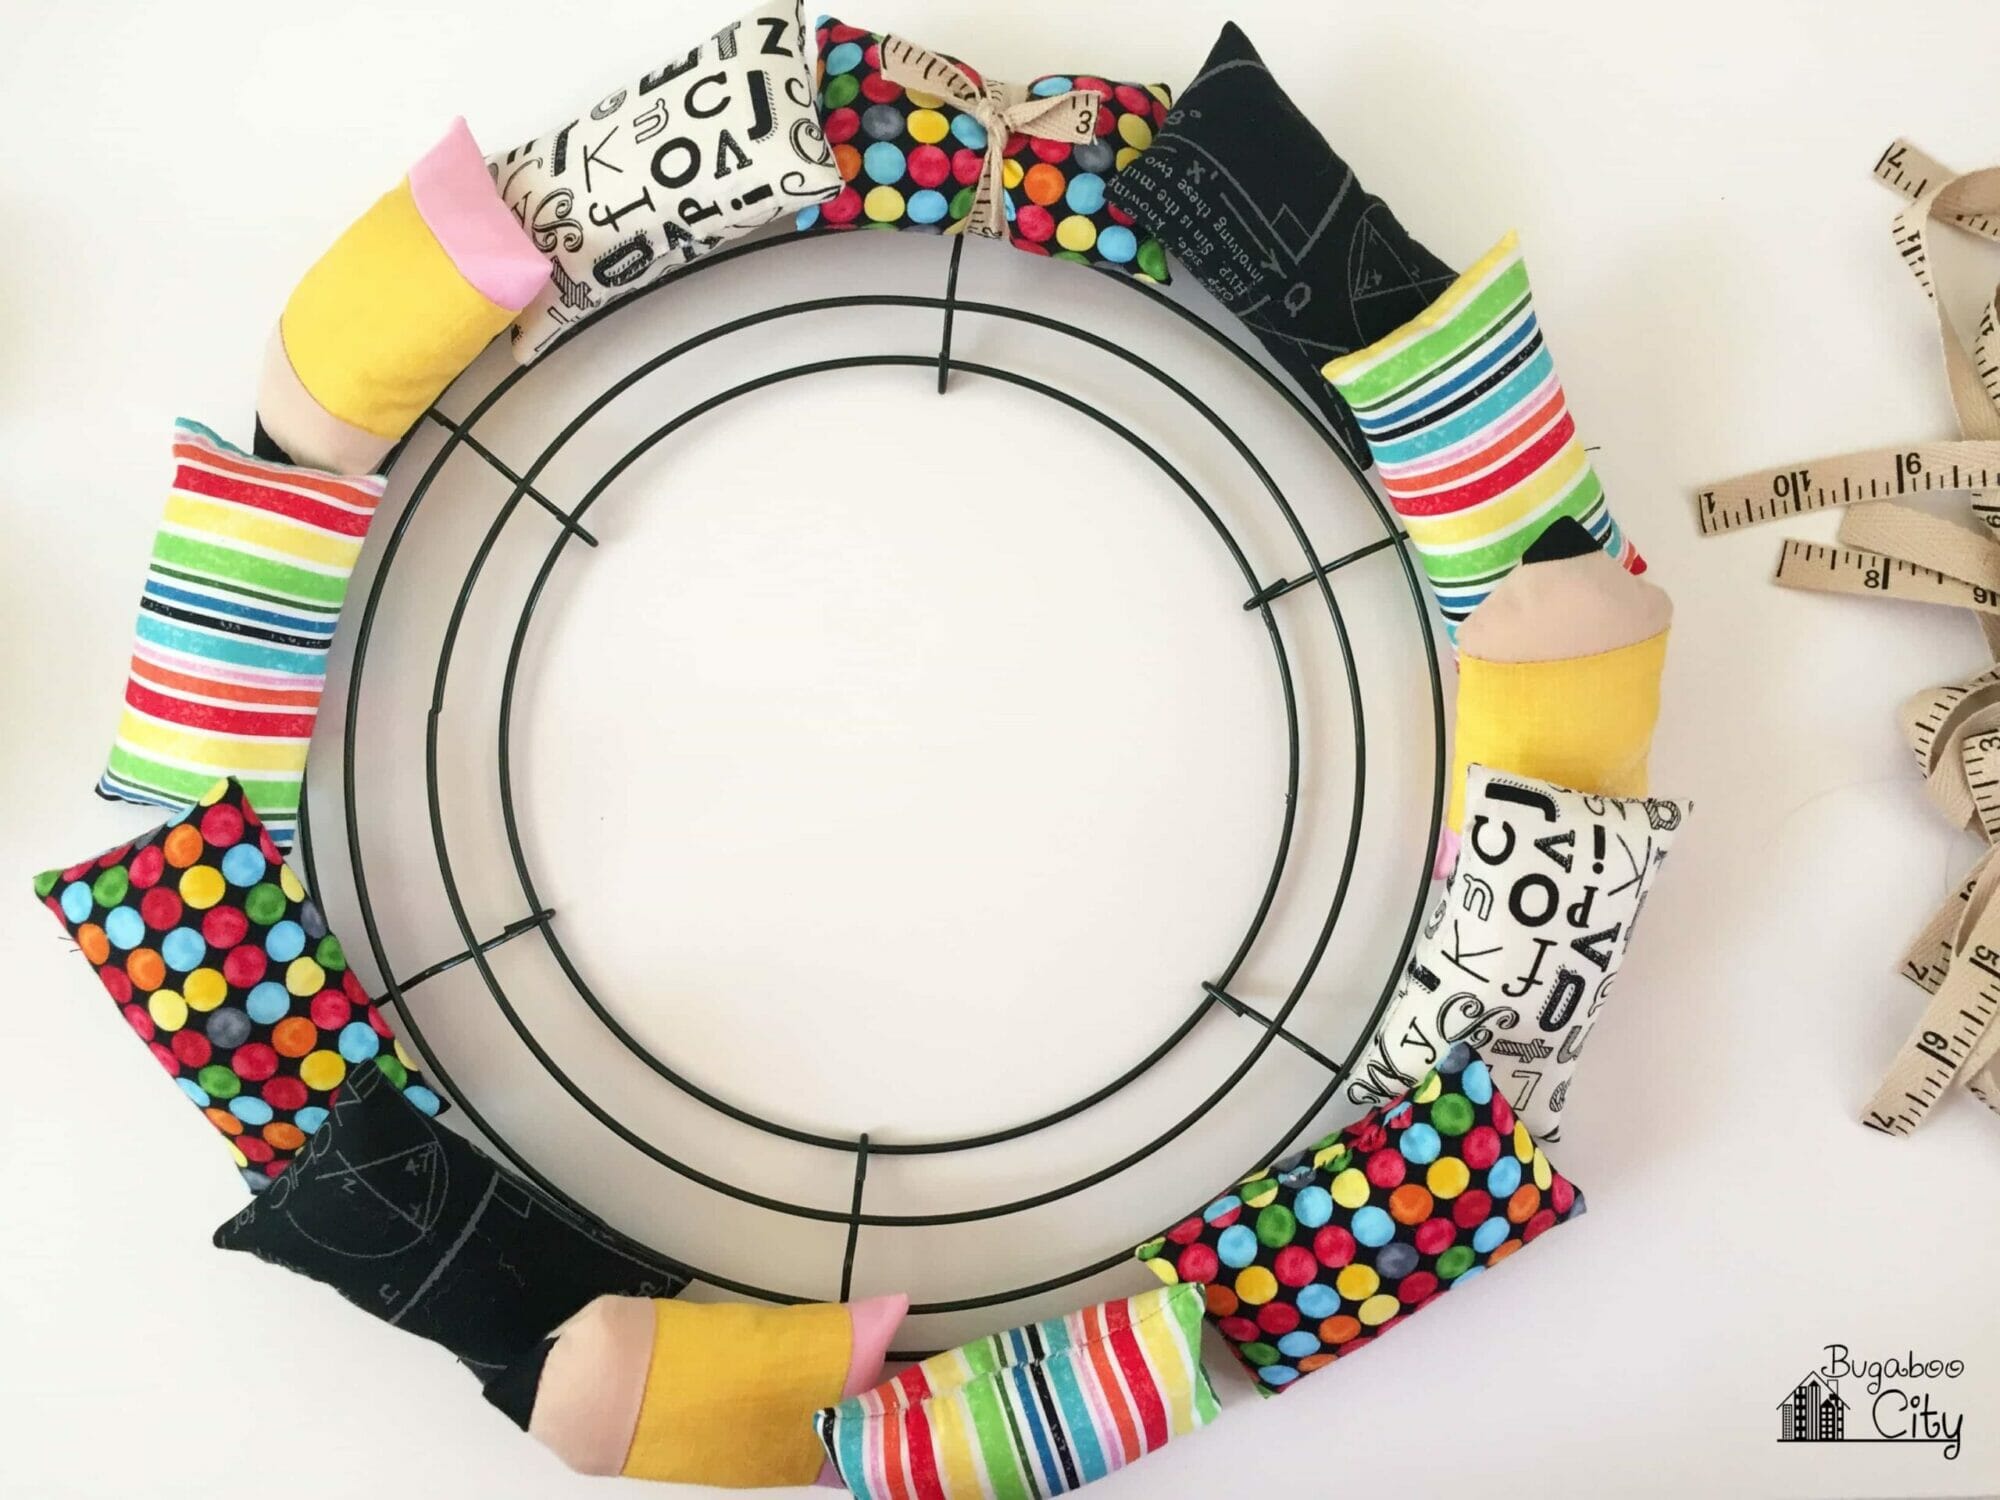
Step Five: Tie the pillows onto the wire wreath form using the ribbon.
Each piece of ribbon can be about 8″ long. You may want to cut one and test it out in case you prefer your ribbons to be longer. Once you decide on an ideal length, you can cut them all out.

Start on the outer ring and work your way in. For this wreath the outer ring has 13 pillows, the middle has 10 pillows, and the inner ring has 7 pillows. You can decide how full you want your wreath to look and always do more or less. This Christmas wreath was made with 35 pillows; 14 for the outer ring, 12 for the middle ring, and 9 for the inner ring.
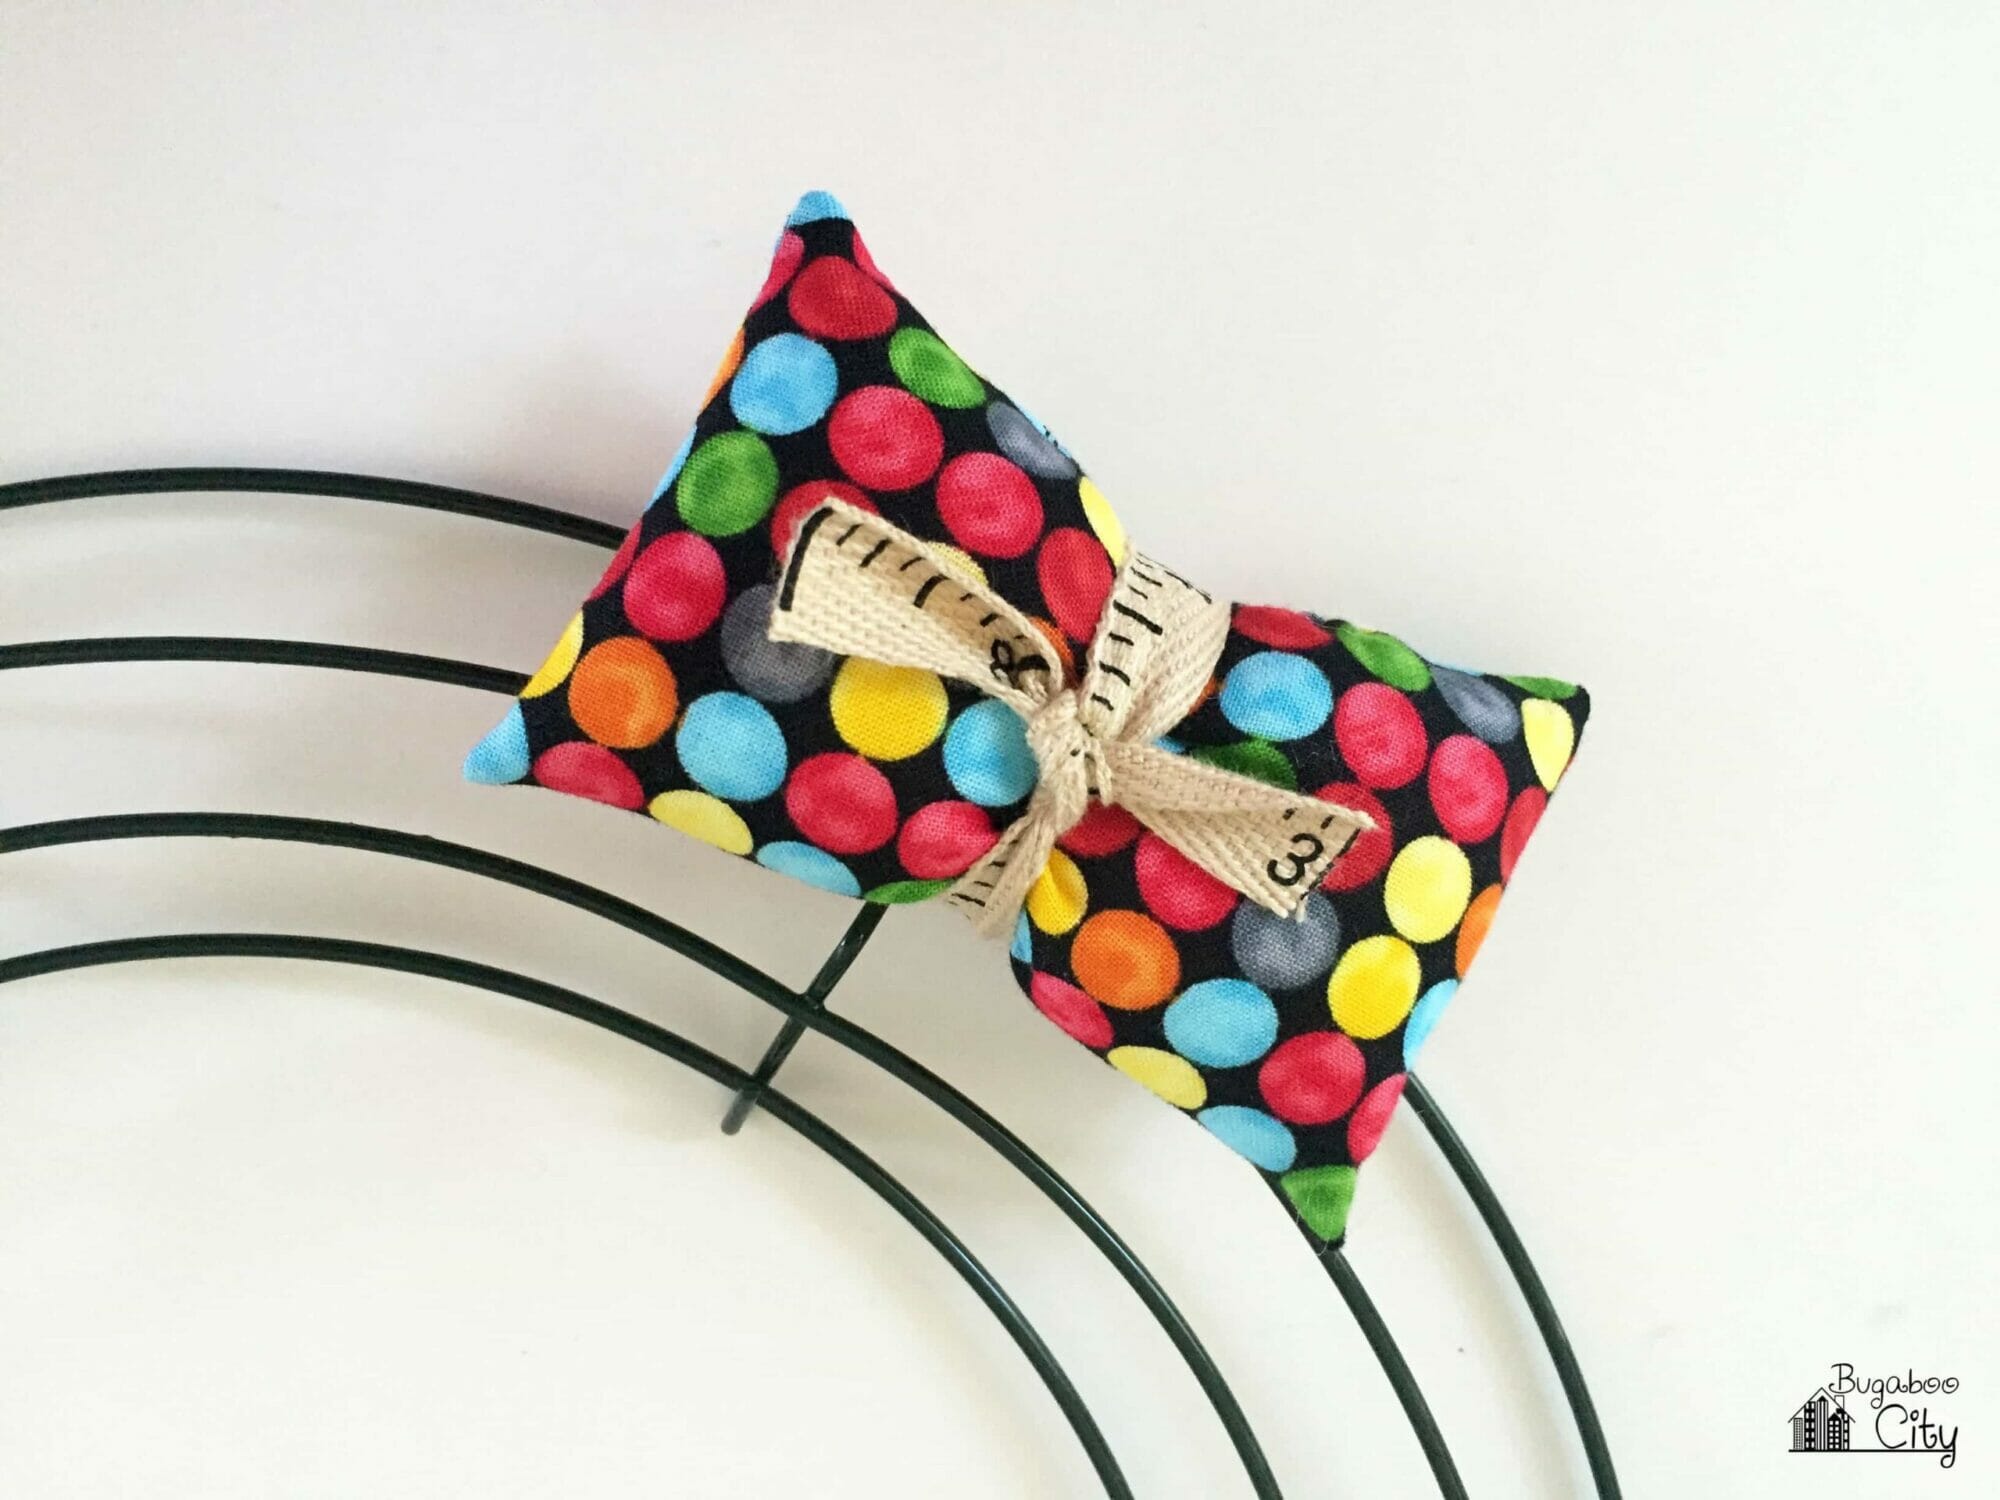
I usually tie the ribbons from the front of the wreath with the ends showing. Since I loved this ruler ribbon so much, I decided to tie them from the back so the ribbon would be more visible.
Step Six: Add a little ribbon loop to the back so the wreath can be hung up.
You can add a little chalkboard if you want to include a teacher’s name. I used twine and wrapped it around one of the metal rings! I wrote the teacher’s name with white paint. The wreath is all finished!
I love this little back-to-school wreath! I have mine hanging near our little “school” area and it definitely makes me smile! Have a great week!
Check out my Ultimate Guide to Making Pillow Wreaths


Get the Free Back to School Pillow Wreath Pattern!
Fill out the purple form below with your first name and email address! The free file will be sent straight to your inbox! If you have already filled out the form below, don’t worry – you won’t be added to my list twice! This freebie is for personal use only. I hope you enjoy crafting something special. Please let me know if you have any questions :)


OH my gosh this is so stinkin’ cute! I know a few teachers this would be perfect for. Thank you for sharing at Merry Monday!
Thank you! :)