
DIY Monster Trick-or-Treat Bag with Free Pattern!
Learn how to make a cute DIY Monster Trick-or-Treat Bag that is perfect for little ones! The zipper mouth pocket is a fun surprise and a great place for hiding favorite treats! I’m sharing the free pattern to help get you started.

Hello Crafty Friends! Today I’m excited to share this fun DIY monster trick-or-treat bag with you! I have been seeing zippers used as mouths everywhere lately – on shirts and dresses – and I’ve wanted to try it for so long. So I created this monster bag for my son to use while trick-or-treating this Halloween!
It turned out so cute and the pocket mouth is a lot of fun. I think as a kid I would have used this pocket to hide the best candy from my little sister! ;)
As someone who isn’t a big fan of scary and creepy things at Halloween, I can get on board with this goofy little monster. My kiddos think he is adorable! I have made a couple other cute trick-or-treat bags over the last couple years, like this Black Cat Treat Bag and a Pineapple jack-o’-lantern.

How to Make a Monster Treat Bag
Supplies Needed for DIY Monster Trick-or-Treat Bag:
- Free pattern – Grab the free file by filling out the purple form at the end of this post.
- 7″ zipper
- Wonder-Under Fusible Web or HeatnBond Iron On Adhesive
- Thread – I used black, orange, purple, green, and white
- Sewing notions
Fabric List
- Black fabric – 1/2 yard. Piece needed measures 11.5″ x 29″
- Pocket fabric – 11.5″ x 10.5″
- Fabric for handles – piece needed measures 8″ x 20″
- Scraps of fabric – purple, orange and Halloween stripe for bottom of tote bag
- Stiff green glitter felt for horns – I used Kunin Stiffened Felt from Joann Fabrics
- Felt scraps – white, orange, and black for eyes and teeth
Step by Step Tutorial
Step One: Cut out the pattern pieces
Cut the fabric bag: First, print the free printable pattern and assemble the larger piece following the guide included with the pattern.Use the pattern to cut out the large tote bag piece from black fabric.
Cutting the Appliqué Pieces: The smaller pattern pieces (the eyes, teeth and horns) can be cut from felt. All of these pieces will be appliquéd onto the tote bag using fusible interfacing.
A simple way to cut out these smaller appliqué pieces is to lay the piece of fusible web over the pattern, paper side up, and trace the pattern with a pencil. Then bubble cut around each piece, leaving at least an 1/8″ border around each one. *Tip: There are a lot of circles, to help keep things organized label them with an O for orange or W for white. The gray pieces on the pattern should be cut from white felt.

Peel the paper backing off of the fusible interfacing and iron each piece to the wrong side of the felt.

Next, cut out the shape along the actual pattern line.

For the horns, trace two horns onto fusible interfacing and follow the steps above to cut them from green glitter felt. Iron the two horns onto another piece of green glitter felt and cut them out. Now you have two very stiff horns made from two layers of felt.
Step Two: Sew the stripes on the front of the bag.
The bottom of the monster bag has three fabrics sewn to the bottom creating stripes. For these fabrics I didn’t use a pattern piece and I used three scraps of fabric. I finished off one side of each fabric scrap by ironing the edge of the fabric over 1/4″.

Next, I positioned the pieces diagonally and horizontally along the bottom edge of the tote with the finished. The top piece (the striped one on my bag) sits about 3.5″ to 4″ from the bottom edge of the tote bag. Top stitch the fabric to the bag along the top edge. Start with the bottom piece. When you add the top piece (my purple piece) the bottom edge should be finished off to meet the bottom edge of the tote bag. I just folded it under and top stitched it down. The sides of these fabrics do not need to be finished as they will end up in the seam allowance of the tote bag.

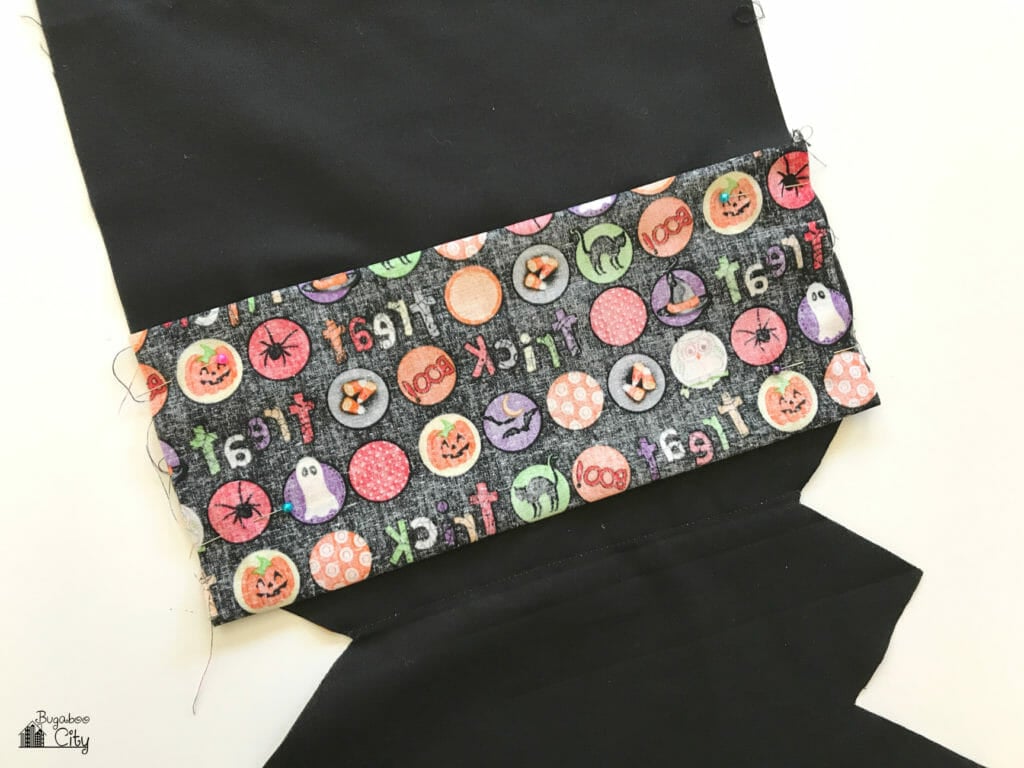
Step Three: Insert the zipper and pocket.
This is the biggest step of the project, but if you take it slow, it isn’t as hard as it looks! We are creating a zipper pocket to be the monster mouth. Cut a piece of fabric for the pocket that measures 11.5″ wide and 10.5″ in length. I used a fun piece of Halloween fabric for the pocket as a fun surprise when you unzip the mouth.
Use the diagrams below to position your zipper and pocket piece in the correct place. The zipper (green line) should be 2.25″ from either edge of the tote bag and 9.25″ from the top. The diagram below shows where the top of the tote bag will be folded over at 1.75″. I marked the zipper line (shown in green below) with a white pencil on the wrong side of the tote bag.

The pocket fabric should be positioned over the zipper line, with the bottom edge of the pocket fabric 1.25″ below the zipper line as shown below. It will lay on top of the tote bag, right sides together. Make sure if your pocket fabric has a print that you lay it upside down! Transfer the zipper line (green) to the pocket fabric.
Stitch a rectangle around the zipper line 1/8″ away. This is shown in pink below.

Cut along the zipper line, stopping 1/4″ from the ends. Clip to the corners in a V shape as shown below.

Now the fun part! Push the pocket fabric through the hole you just cut so it is now on the back side of the tote bag. Press so you now have a 1/4″ rectangle hole.

This is what the back should look like. 
Place your 7″ zipper under the hole and center it. The zipper should fit perfectly with the zipper pull and zipper stop visible through the hole. Pin in place.

Stitch a rectangle around the zipper 1/8″ away using a zipper foot. I chose to use bright green thread to match the zipper.


Yay, the zipper is in! Awesome job! To finish the pocket, turn to the back side of the tote bag and fold the pocket down so the edges meet at the bottom. Pin the two edges of the pocket together, making sure your pins are just going through the two layers of pocket fabric and not the black tote bag fabric.
Grab onto the pinned edges of pocket and push the tote bag fabric to the left. Now you will be able to sew along the pinned edge of the pocket without catching the tote bag fabric. I stitched with a 3/8″ seam allowance.


You can see my stitch line in green along the bottom edge of the pocket.

The pocket is now a little tube. Lay the tote bag out and roll the pocket tube down. Most of the pocket will now be below the zipper. Pin pocket in place along the sides.

Step Four: Sew the eyes and teeth on.
To attach the teeth, remove the paper side of the fusible interfacing and iron the teeth below the zipper. Hand sew the teeth on to the bag, making sure you do not sew the pocket closed!

Iron the eyes in place and stitch them down with your sewing machine. My eyes are positioned an inch above the zipper.

He’s so cute!

Step Five: Make and attach the tote straps.
Next up is making the tote bag straps. You can do this “easy mode” and use ribbon or you can make your own straps with fabric. I made my own straps using the same fabric as one of my stripes. To make the straps, cut four pieces that are 20″ x 2″.

Stitch two of the pieces together, right sides together, with 1/4″ seam allowance. Turn the tubes right side out. I like to use a safety pin to do this. I attach the safety pin to the top layer on one end and then push it through to the other end. 
Once the tubes are turned right side out, press them and topstitch about 1/8″ from the edge.

Before attaching the straps, press over the top of the bag 1.75″ as marked on the pattern piece. I folded the edge over 1/4″ first and then along the 1.75″ line so the edge was finished inside the bag. Position the straps 2″ from either side with the ends tucked under so no raw edges are visible.

I pinned some cute purple felt trim I had along the top of the tote bag. I then top-stitched the trim down, which also stitched my tote straps down. 
Step Six: Sew the bag together.
Final step!! All that is left is to sew the bag closed! Pin the horns in place as shown below. They should be positioned about 2″ down from the top of the tote bag along the side edge of the bag.

Start by sewing the bottom of the bag closed. You are just closing up the two “V” shapes. Start with one “V” and stitch both sides of the tote using a 3/8″ seam allowance.

For the second “V”, stitch again with a 3/8″ seam allowance. You won’t be able to sew all the way across like you did the first “V”. Instead, start at the previous stitch line and sew out to the edge of the fabric.

Once the bottom of the tote is closed up, sew the sides of the tote bag with 1/2″ seam allowance. When sewing the sides, you will be catching the pocket and horns and holding securing them in place.

Turn the bag right side out and it is finished!!!

This monster treat bag was a lot of fun to make! I tried to use a lot of fabrics I already had in my stash – some of them came from the Solar System pillow I made my son last year! You could easily personalize this monster treat bag with different fabrics.

Get the Free Monster Treat Bag Pattern!
Fill out the purple form below with your first name and email address! The free file will be sent straight to your inbox! If you have already filled out the form below, don’t worry – you won’t be added to my list twice! This freebie is for personal use only. I hope you enjoy crafting something special. Please let me know if you have any questions :)
![]()
![]()


Kim,
I finally figured it out (how to assemble the pattern pieces). I really enjoyed this sewing project – one of my favorites. I am nervous with zippers, but I just took your advice and went slow and reread your instructions a couple of times (my seam ripper came in handy) and I am really happy with the results. Thank you for offering such a cute treat bag to your readers. I really enjoyed making it and I hope my grandniece will too!
Yay! I’m so happy to hear making the bag went well – including the zipper part! I hope your grandniece loves the bag and has fun using it! Happy early Halloween! :)
I love your creativity and this monster treat bag is so cute. I am a beginner sewer and love that addition of the zipper (great to build up my confidence and skill). I do have a few questions. When I printed the pattern, I noticed there were 4 rectangle pieces. Am I supposed to tape two together before I cut the fabric? Piece 1 and 2, Piece 5 and 6. I couldn’t tell from the instructions how to cut out those specific pieces and thought you could provide a little more detail for this novice. Thanks in advance. Cindy
Hi! Thank you so much for the message! I recently updated the pattern and it looks like I accidentally left out the page that shows how to tape the pattern together! Thank you for letting me know! I updated the pattern in my Resource Library so if you re-download it you’ll see the extra pages showing how to put it together! Please let me know if you have any other questions! :) You can also always email me at kimberly@craftingcheerfully.com if you need specific help moving through the tutorial! Happy Crafting!