DIY Rubik’s Cube Ornament
Create a cute Rubik’s Cube ornament using a wooden cube, vinyl and a Cricut cutting machine! a fun gift for someone who loves the popular 3D puzzle cube!

Hello Crafty Friends! Today I’m excited to share this fun craft tutorial with you on how to make your own DIY Rubik’s Cube Ornament! I made this ornament last year for my son who loves doing Rubik’s cubes. Making my kids an ornament each year that fits their current interests has become a fun tradition I look forward to every holiday season.
I created this ornament using a wooden cube, vinyl in the six colors found on a Rubik’s Cube, and my Cricut Explore. Figuring out how to place the squares in the file was the trickiest part but making the ornament came together quickly.
Thankfully I gave my son the ornament last year before sharing a tutorial on my site. He took one look at my *first attempt* and let me know it was incorrect! I had originally designed the cube with the six colors mixed up in random order on each side of the cube.
As someone who doesn’t do Rubik’s cubes I was more concerned about having a pretty pattern of colors on each side not realizing I was putting colors next to each that never would be – or that I had two sides with an orange center which doesn’t exist! It was pretty funny and I fixed my mistakes on my *second attempt*. I’m happy to report this new file and design are accurate and based on a real cube!

Below is the tutorial plus instructions for how to apply the vinyl to your wooden cube without making any mistakes!
DIY Rubik’s Cube Ornament
Supplies Needed
- 1.25″ Wood cube
- Black acrylic paint (I used outdoor Patio Paint because it was what I had on hand)
- Vinyl in red, orange, yellow, green, blue and white
- Transfer tape
- Cricut Design Space File
- Craft Screw eyes/eyelets or black square bead
- Baker’s Twine
Step-by-Step Tutorial
Step One: Start by painting the cube black using acrylic paint. I used my outdoor Patio Paint which is what I had on hand, but any black acrylic paint will work!

Step Two: Cut out the vinyl squares using my Cricut Design Space file. The files is designed with triangle registration marks in each corner to help you line all of the colors up on one sheet of Transfer Tape before applying the design to the wooden cube.
I’ve also marked what side each design should go on since it’s important that they are placed on the correct sides of the cube.

After cutting out the vinyl, weed each color with a weeding tool.

Step Three: Layer the vinyl cubes together to create the design. Start by transferring one color to a piece of Transfer Tape. I started by transferring the red layer. Once it was on my Transfer Tape and I had peeled away the backing, I placed it on top of the blue vinyl lining up the triangles in the corners.

Repeat this process until all of your colored vinyl layers are combined on one piece of Transfer Tape.

Step Four: Adhere the vinyl squares to the wooden block following my guide. Use the guide below to apply the square in the correct order. When finished the blue center will on the opposite side as the green center, the orange center will on the opposite side of the red center and the white center will be on the opposite side of the yellow center.
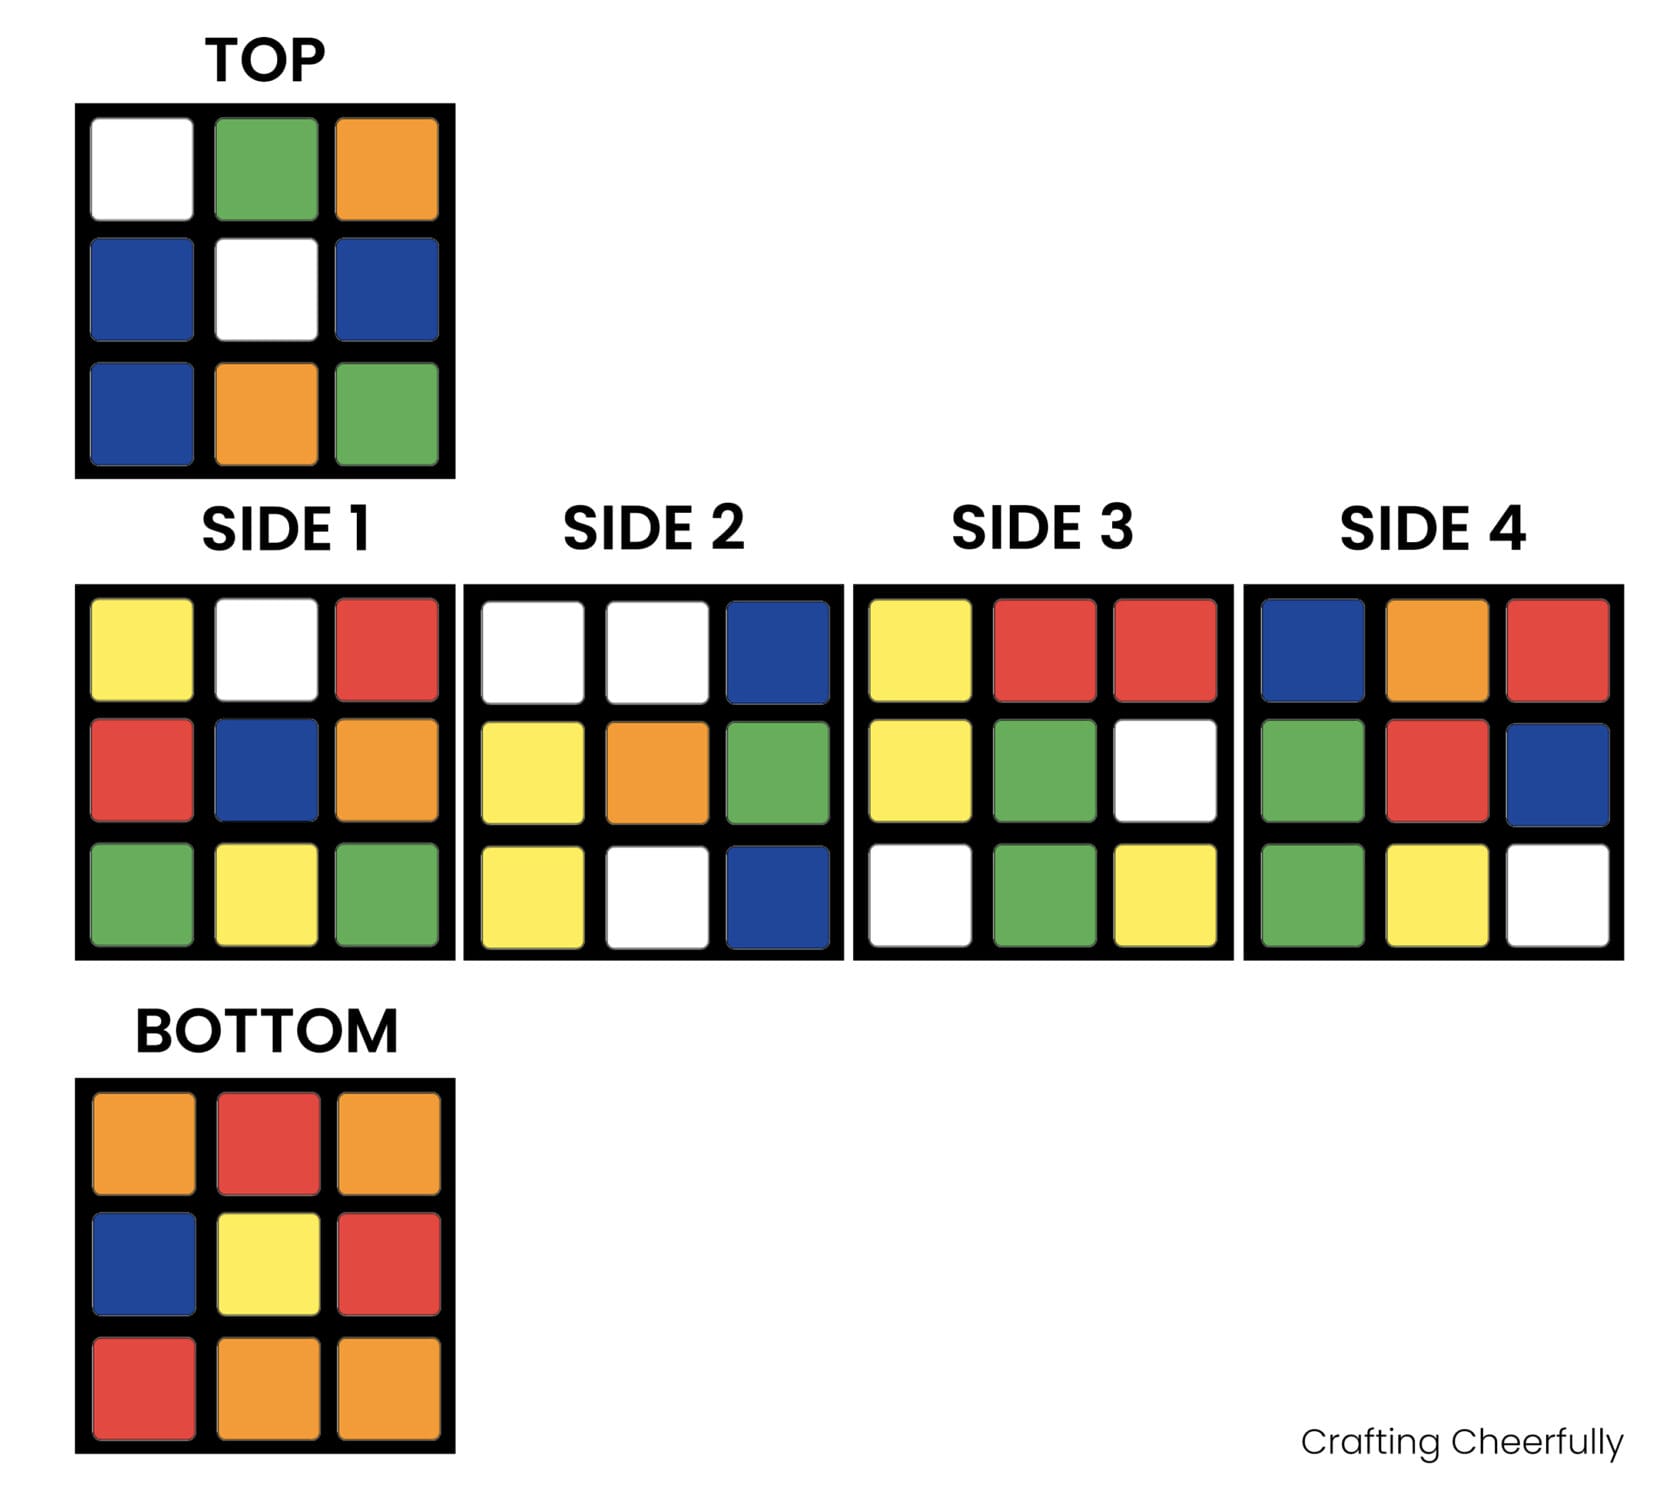
Start by applying Side 1 to the wooden cube. Use a scraper to apply the vinyl to the side then carefully remove the Transfer Tape leaving the vinyl on the cube. Move to Side 2 and repeat until all four sides of the cube are done.

Place the cube so Side 1 is facing you then attach the Top design to the top of the cube. The bottom row of the top design (blue-orange-green) will be directly above the top of Side 1 (yellow-white-red).
Place the bottom of the cube design in a similar way making sure the top of the bottom design (orange-red-orange) is directly below the bottom of side 1 (green-yellow-green).

Step Five: Add a the ornament hanging loop. This can be done two different ways. For the first way, use your weeding tool to poke a hole directly in the center of the white square. I slowly pushed it into the wood cube and it made a small hole. Screw in a tiny jewelry eyelet then use Baker’s twine to create a hanging loop.

Another way you can add a hanging loop is by glueing a small square bead to the top of the ornament and thread the twine through the bead’s hole.

Step Six: Add a year to the top of the cube using white vinyl. I included the year in my Design Space file. Edit it to whatever year it is and cut it from white vinyl and add it to the cube.

The cube ornament is finished and ready to be hung in your tree or gifted to someone special!
If you love creating handmade ornaments don’t forget to check out my DIY Ornaments Tutorial page for fun ornaments that use paper, fabric, vinyl and more!