
DIY Holiday Pillow with Cricut Patterned Iron-On
Learn how to create a faux quilted holiday pillow using patterned HTV and hand embroidery! Download my free polar bear pillow pattern to get started.
Thank you to Fairfield World for providing me with the 20″ pillow form for this pillow project!
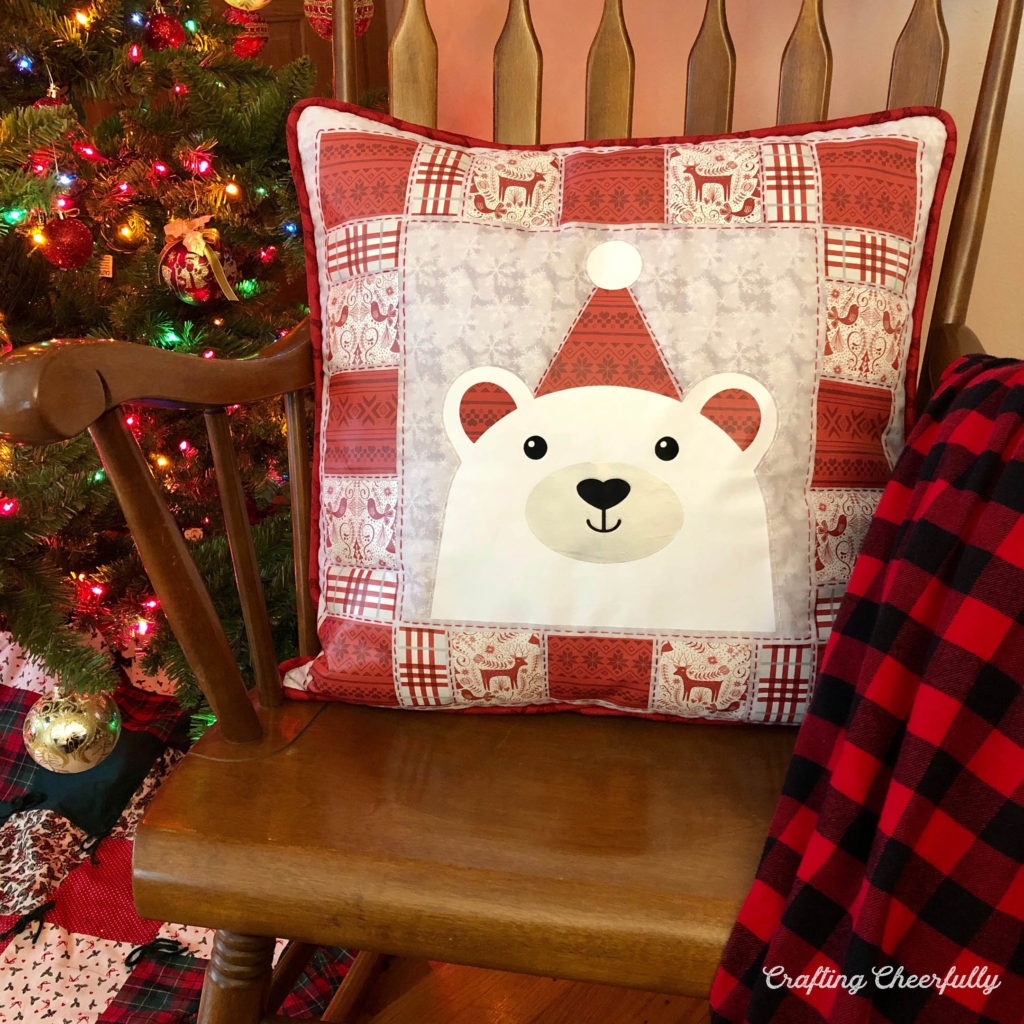
Hello Crafty Friends! Pillows are a great way to transform your home for the holidays. Today I’m sharing a tutorial for this fun polar bear pillow, a faux quilted pillow perfect for Christmas. The pillow case is made out of fabric and then decorated with patterned HTV (heat transfer vinyl or Iron-On) to give it the look of a quilted pillow. I added hand embroidery around the HTV.
The pattern for this pillow case is designed to fit a 20″ pillow and uses an easy envelope closure in the back so the pillow case can easily slip on and off the pillow form. The 20″ pillow is the perfect size for a couch throw pillow and was large enough to not only fit my design but also to make an impact in our room. It really is crazy how switching up your pillows can instantly make your home feel ready for the holidays!
I used my Cricut Explore to cut the polar bear and his hat but cut the border pieces by hand using a paper trimmer. It was fun to mix the Patterned Iron-On with hand stitching – it really makes the Iron-On look like quilted fabric! Below is the step-by-step tutorial, plus you can grab the free template and SVG cut file! Yay!


I’m sharing this pillow as part of the Fairfield World Pillow Party1 Be sure to check out all of the awesome holiday pillows and thank you to the lovely hosts of this Pillow Party, Laura Kelly Designs and The HedgeHog Hollow, and to Fairfield World for the great pillows :)

DIY Polar Bear Pillow
Supplies Needed:
- Free PDF and SVG files – Grab the free files by filling out the purple form at the end of this post.
- 20″ Fairfield World pillow
- Patterned HTV – I used Cricut Iron-On Sampler, Nordic Christmas – the Iron-On Lumberjack would also work.
- Cricut Iron-On – white, silver and black
- White embroidery floss
- Red embroidery Floss – DMC 321
- Fabric for pillow – the fabric I used is from Joann Fabrics.
- Front – 1 piece measuring 21″ x 21″
- Envelope Back – 2 pieces measuring 15″ x 21″ each
- Pellon White Fusible fleece – 1 piece measuring 21″ x 21″
- Pressing cloth like a thin piece of cotton
- Optional cording – fabric and cord for making your own or purchase ready-made cording. You will need approximately 80″
*My finished pillowcase measures 20″ x 20″ and is fit on a 20″ pillow form. If you like a tighter fitting pillow case you may want to reduce the measurements.

Assembly Instructions
Step One: Cut out all of the pieces using the pattern.
Cut out all of your pieces of fabric according to the dimensions listed in the supplies needed. I like to back my front piece of fabric with fleece interfacing. This makes an extra soft pillow and gives the front piece of fabric a little more weight, which helps when hand embroidering.
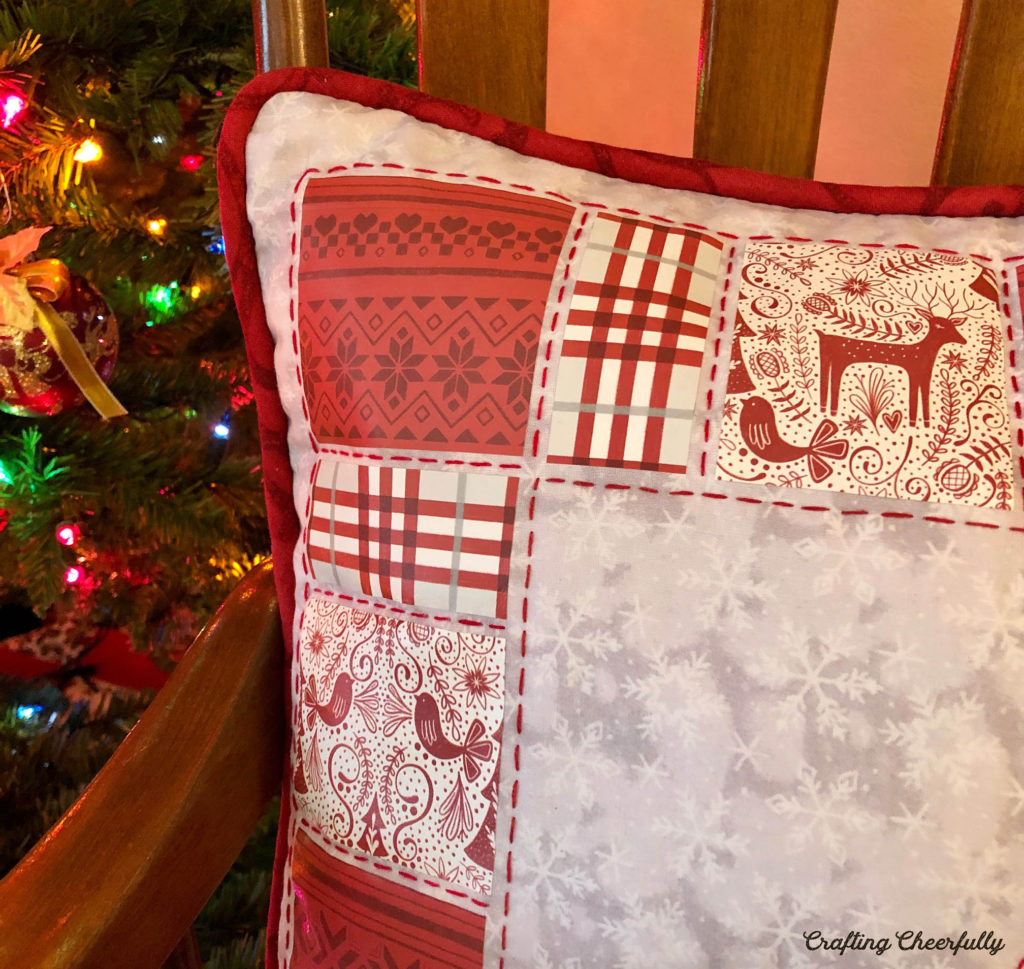
Next, you’ll need to cut all of the Patterned Iron-On pieces. Below are the dimensions for all of the border pieces. It worked out well to use my paper trimmer to cut all of these border pieces. I cut the red and white nordic print so the deer were featured in the top and bottom borders and the two birdies were featured on the side borders. I cut all of the solid red printed pieces so that the horizontal lines would match up across the pillow. All of the plaid pieces were cut the same.
Cutting Guide:
- Red: Cut 8 pieces 3″ x 3″
- Plaid: Cut 8 pieces 3″ tall by 2.5″ wide
- Reindeer Print: Cut 8 pieces 3″ tall x 1.25″ wide
Here is a little guide showing the top border. All of the pieces measure 3″ tall and are spaced 1/4″ apart.

Step Two: Adhere the Iron-On.
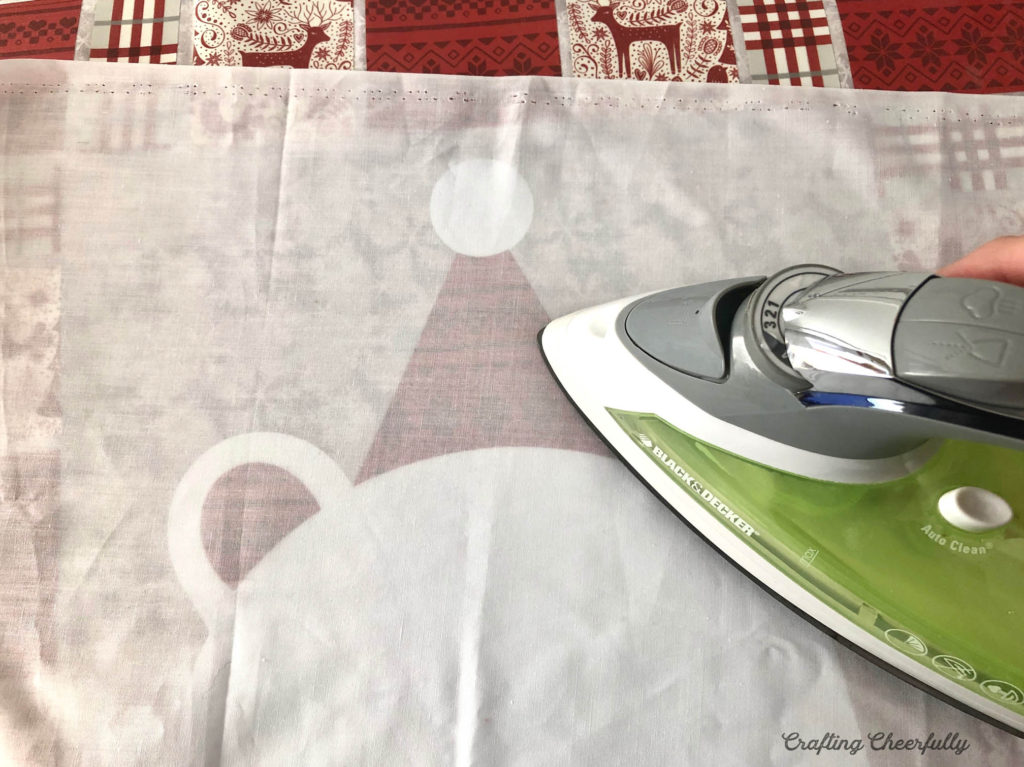
Once all of the Patterned Iron-On pieces are cut, it is time to adhere them to the fabric. I placed the border 1.5″ from the edge of my fabric. Using a light pencil line at the 1.5″ mark helped to keep all of the pieces straight. Leave 1/4″ between each piece so there is room to add the hand embroidery. I started with the top border and adhered those pieces first. You will need to use a light pressing cloth when ironing the pieces into place to avoid melting the edges of the Iron-On.

Cut the polar bear pieces using your cutting machine or carefully by hand.

Adhere them to the center of the pillow, starting with the large white piece and then layering the Iron-On.
Step Three: Hand Embroidery
Time to add the hand embroidery. You could definitely stop after the Iron-On is adhered, but I think the hand embroidery adds so much to the pillow! I used a simple running stitch in a coordinating red floss.

I added the running stitch around the inside of the border, in between each piece of Iron-On and around the outside of the border. Don’t forget to add it around the hat before switching to white floss and stitching around the bear and his hat pom-pom.

Below you can see my pillow top after all of the hand embroidery!

Step Four: Piping
I decided to add piping to my pillow, but this step is completely optional! I made my piping using a thick cording and strips of bias cut red fabric. You could also purchase pre-made cording or skip it altogether! :)

If you decide to add piping to your pillow, add it to the pillow top along the 1/2″ seam line. Stitch the piping down with a zipper foot along the seam line so your stitching line is just right of the cording. If you don’t want to add piping, skip to Step 6 :)

Step Six: Create the pillow back and finish the pillowcase.
To finish the pillow case, you’ll need to add a pillow back! I chose to do an envelope closure because it is quick and easy. Finish one edge of each pillow back piece – the edges that will be overlapping. I folded my edges under twice 1/2″ and then stitched them.

Pin the back pieces to the pillow top so the two back pieces overlap. Below you can see my first pillow back piece pinned on. Stitch along the 1/2″ seam line. If you added piping, flip your pillow over and stitch along the line you made from sewing the piping on.

Below you can see the pillowcase finished!

The back envelope closure makes slipping the pillow form in super easy!

Yay!! The polar bear pillow is finished!! I love how it turned out and really liked trying out the Cricut Patterned Iron-On. You could also switch up the colors and use blue and silvers and create a cute winter pillow!
I hope you enjoyed this pillow tutorial, and don’t forget to check out all of the other pillow designs from the Fairfield World Pillow Party!

Here are links to the other awesome pillows!
- Gnome Pillow by Laura at Laura Kelly Designs
- Hedgehog Pillow by Alexandra at The Hedgehog Hollow
- Pom Pom Snowflake Pillow byt Emily at The Benson Street
- 3 Snowmen and a Bunny Pillow by Cindy DeRosier
- Reindeer Prance Pillow by Lindsey at Artsy Fartsy Mama
- 3 Trees Pillow by Beth from Creatively Beth
- Tree in a Truck Pillow by Katie from The Crafty Blogstalker
- Snowflake on Buffalo Plaid by Cheryl and Maybe That’s What Che Said
- Snowman Pillow by Janet at Try It Like It
- Oh Joy Pillow with Pom Poms by Ginger at GingerSnaps Crafts
- Merry Christmas by Ann Makes
- 25th of December Pillow by Lindsay at See Lindsay
- Joyful Pillow with Pom Poms by Natalie at DoodleCraft Blog
- Plaid Christmas Tree Pillow by Erica at Five Little Monsters
- Harry Potter Christmas Pillows by Julie at The Quiet Grove
- Felt Tree in Truck Pillow by Debra at Quartermain Designs
- Joyeux Noel Pillow by Monica at Sookee Designs
- Oh Come Let Us Adore Him Pillow by Amy at Amy Latta Designs
- Joy on Snowflakes Pillow by Diana at Miss USG Moments
- Polar Bear Pillow by Kimberly at Crafting Cheerfully
- Let It Snow Pillow by Katie at A Sweet Berry Designs
- All Hearts Come Home For Christmas Pillow by Suzie Bentz Designs
- Ornaments Pillow by Morena’s Corner
- Meet Me Under the Mistletoe AND Fresh Farm Christmas Trees by Laura at Laura’s Crafty Life

Get the Free Holiday Polar Bear Pillow Pattern!
Fill out the purple form below with your first name and email address! The free file will be sent straight to your inbox! If you have already filled out the form below, don’t worry – you won’t be added to my list twice! This freebie is for personal use only. I hope you enjoy crafting something special. Please let me know if you have any questions :)
![]()


My daughter took my Santa pillow because of the feel of the fabric but she LOVES polar bears – yours would be a goner too!
That’s so funny! You’d have to make two! :)
Thank you so much for this pattern. I love polar bears. hugs Cathy K
You’re so welcome! I love polar bears too :)
This is a darling polar bear pillow. He is so cheerful and festive. Thank you for participating in the Pillow Party 2019!
Thank you! The Pillow Party was so much fun and there were so many great pillow ideas! :)