DIY Halloween Accordion Photo Album
Learn how to create a cute Halloween accordion album for the season! It is perfect for displaying holiday pictures and it also makes a great gift. Grab my free SVG cut file and PDF pattern to get started.

Hello Crafty Friends! Celebrate the Halloween season with a cute, handmade accordion album. It is the perfect spot for displaying holiday photos and cute scrapbook paper.
I love accordion albums because they can lay flat for gifting and then be expanded and displayed just about anywhere! At home on a table or mantle or even at the office on your desk. This album can also be made as large or small as you’d like by just adjusting the number of folded pages inside.

This Halloween photo album is an easy project that only requires a few supplies like decorative paper, chipboard, adhesive and, of course, your photos! You can download my free SVG cut file or PDF pattern to make this even easier!
You could easily make these work all year round with your choice of papers. I’ve made also a Mother’s Day accordion album that has a flower cut-out in the front and a Holiday Album with just a square cut out. If making these by hand, I suggest using my Holiday Album as it will be easier to cut the square opening with a craft knife than the pumpkin.
DIY Halloween Accordion Photo Album
Supplies Needed
- Free SVG cut file and PDF paper pattern – Grab the free files by filling out the purple form at the end of this post.
- Solid cardstock – orange, purple and black – I used Bazzill
- Decorative scrapbook paper – I used paper from Halloween paper from Doodlebug Designs
- Tagboard or chipboard
- Adhesive – I used 1/4″ Scor Tape, 1/2″ Scor Tape and Bearly Art Craft Glue
- Cutting machine
- Standard cutting mat
- Cutting tools
- Brayer
- If cutting without a cutting machine
Preparing the File in Cricut Design Space
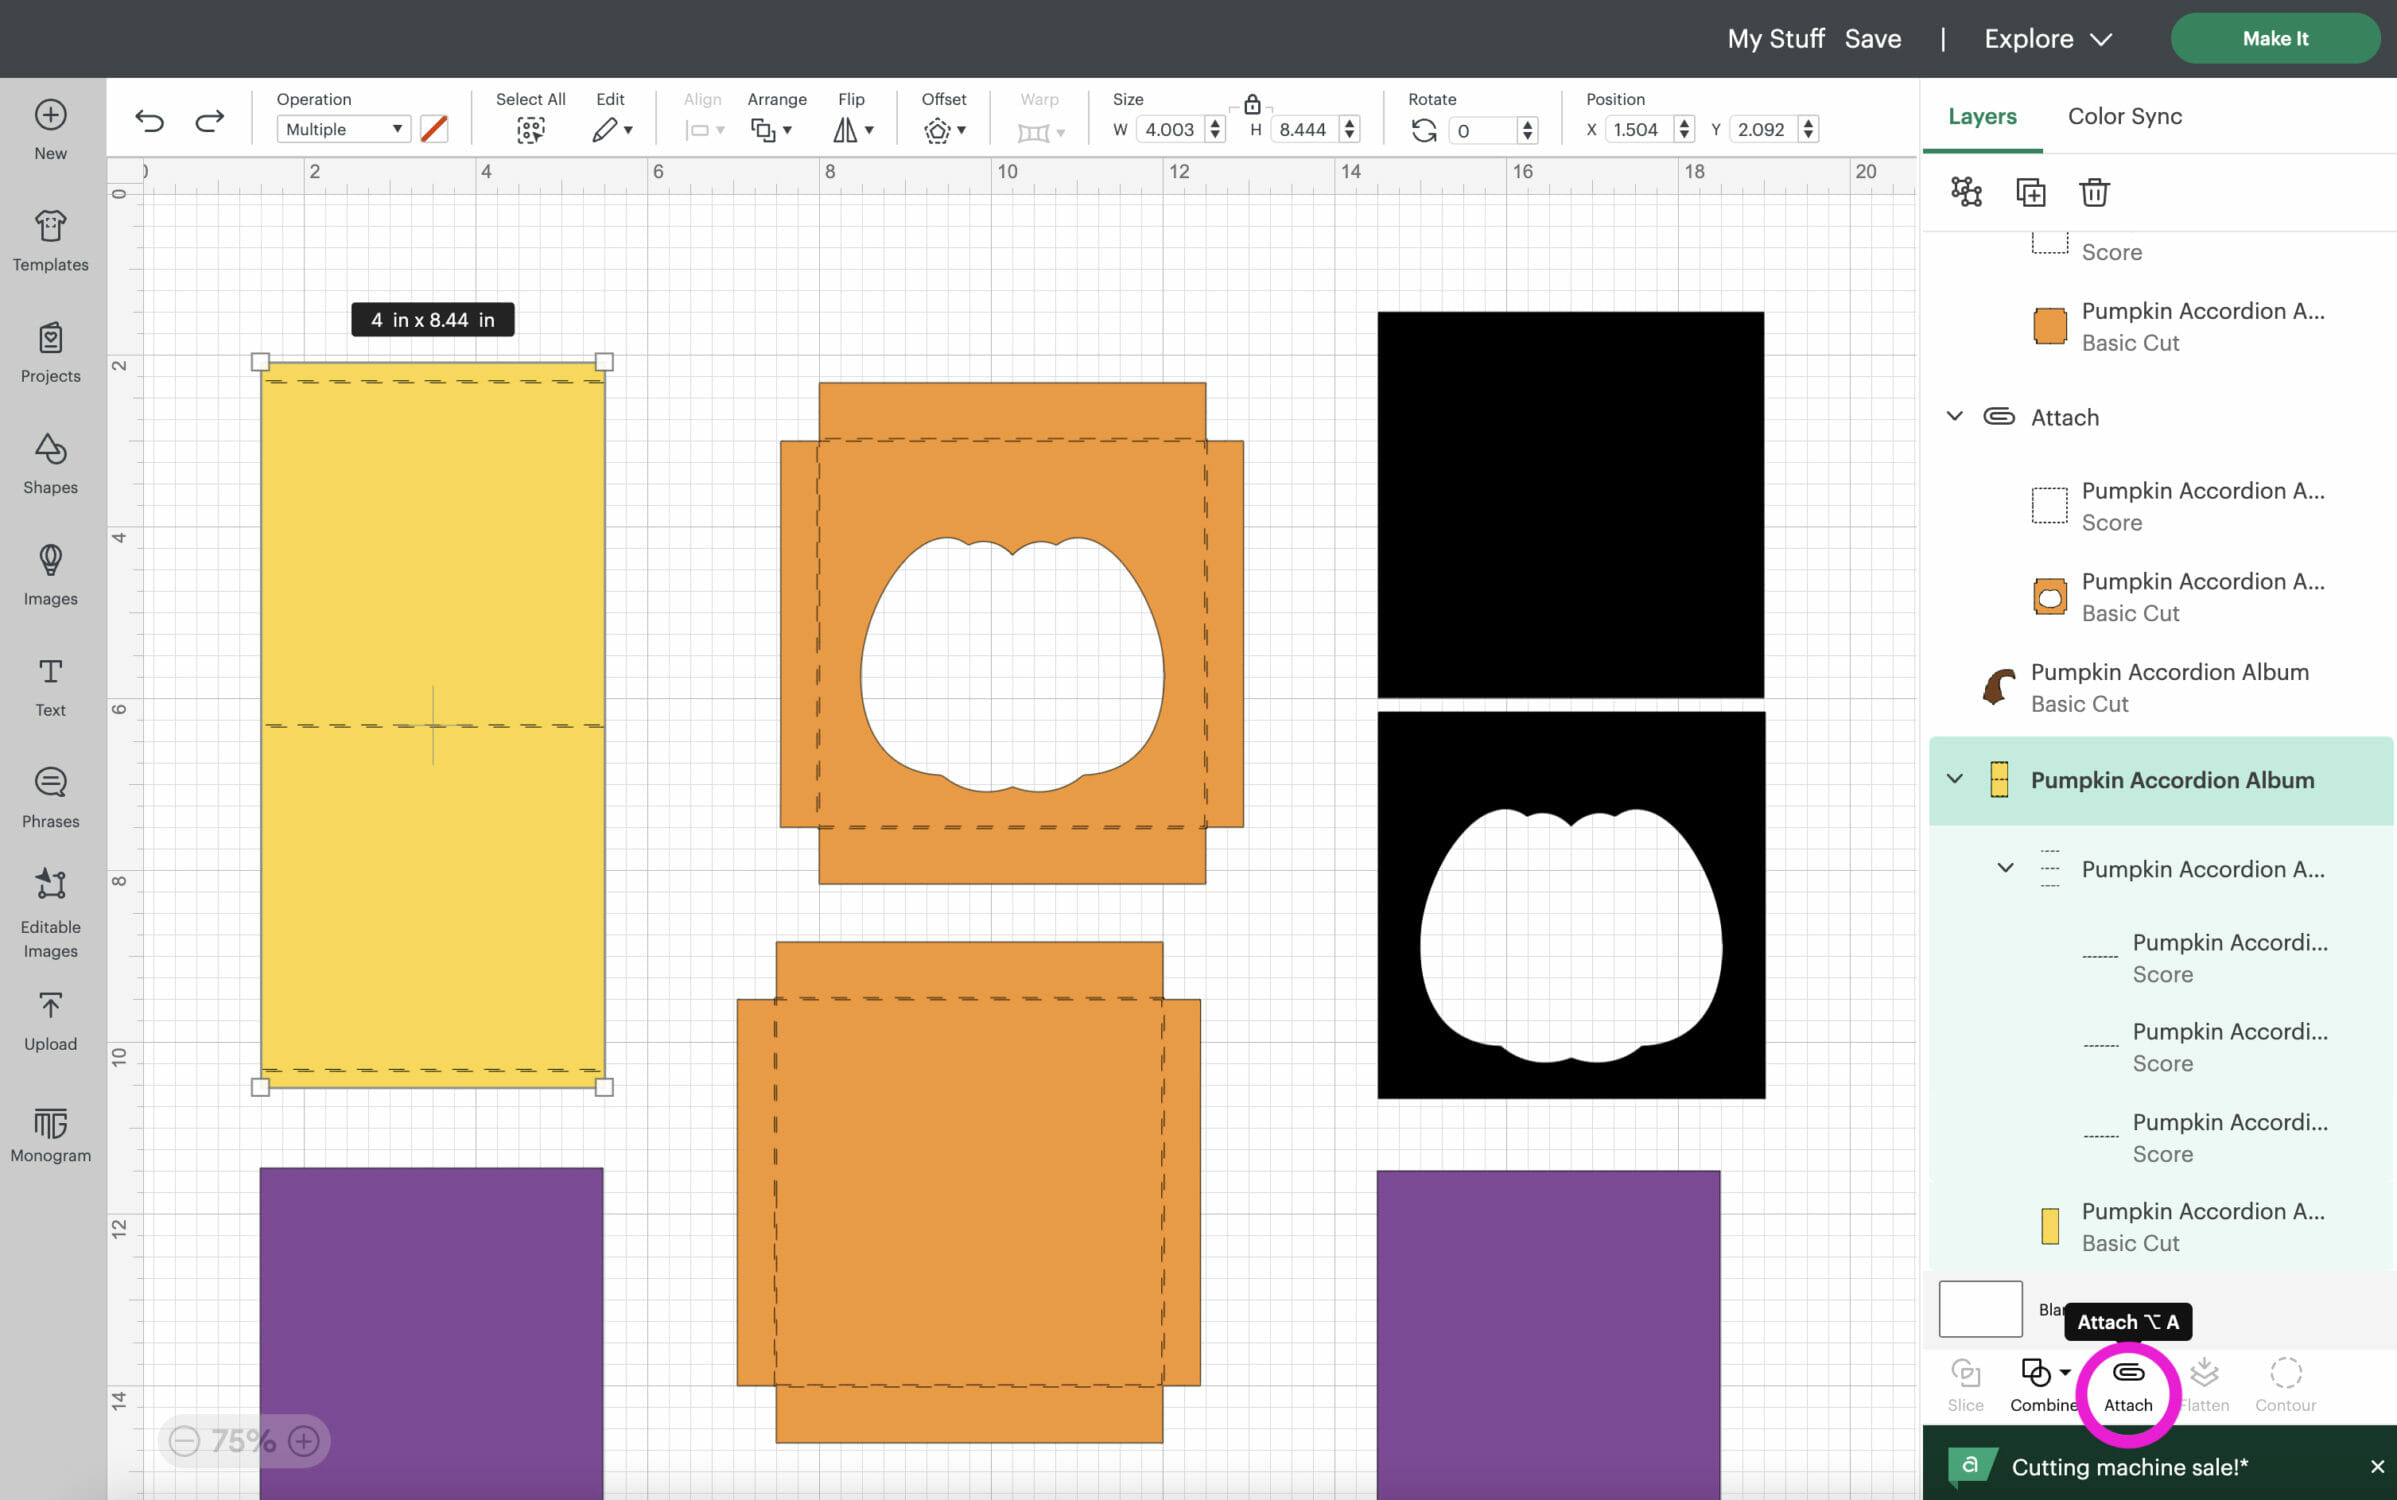
In Cricut Design Space, upload the file and insert it into a new project. The SVG includes score lines in bright pink. If you are using a cutting machine that does not scor, delete these layers and score by hand using the PDF as a guide.
If you are using the scoring layers, you will need to attach them to the correct pieces. Start by highlighting the three layers of score lines and changing their operation from cut to score. The solid pink lines will turned into dash lines.

Next, select the entire project and Ungroup it.

Continue to ungroup the two groups with orange pieces until the layers are all separate.

Next, attach each score line to the piece it is positioned on top of. You can do this by selecting the score line and the piece and using the “attach” tool located in the bottom right. Repeat for both of the cover pieces. This will move the attached pieces to the top of your layers panel. If it hides the pumpkin stem you can bring it forward or to the top of your layers panel.

Repeat this process for the yellow insert. It has three scores lines that should be attached.

Duplicate the insert piece and change the color of the pieces to match the cardstock you plan to use. I made sure to make my chipboard pieces brown since this helps remind me to switch my settings before cutting those two pieces.

You are ready to cut the file! Double-check your mats to make sure the score lines are attached. The dashed lines will appear on top of the pieces and “score” will be listed on the left. Don’t forget to insert your scoring tool. I changed my settings when cutting the chipboard pieces and used a deep cut blade.

Cutting the Pieces
Cut out all of the pieces using a cutting machine. The album covers (the black pieces in the cut file) should be cut from chipboard or tag board, the rest of the pieces can be cut from scrapbook paper. I used solid-colored Bazzill paper for the covers and inserts and patterned paper from DoodleBug Designs for the two liners.

Gently fold along the score lines. If your cutting machine does not have a scoring tool, or you cut these pieces by hand you can use a scoring board and stylus to score the fold lines by hand. Use the PDF as a reference for where to score the pieces by hand.

Wrap the Album Covers
Wrap the chipboard pieces with the solid cardstock. I placed strips of Scor-tape (double-sided tape) along the tabs on each cover. I then used glue to adhere the paper to the chipboard and wrapped the tabs around the cover. You can let these sit under a couple of heavy books as you do the next step. Add the pumpkin stem to the top of the front cover with glue.


Create the Inside of the Album
Next, create the center of the album by accordion-folding the insert pieces and adhering them together. For my album I used three insert pieces, but you can use as many as you’d like. Each insert pieces comes with two tabs, one on either end. You will need to trim off some of the tabs so the pieces go together. I had to trim the tabs off my middle insert piece (the black one).

Assemble the Accordion Album
Adhere the lining pieces to each end of the accordion insert.

Attach the insert pieces to the inside of the covers. Be sure to leave the top of the lining open on the front cover so a photo can be slid into the album. Below you can see my sheet of blue paper is able to slide under the front lining.

Decorate the Album
Finally, use scrapbook paper, stickers, photos and more to decorate the album. Don’t forget to decorate both sides of the insert pages.

I decorated some of the pages using the cute stickers and ephemera that came with the scrapbook paper. Other pages have blank spots to add cute little photos of my kids trick-or-treating on Halloween!


The Halloween photo album is finished and it turned out so cute! I had a lot of fun playing around with the pretty scrapbook paper and stickers and decorating this album.

I hope you enjoyed creating this cute pumpkin photo album! It is such a fun project that looks adorable displayed for Halloween. It also makes a great gift :) If you are looking for more crafty ideas for the Halloween season, check out my Halloween Crafts Page.

Get the Free Pumpkin Accordion Album Files!
Fill out the purple form below with your first name and email address! The free file will be sent straight to your inbox! If you have already filled out the form below, don’t worry – you won’t be added to my list twice! This freebie is for personal use only. I hope you enjoy crafting something special. Please let me know if you have any questions :)


