
DIY Heart-Shaped Box for Valentine’s Day
Create a sweet heart-shaped Valentine Treat Box for Valentine’s Day! This fun paper craft can be filled with sweet treats for someone special! Grab the free pattern and cut file to get started!

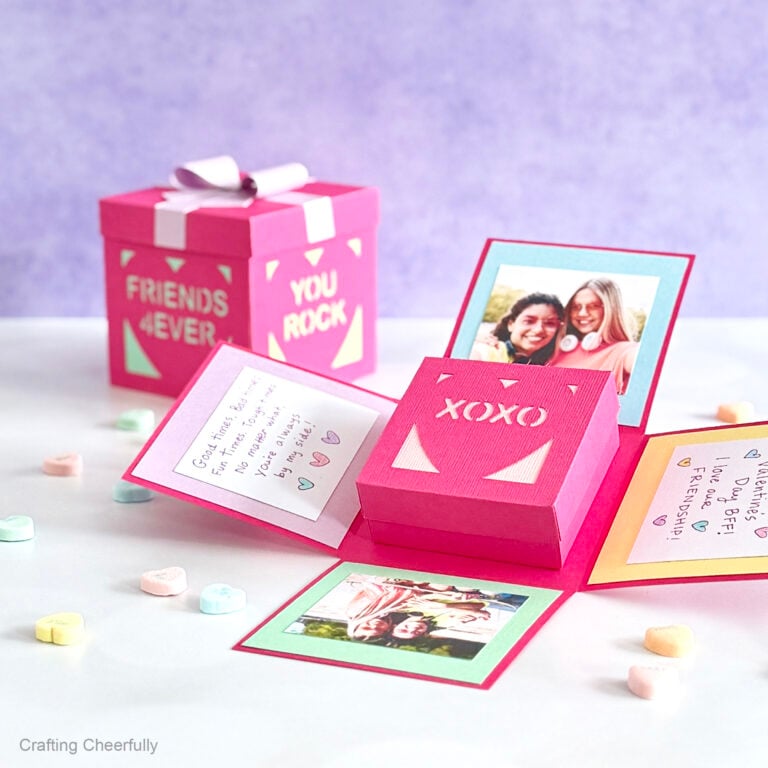
Hello crafty friends! It’s time to start sharing Valentine’s Day craft projects! First up are these sweet heart-shaped Valentine treat boxes. They were so fun to make! Choose any color or pattern of cardstock to create the box, then decorate the front however you’d like. You can add a name to the front to personalize the boxes.


I chose to make my valentine treat boxes with solid pink, purple and teal paper from DCWV. I decorated the front of each box with two stacked paper hearts. The first layer is made from silver glitter paper. My favorite glitter paper is also from DCWV because it doesn’t shed ANY glitter! The heart on top was cut from a sheet of paper from the DCWV paperstack, Rainbow Splash.

DIY Valentine Treat Box
Supplies Needed:
- Free printable PDF template and SVG Cut File – Grab the free files by filling out the purple form at the end of this post.
- Cardstock – I used DCWV cardstock, DCWV Glitzy Stack, and DCWV Rainbow Splash.
- Adhesive – I used 1/4″ Scor-Tape
 Scoring Board
- Cutting Machine
- Cutting mat, Cricut brayer, and Cricut Tools
- Tiny adhesive rhinestones
Step by Step Tutorial
Step One: Cut out the pieces.
Download the free printable pattern or cut file and cut out the pieces for the box. If you are using a cutting machine, import the SVG cut file into your software. Ungroup the image then change the black lines from cut to score and attach them to the pink pieces. If your cutting machine does not score, go ahead and delete those layers.
There is one heart shape that can cut from a decorative paper and placed on the front of the heart box. Duplicate this layer to have one for the front and back. You can also duplicate the layer and make the shape smaller if you’d like to layer hearts as I did on my boxes.

Step Two: Decorate the front of the box.
Decorate the front of the boxes any way you want! Add stickers, write names on them or add hearts cut from decorative paper as I did.

Step Three: Score the sides of the box.
The sides of the boxes have flaps on either sides that will need to be folded. You can use a scoring board and stylus to score along the tabs.

Step Four: Add adhesive to the tabs.
Add adhesive to the tabs using glue or double-sided tape. Be sure to add the adhesive to right side of your paper if it is double-sided. I used 1/4″ Scor-Tape, which I like to use for treat boxes because it has a very strong hold. I placed a strip of tape along the tabs and then cut out the little triangles.

Step Five: Fold along the score lines.
Fold along the score lines and also fold the two squares at the end of the tabs. They will overlap to create the bottom of the heart box.

Step Six: Assemble the bottom of the heart box.
Both side pieces of the box have a square section at the ends of them. Add adhesive to the square that doesn’t have tabs. Layer the two squares to connect the two side pieces.


Step Seven: Attach the front and back of the heart box to the bottom square section.

Attach the sides of the box to the front and back, curving the sides to follow the curve of the hearts.


Finally, attach the top of the basket by overlapping the two pieces at the top.

The Valentine Treat box is complete!

I had so much fun making these heart treat boxes! I added little adhesive rhinestones to the front of my purple box and love the added sparkle!


I hope you enjoy creating these sweet boxes. You can check out even more fun Valentine’s Day craft ideas from some of my favorite bloggers. Click the picture below :)

![]() Looking for a few more fun Valentine’s Day treat boxes? Check out some of my other cute treat boxes – I love making them for Valentine’s Day!
Looking for a few more fun Valentine’s Day treat boxes? Check out some of my other cute treat boxes – I love making them for Valentine’s Day!
- Valentine’s Day Treat Boxes with Heart Window
- Adorable Love Bug Boxes
- Valentine’s Day Treat Boxes for your Cutting Machine
- Love Bug Pillow Boxes

Get the Free Heart Treat Box Files!
Fill out the purple form below with your first name and email address! The free file will be sent straight to your inbox. If you have already filled out the form below, don’t worry – you won’t be added to my list twice! This freebie is for personal use only. I hope you enjoy crafting something special. Please let me know if you have any questions :)


Oh my gosh, these are adorable. Thank you for sharing and being a part of our Valentine’s Day Creative Crafts!
These are great, thank you for being part of our Creative Crafts Valentine’s Edition! ~ Ann