
Paper Purse Party Favors – Free Printable Pattern
Create a sweet DIY Paper purse! A perfect party favor for wedding showers, bachelorette parties, spa parties, birthdays, Mother’s Day and more. Grab the free printable pattern to get started!

Crafting for weddings can be so much fun – especially when you consider all of the events leading up to a wedding including engagement parties, wedding showers, and you can’t forget about the bachelorette party! Today I have a fun DIY paper project that would make adorable favors for a bachelorette party or wedding shower – DIY paper purses party favors!
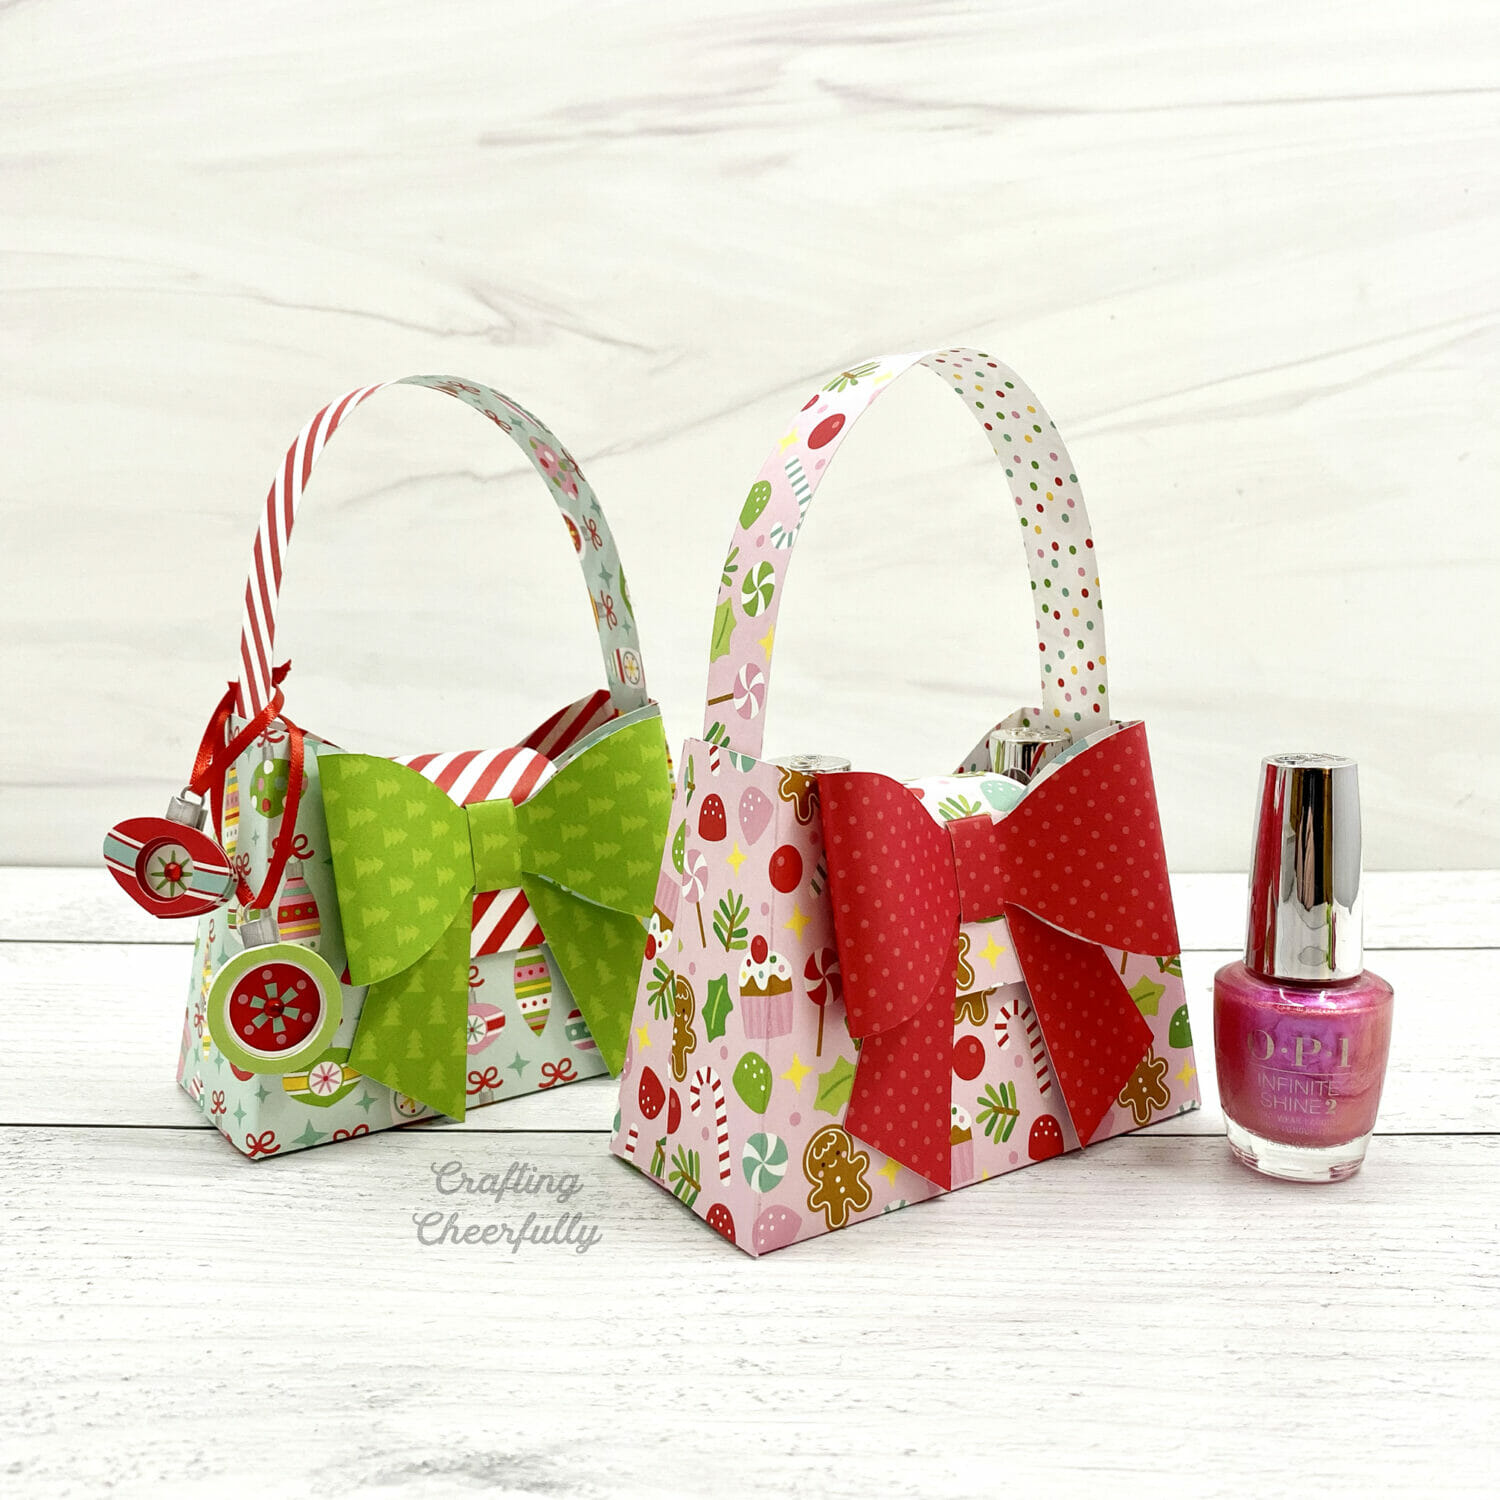
Create mini paper purse favors to hold nail polish, makeup, candy, a gift card or any other little favor you want to leave your guests with! They are the perfect size for holding two full bottles of nail polish. Place one on either side of the box and the bow latch will hold them upright and in place.


Choosing the Paper
Choose medium-weight cardstock for the purses between 65lbs and 80lbs. Some cardstock will crack when folded, especially thick cardstock, so be sure to test your paper before getting too far into the project. For the bows you can use almost any weight cardstock, just know that if the cardstock is too thick the bow loops may not curve easily.
Prefer to make this with your cutting machine? Please visit this Paper Purse Treat Box with SVG Cut File.
Here are a few ideas for choosing paper for your purses.
1. Mix patterned papers for a playful design.
Choose a small pattern to mix with a larger pattern to balance things out. Below, I mixed a small polka dot pattern with larger florals and butterfly motifs. Read more about these purses I made with the SVG cut file here: DIY Paper Purses.

2. Choose papers from a coordinating collection!
Below I used papers from the Echo Park Paper Collections, Fashionista, to create these fun purses. I used matching tags to add a little extra element to some of the purse. Read more about these purses here: Fashionista Paper Purses

For these holiday-themed purses, I used paper from the DoodleBug Design Collections Christmas Magic and Night Before Christmas. Read more about these purses here: Christmas Paper Purse Boxes.
3. Mix patterns with solid paper.
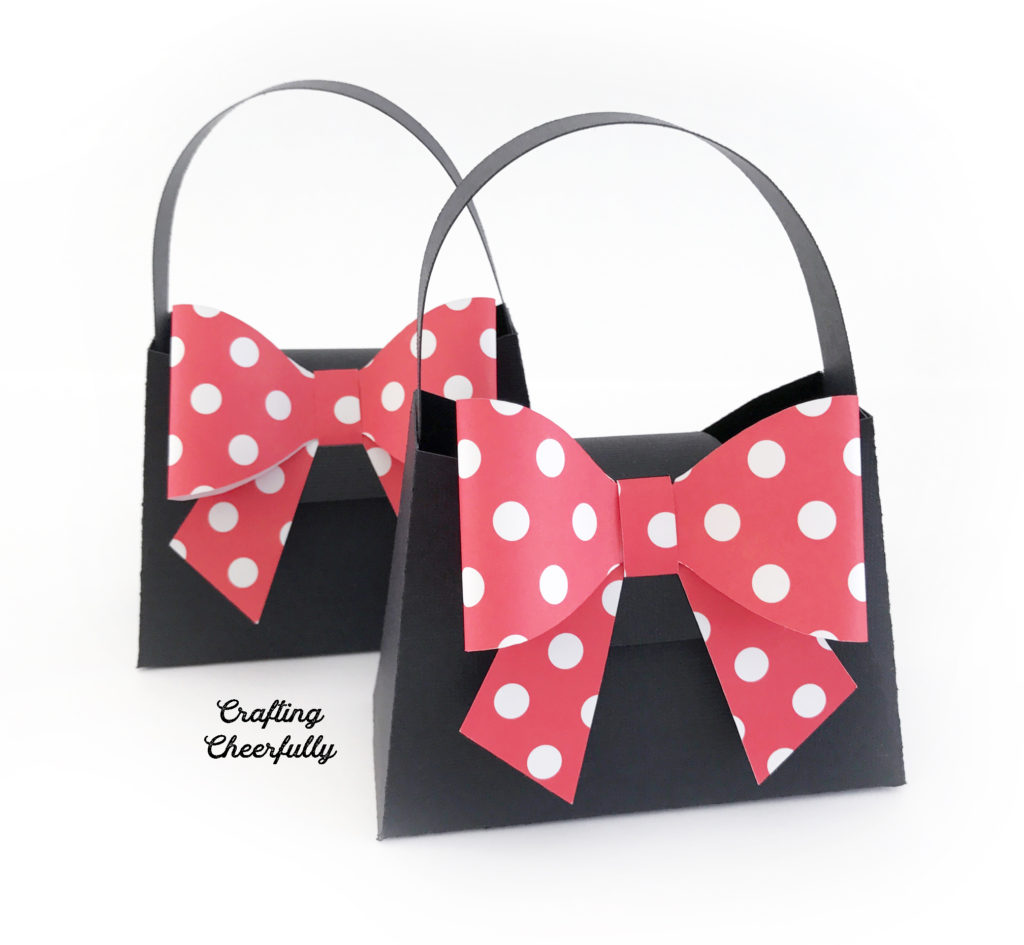
For these Minnie Mouse-themed purses, I used Minnie Mouse polka dot paper from Joann Fabrics alongside solid black cardstock. The bows become the focal point and really pop! Read more about these purses here: DIY Minnie Mouse Party Supplies.
3. Use Glitter Paper!
Making the bow out of glitter paper adds so much fun and sparkle to these paper purses. Some glitter papers are more prone to cracking depending on how thick they are. For my bachelorette party purses, you can see the black and white polka dot cardstock was so thick it was difficult to get it to curve nicely for the bow loops. My favorite glitter paper to use for the bows is DCWV glitzy paper. It is too thin to make the boxes, but is a great weight for the bows. Keep this in mind when choosing a glitter paper.

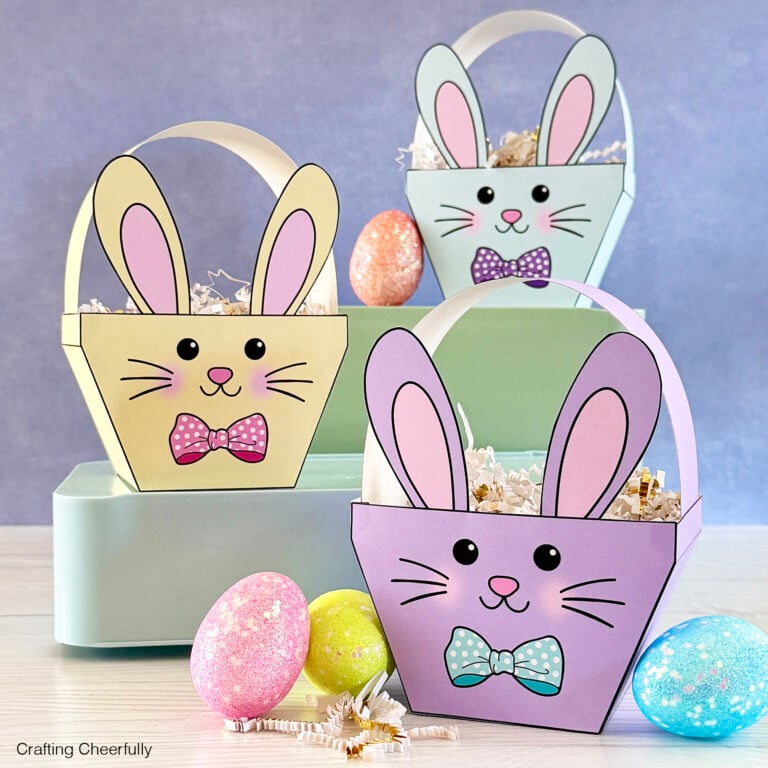
There are so many fun ways you can create these purses! Match your party, holiday or special event by choosing colors and patterns to coordinate.
Paper Purse Tutorial
Supplies Needed:
- My Free Purse PDF template and SVG cut file – get the files by filling out the form at the end of this post.
- Decorative paper
- Purse – 12″ x 12″ sheet of paper works best
- Bow – paper should be at least 7.5″ x 4″
- Scissors
- Craft knife or X-Acto Knife and self-healing cutting mat
- Adhesive – Choose a strong adhesive. I used 1/4″ Scor-tape (double sided tape). Hot glue could also work.
- 3/8″ Clear Fasteners
- Pencil
- Ruler
- Optional: Scoring Board

Step by Step Tutorial:
- If using the SVG cut file, check out my other Purse Treat Box tutorial for steps specific to that process.
Step 1: Print and cut out the pattern.
Download and print the free purse template. Cut out the pattern pieces. Use a craft knife to cut out the small notches.

Step 2: Trace the pattern onto your decorative paper.
Trace around the pattern pieces on decorative paper. The light blue pattern pieces are for the bow.
Tip: Choose your decorative paper carefully. Check to see what happens when you fold it. Some decorative papers, especially those with glitter, will break along their fold line.


Use a ruler to add score lines to the large purse piece. The score lines are marked in pink on the printable pattern and can be used as a guide for adding the score lines to the decorative paper.

Step 3: Cut out the pieces from the decorative paper.
Start by carefully cutting out the notches with a craft knife or X-Acto knife.

Step 4: Score along the fold lines.
Score along the fold lines and then fold. I used a scoring board and stylus but you can also fold by hand.


Step 5: Assemble the paper purse.
The back of the purse box is marked with the cut out tab. Assemble the box so the tabs from the front of the box are on top. This will look cleaner from the front of the box. Use double-sided tape to attach sides of the purse. Below you can see where I applied my double-sided tape to the box and the handle.


Step 6: Make the bow!!
My favorite part! To create the bow, first fold the two ends of the large piece towards the center and attach with double-sided tape or hot glue.


Attach the two bow ends to the purse latch pieces. Position them so the top of the pieces is slightly above the first notch to ensure the bow will cover them.

Place the bow loops on top of the latch and use the small rectangle piece to attach it. The small rectangle will cover the center of the bow and slip through the two cut out notches to the back of the latch piece. Adhere it with double-sided tape or hot glue.


Step 7: Attach the latch to the purse.
Mark the end of the latch at 3/4″ on the right side of the paper. Apply double sided tape or whatever adhesive you are using.

Slip the latch into the back tab of the purse and attach. The double-sided Scor-Tape I used is super strong but if you are using a gluestick or tape runner you may find you need to use something stronger for this step. Hot glue is another option that would have a strong enough hold.

Step 8: Add the handle!
Mark the handle at 1″ on either end and apply adhesive to the right side of both ends. Attach to the inside of the purse on both sides.

Step 9: Lastly, add the Velcro closure!
Use Velcro Dots to keep the purse closed. Apply the rough side of the dot to the under side of the latch. Then attach the soft side to the rough side and close the latch. The soft side will stick to the purse. Press firmly and allow to sit for a little bit before detaching it.

The purse is finished! If you are planning to make a bunch of these for favors or gifts, I recommend making one first all the way through. After that, make multiples assembly-line style.
Fill the purses!
These purses are the PERFECT size for holding nail polish! This was actually a happy accident when I was designing the purse. Place two bottles of nail polish on either side of the purse and the bow closure will hold them upright and in place.
You can also fill the purse boxes with make-up, candy, a gift card, jewelry for your bridesmaids…pretty much anything small enough to fit! These are so fun and look adorable lined up!


Get the Free Paper Purse Files!
Fill out the purple form below with your first name and email address! The free file will be sent straight to your inbox and you’ll receive my fun email newsletter with more free files and DIY craft tutorials. If you have already filled out the form below, don’t worry – you won’t be added to my list twice! This freebie is for personal use only. I hope you enjoy crafting something special. Please let me know if you have any questions :)


Hello I would love to make these purses with the seniors at my community, Can you send me the Template to print out please?
Hi! I’d be happy to send you the template – please email me at kimberly@craftingcheerfully.com :)
Ohhhhh
Simplemente hermoso, me encanta cada detalle, realmente un fino proyecto.
¡Muchas gracias! Estoy tan feliz de que te guste.
Thank you so much! I’m so happy you like it!
Each time I click on the DIY link it takes me back to the beginning of the blog. Don’t see another way to get to the pattern. Please help! Thanks.
Hi! The PDF pattern is available on this post, the pink link takes you to a different blog post that has the tutorial for assembling the box with an SVG cut file. Scroll down to the purple box, blue text to download the free svg cut file. You can also access all of my free patterns in my Freebie Library – the link for that is at the top of my blog home page. I hope this helps. Feel free to email me at kimberly@craftingcheerfully.com and I can email you the file!
where is the free patern?
Hi! It is in blue at the end of the post. It was under supplies needed but I just updated the pattern. Let me know if you have any problems finding it :)
So adorable!!!
I would like to print out this cute purse pattern but the pattern is coming out to big for the printer paper. Can you help me with this?
Hi! If you can save the files to you desktop, or drag them there if you are on a Mac, then you can open them and print them that way. Make sure the scale is set to 100%. I just printed them from my website and this method works the best. Let me know if you still have any problems! Each file is 8.5″x11″. Thank you!
Thank you very much!! I love this little purses ?
Thank you!! :)
Awesome, like to share your handmade with our all handmade fans, Read the story of handicrafts, Feel the Souls of Handmade! >> http://www.handsouls.com/blog.aspx?url=blog