
Candy Corn Stuffie – Free Halloween Sewing Pattern
Learn how to make this cute candy corn stuffie for Halloween using my free sewing pattern! A sweet decoration for the holiday or fun toy for littles ones.

Hello Crafty Friends! Today I am excited to share with you a tutorial for a candy corn stuffie! This cute little candy corn was so fun to make and is a such a fun sewing project for Halloween. The free pattern is one of the first patterns I ever shared on my blog. I originally made this for my little ones to play with, but it turned out so cute it is fun to set out on a shelf as a fun Halloween decoration.
Since I originally made this as a fun stuffy for my little ones, the tutorial will show you how to make the wings crinkly and how to add plastic rings to the legs. If you are making this for decoration, you could skip these steps.
I have always loved cute Halloween decorations as opposed to scary ones and this little stuffie is definitely cute! I hope you enjoy creating it.

Candy Corn Stuffie Sewing Tutorial
Supplies Needed:
- Printable candy corn pattern – Grab the free pattern by filling out the purple form at the end of this post.
- White, orange and yellow fabric for the body
- Striped fabric for legs
- Black fabric for wings
- Cellophane (for crinkly wings)
- Ribbon scraps
- Black felt
- Black embroidery floss
- Poly Fil Fiber Fill Bag
- Plastic baby ring toys
- Sewing notions –
* A quick note about safety: If you plan to make this stuffy for a child, always use your own discretion on what is safe and appropriate for the child’s age. Handmade toys should be played with under adult supervision and should never be used as a pillow or toy in a baby’s crib. Pre-wash all fabrics and ribbons, use a small stitch length, test your seams by pulling on them and follow the instructions of any products you use.
Step by Step Tutorial
STEP 1: Cut all of the fabric using the free pattern!
Cut out all fabric pieces using the printable pattern. The pattern does not include seam allowance so be sure to add your seam allowance to each piece (except the legs). I chose to add a 1/4″ seam allowance.

STEP 2: Sew the legs and flip inside out.
Sew the legs by folding each strip of 3″ x 11″ piece of fabric in half with right sides together. Sew using a 1/4″ seam allowance. Flip the tubes right side out and press with the seam on one side.

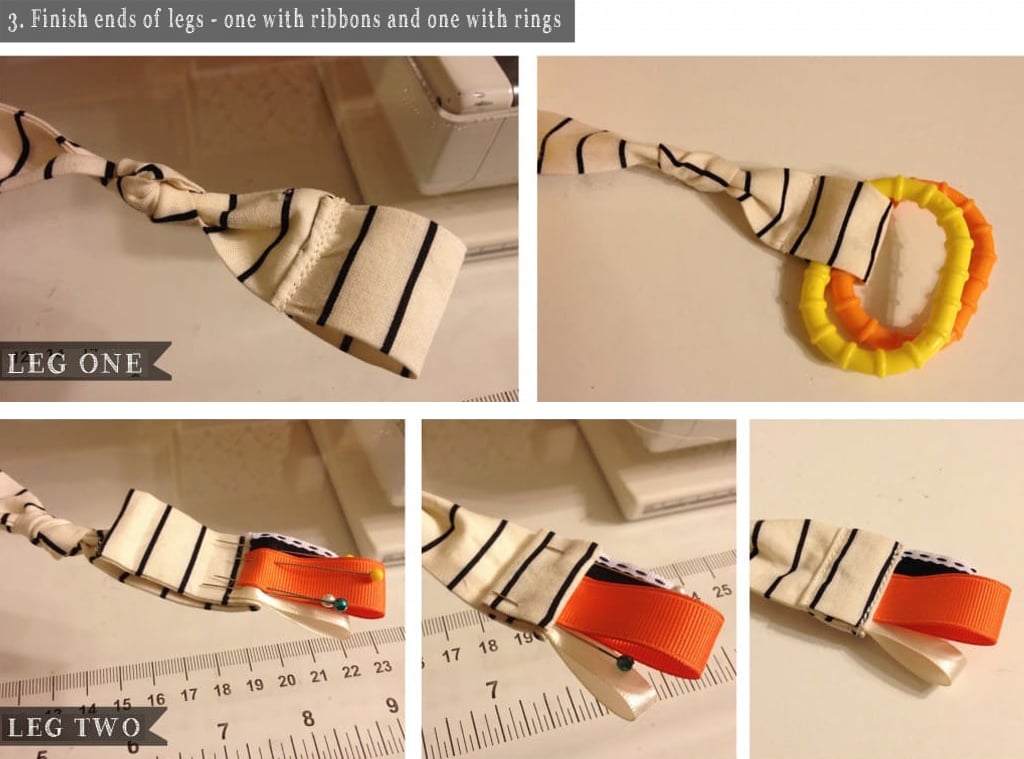
Step 3: Finish the ends of the legs.
Tie a knot about halfway in each leg. Leg 1 is finished by creating a loop for the plastic rings. Fold the end of the leg under 1/4″ and then again 1.5″ and sew along the top folded edge. This creates a loop with no raw edges visible.
Leg 2 is finished with ribbon loops on the end of it. To create this, fold the bottom of the leg up so it will be the same length as the first leg. Sew the ribbon loops to that folded up edge. I then folded the end back down to cover up the ends of the ribbons I just sewed. You can fold the final edge under 1/4″. There’s a lot of folding here – 3 times total, but when you are finished, there are no raw edges and the tops of your ribbon loops are completely encased.
STEP 4: Sew the candy corn body together.
The front and back of the candy corn are made from three pieces of fabric. Stitch the pieces, with right sides together, using a 1/4″ seam allowance. Press open the seams.

Step Five: Add the face to one side of the candy corn.
Add a cute face to the candy corn stuffie using felt and embroidery floss. Cut two circles from black felt and stitch them on by hand or with your machine. To create the smile, draw one lightly in pencil and then cover with a simple running stitch in black embroidery floss. I kept both my knots on either end small and on the wrong side of the fabric.

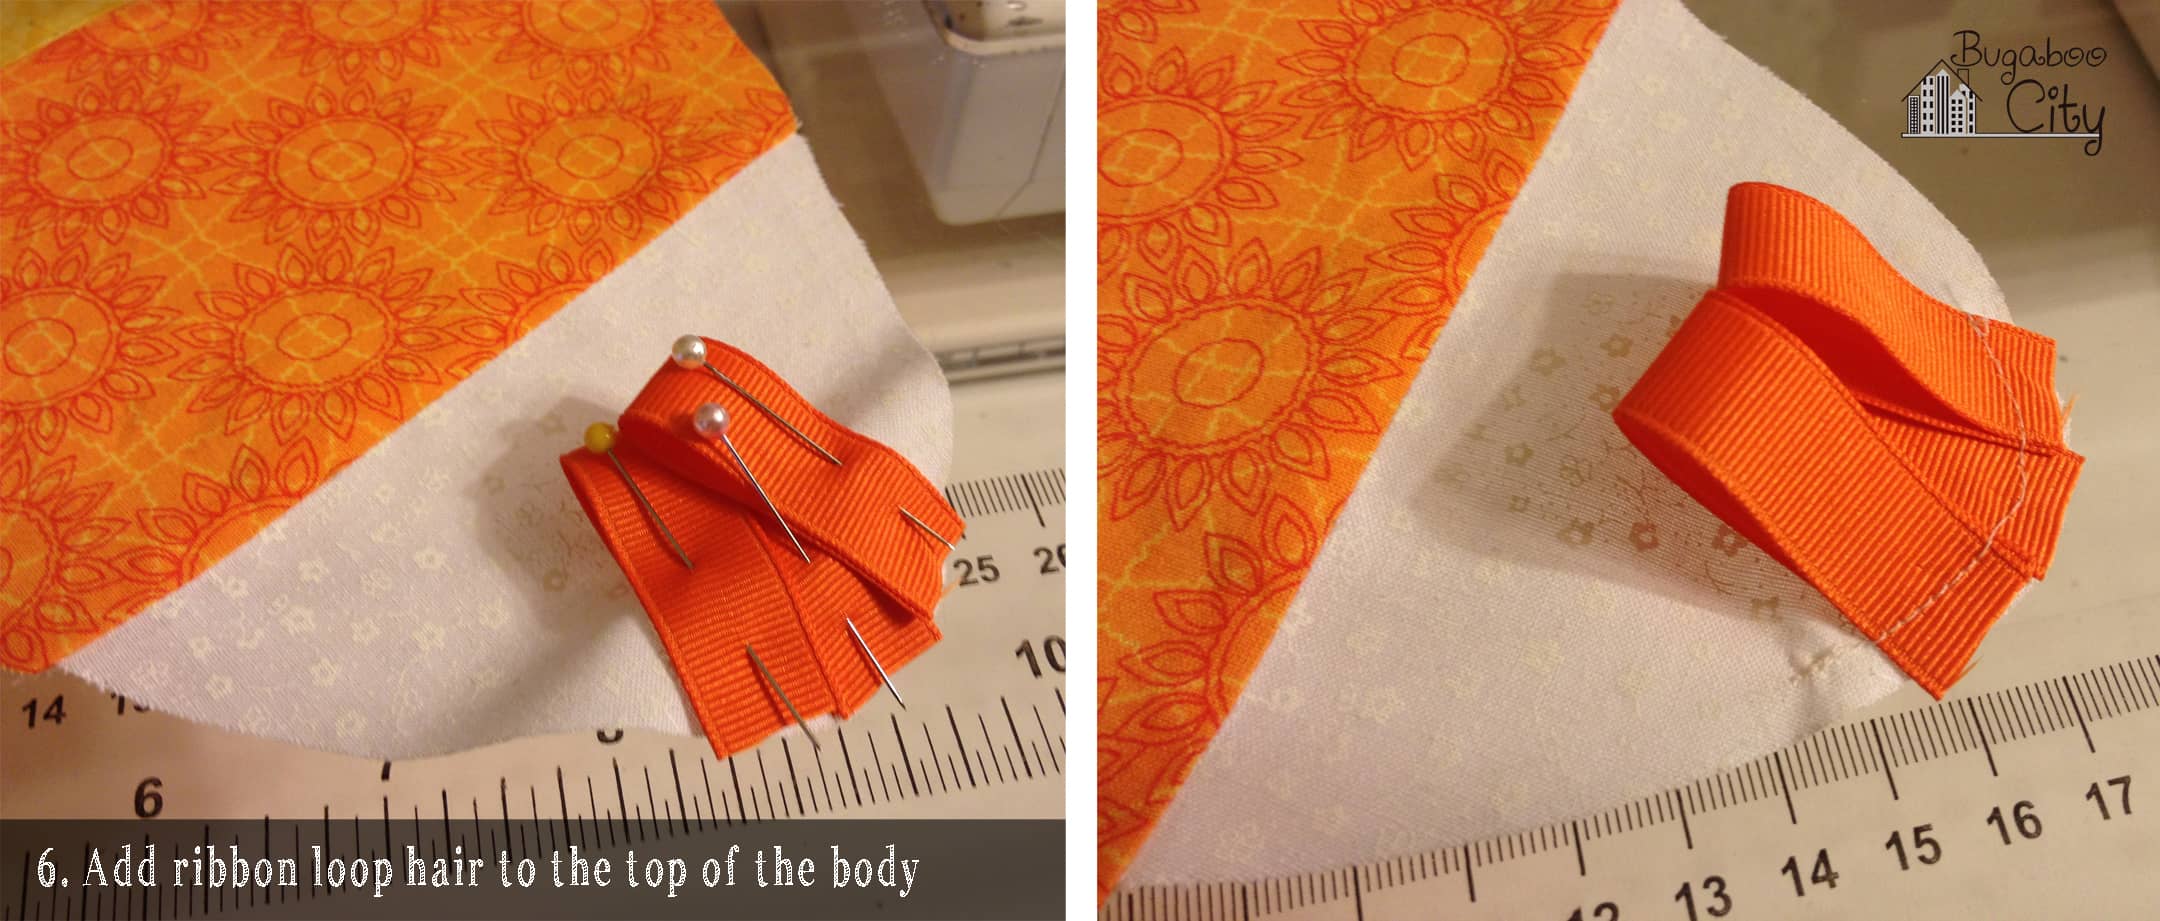
STEP 6: Add ribbon loop hair.
Pin three ribbon loops to the top of the candy corn body (your back piece without the face on it), pin them on the right side of the fabric facing down. Stitch them in place along the top.
STEP 7: Create the wings!
Sew your wings, right sides together. Flip inside out and press. Stuff with torn up pieces of cellophane to make them crinkle, or stuffing to be extra soft!

STEP 8: Sew the body together.
Pin the wings and legs to the back of the candy corn body. Lay the two body pieces together, right sides together and stitch the body together leaving the bottom open. Make sure the long legs don’t get caught in your seam as you sew!

STEP 9: Sew the bottom piece to the body.
Stitch the bottom to the candy corn stuffie. Leave a small gap in the back so you turn the candy corn inside out and stuff.

STEP 10: Stuff and add the finishing touches!
Flip the body inside out through the small gap. Stuff until firm, then hand sew the hole closed with yellow thread. Add plastic or wooden rings to one of the legs and the candy corn stuffie is finished!


I hope you enjoyed this cute Halloween stuffie project. If you are looking for more fun Halloween projects, be sure to check out some of my other fun Halloween crafts!

Get the Free Candy Corn Stuffie Pattern!
Fill out the purple form below with your first name and email address! The free file will be sent straight to your inbox! If you have already filled out the form below, don’t worry – you won’t be added to my list twice! This freebie is for personal use only. I hope you enjoy crafting something special. Please let me know if you have any questions :)


One Comment