
DIY Paper Wedding Dress Banner
Create a sweet wedding dress banner using cardstock and ribbon! The skirts of each wedding dress are made from paper medallions. This banner is perfect for bridal showers and bachelorette parties.

Hello Crafty Friends! I am so excited to share an entire week of wedding crafts with you! Did you know September and October are now the most popular months to get married? I can definitely understand why – the cooler weather and beautiful fall foliage create a gorgeous backdrop. With fall weddings trendier than ever, what better time to share some fun wedding DIYs?
I’ll be posting every day this week Sunday through Saturday with new DIY wedding crafts. So if you are planning a wedding, hosting a wedding shower or attending a wedding this autumn, be sure to follow along for wedding crafting fun!
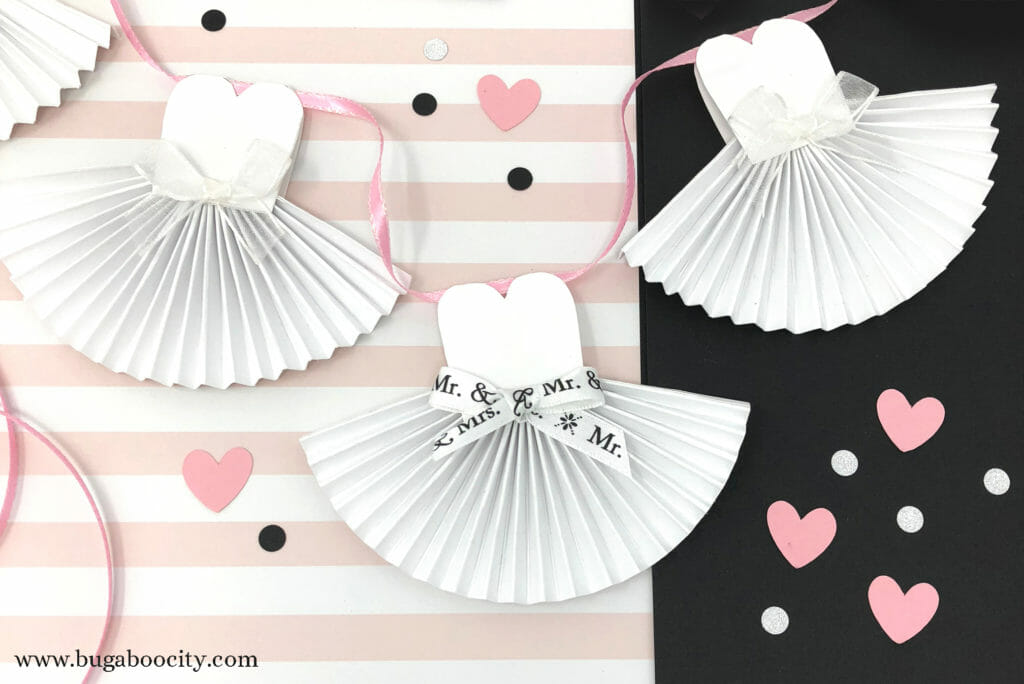
To start out the week, I’m sharing this cute, and easy-to-make, paper wedding dress banner! I love creating paper medallions and seeing what I can turn them into. Last year I made paper medallions into pumpkins and watermelons, and this time I’m turning them into tiny little wedding dresses! All you need to create this banner is white cardstock and ribbon. Switch to black cardstock for a little black dress banner, perfect for a bachelorette party!
How to Make a Wedding Dress Banner
Supplies Needed:
- Free bodice template – Grab the free file by filling out the purple form at the end of this post.
- White card stock – I used Neenah 110lb white paper

- Ribbon for bows
- Ribbon, string, yarn or twine for hanging
- Paper Trimmer and scissors
- Scoring Board and Stylus
- Glue stick
- Tacky Glue

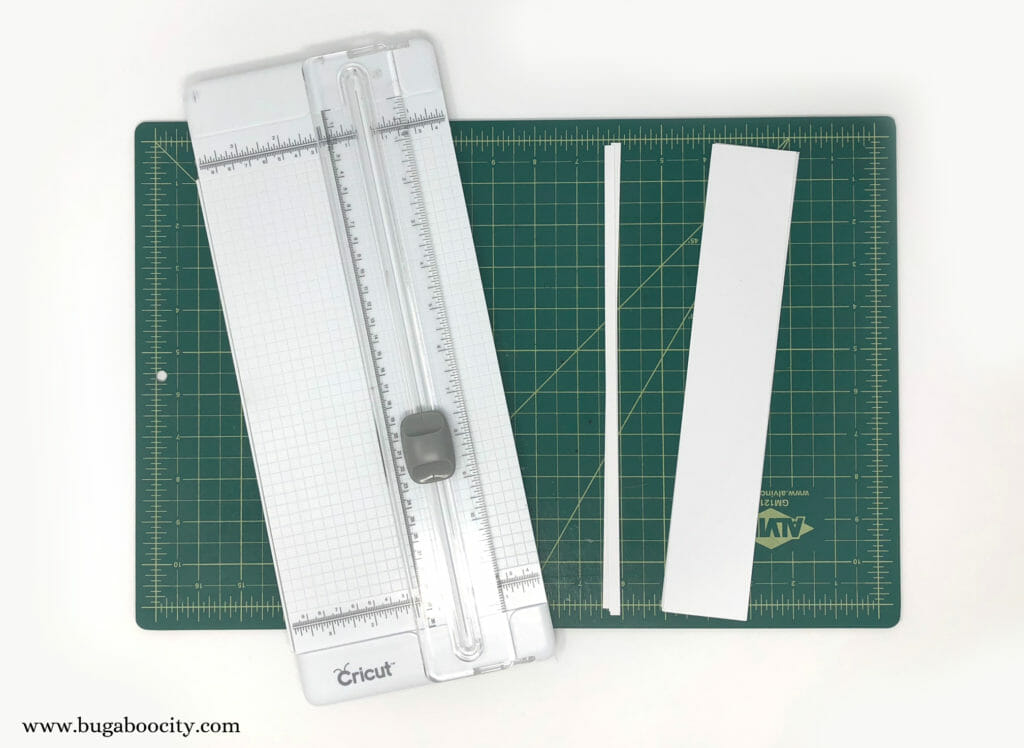
Step One: For each little wedding dress, you will need one strip of 2″ paper and one strip of 1/4″ paper. I used my paper trimmer and my favorite white cardstock, Neenah 110lb white paper, which is 8.5″ x 11″.
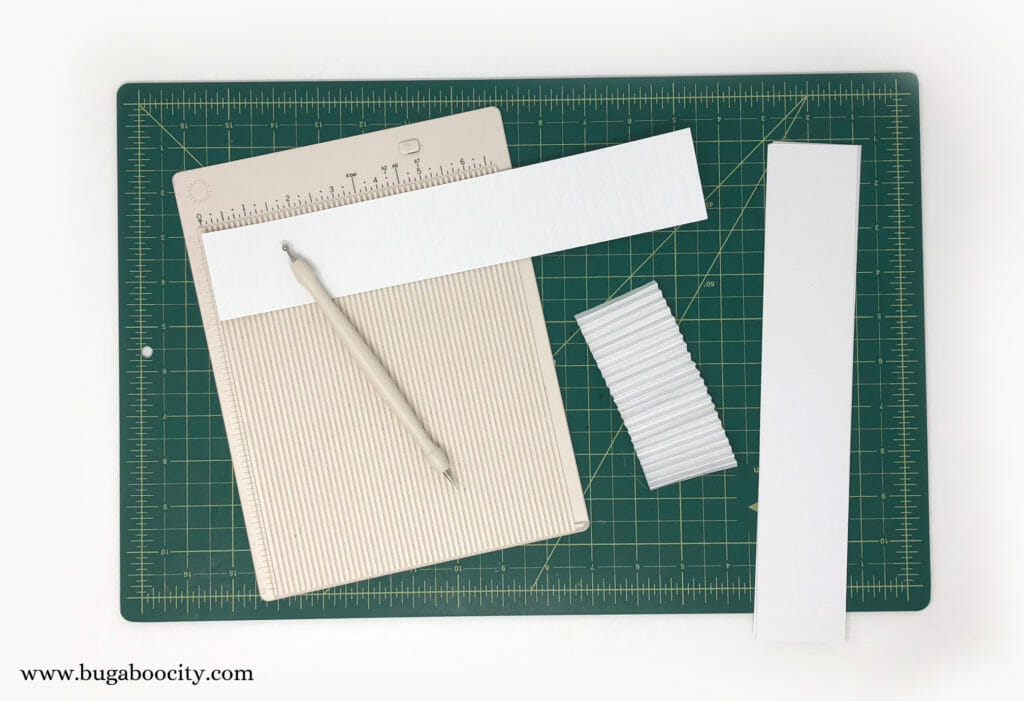
Step Two: Accordion fold the 2″ strips of paper. You can score by hand or use a scoring board and stylus for nice, crisp fold lines. Score every 1/4″, then accordion fold the entire strip of paper.
Step Three: Glue one end of the 1/4″ strip of paper to one end of the accordion-folded strip of paper as shown below.

Squeeze the accordion fold together and wrap the 1/4″ piece of paper around the accordion fold to the other end and glue into place. I put glue on the other end of the accordion fold before squeezing it together. This way when I wrapped the 1/4″ piece of paper around, I could stick it into place right away. Hold for a few seconds to help it stick.

Below you can see what it looks like when you stop squeezing the accordion fold. The thin 1/4″ paper strip is holding it together now while letting the accordion fold splay out on one end. It looks like a skirt!

Cut the long end of the 1/4″ strip of paper off so it is flush with the accordion fold.

Step Four: Time to make the little dress bodice. Fold a piece of cardstock in half and use the template to cut out the bodice for each dress by placing the top of bodice along the folded edge. When you cut out each bodice, the top of the sweetheart neckline won’t be cut, keeping the two sides of the bodice together.


Step Five: Glue each bodice to an accordion folded skirt. I applied glue to the bottom edge of each bodice side and then sandwiched it around the skirt. Hold in place until the glue is set or set something on top to hold it.


Step Six: Once the bodices are attached to all of the skirts, it is time to add bows to the front. You can use any ribbon color you like. I used a sheer white ribbon and a Mr. and Mrs. ribbon I found in my stash that was perfect for this banner! I used a dot of glue to attach each bow.


Step Seven: The last step is to string all of the little dresses together! To keep them from sliding around on the string, you can add a bit of glue to the ribbon before putting the dress on. I used a thin, pink ribbon which had a nice sparkle to it!

I love how this little banner turned out!! It is perfect for a bridal shower! I also want to try making it with black cardstock and fun printed ribbon for a bachelorette party. The best part of this craft is it doesn’t require a lot of materials – just cardstock and ribbon. The paper crafting tools, like the scoring board, stylus and paper trimmer, aren’t necessary, but they will definitely speed up the process!

I hope you enjoyed the first DIY wedding craft of this Wedding Week series! I’ll be back tomorrow with another fun project! :)

Get the Free Wedding Dress Banner Template!
Fill out the purple form below with your first name and email address! The free file will be sent straight to your inbox! If you have already filled out the form below, don’t worry – you won’t be added to my list twice! This freebie is for personal use only. I hope you enjoy crafting something special. Please let me know if you have any questions :)


