DIY Christmas Boxes with Free Cut Files
Learn how to make DIY Christmas boxes using a cutting machine perfect for holding small gifts and sweet treats. These boxes feature four fun designs including a snowflake, tree, ornaments and peppermint pattern. Grab my free SVG/PNG cut files to help you get started.

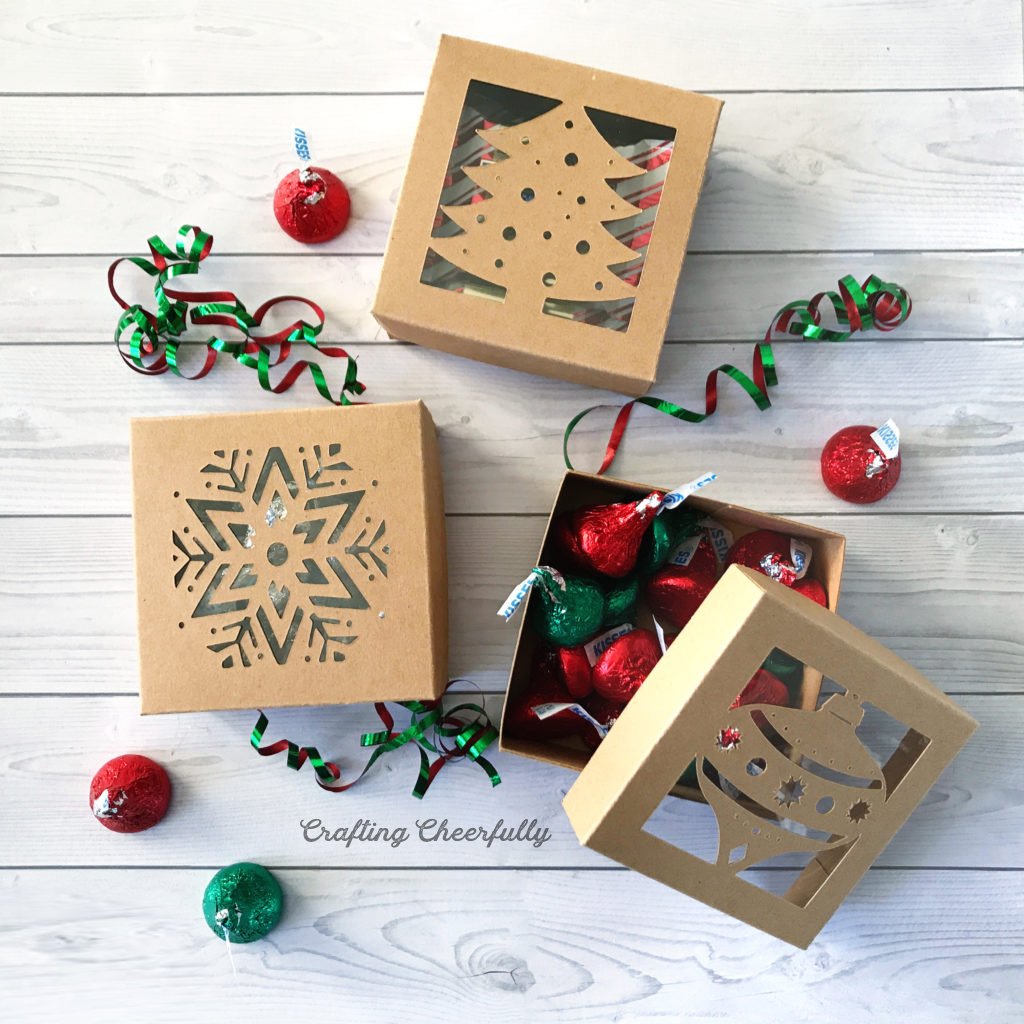
On the Twelfth Day of a Crafty Christmas…
Hello Crafty Friends! Today I’m sharing the cut files to create these beautiful little Christmas boxes! Last month I created similar ones, my Autumn Treat Boxes, to use at Thanksgiving. I loved them so much, I decided to make more!
I love how small the boxes are, yet they seem to hold a lot. Fill them with chocolates, cookies, candy or a holiday snack and gift them to someone special. Use them as holiday party favors or at place settings for a nice DIY touch.


Below are the free cut files and the quick tutorial for putting these together! I found the 110lb Kraft paper at Joann Fabrics. I love this weight of paper for treat boxes. It holds up well, yet is still easy to work with.

DIY Christmas Treat Boxes
Watch the Video!
Supplies Needed
- Free SVG and PNG cut files – Grab the free files by filling out the purple form at the end of this post.
- Cardstock (read more under in the next section)
- Thin Clear Craft Plastic – I used Grafix .007 craft plastic
- Double-sided tape – I use 1/4″ Scor-Tape. The 1/8″ Scor-Tape is also handy for adding the clear craft plastic.
- Cutting Machine – I used my Cricut Explore 3
- Cutting mat and Cricut Tools
- Scoring Board
- Paper trimmer – if cutting the craft plastic by hand
Choosing Your Paper
These boxes will work best with paper that is 80lbs or more. But depending on what you are filling the boxes with, 65lb cardstock can work as well. I prefer to use solid core cardstock, rather than white core, so there is no white paper visible in the cut out designs.
A few paper brands I have enjoyed using for these boxes include AC Cardstock (textured, solid core, 80lb cardstock), Bazzill Cardstock (80lb cardstock available smooth or with a subtle texture) and for lightweight boxes Recollections (65lb, solid core, smooth cardstock). For the boxes pictured in this tutorial, I used a Kraft index that was 110lb. I can no longer find it to link to, but this Kraft coverstock from Printworks looks very similar.
One sheet of 8.5″ x 11″ paper will fit one box including the lid and bottom of the box.
Preparing the Files in Cricut Design Space
After downloading the free files upload them into your cutting machine software. I used a Cricut Explore to cut my boxes. If you are using a Cricut, open a new project and upload the SVG cut files. Add them to your project and then “ungroup” the layers. Change the pink lines from “cut” to “Score” and attach them to the layer they belong to. You will then be ready to cut! *Tip: Place the 8.5″ x 11″ sheet of cardstock on your cutting mat the landscape way, so the width is 11″.
If you are using a cutting machine without a scoring tool, delete or hide the layers with the pink score lines. You can score the boxes by hand using the scoring guide I have included with the files. * I have added PNG files of each box. You will need to resize them in your cutting machine software.
How to Assemble the Christmas Boxes
Step One: After the boxes have been cut, fold along the score lines. If your machine did not score the boxes, or you wish to go over the machine’s score lines, use a scoring board and stylus. I have included a scoring guide with the files.

Step Two: Add clear plastic behind the cut out lid designs. Cut a small square of craft plastic, a little less than 3″x3″, and adhere it to the wrong side of the box lid. I used 1/8″ or 1/4″ Scor-Tape along the edges of the plastic square but you can also use a thin strip of glue. *Tip: Give these boxes a completely different look and use colored sheets of cardstock under the lids instead of the clear craft plastic.
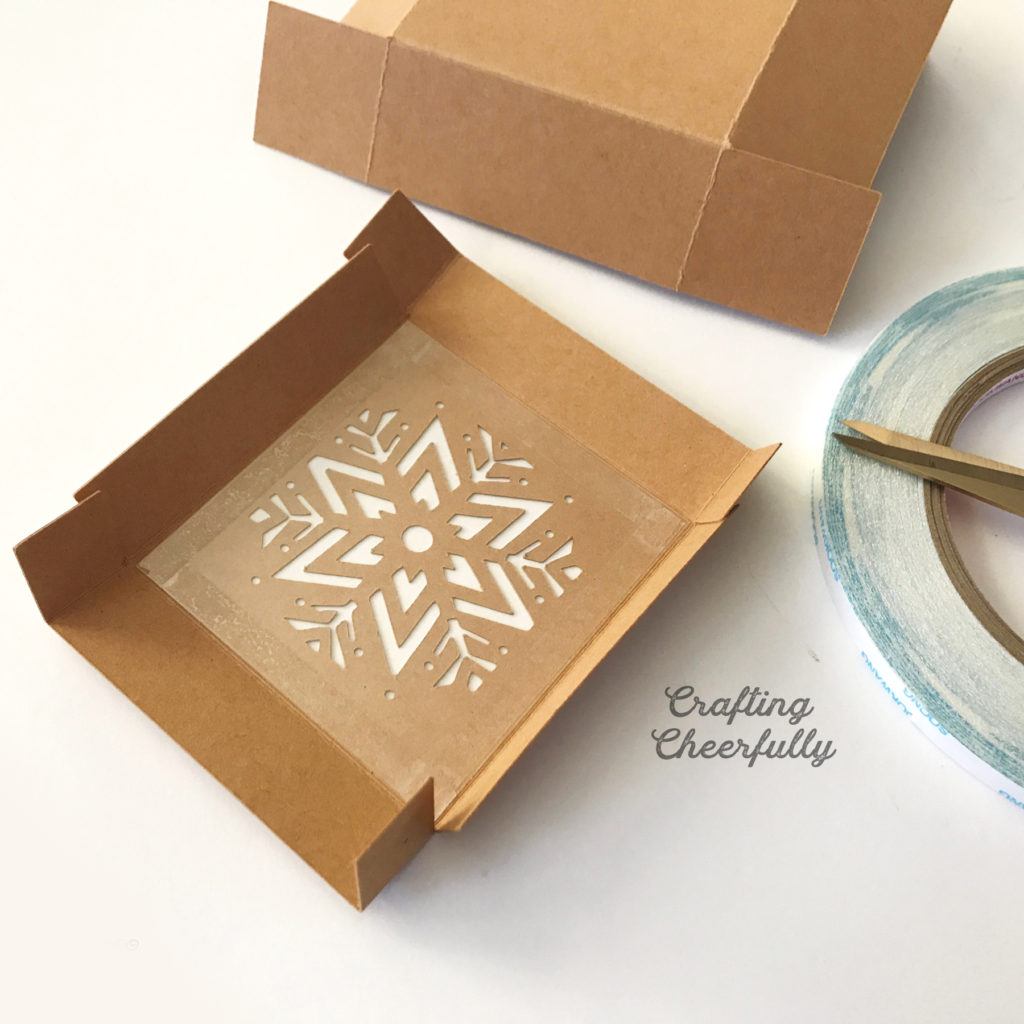
Step Three: Assemble the box pieces using the tabs. Lay the boxes on your crafting surface so they are right side up, then apply adhesive to the tabs and assemble the boxes. The lid of the box is slightly larger than the bottom of the box so they should fit together easily.


The treat boxes are finished and ready to be filled with goodies!!

I truly hope you’ve enjoyed my 12 Days of a Holiday Crafts series! Christmas time and holiday crafting is my favorite! Putting together this series was so much fun and I hope you’ll give one of these projects a try!
More Treat Boxes You Can Make with a Cutting Machine.
If you like this style of treat boxes, be sure to check out my other similar treat boxes ready for other occasions!
- Autumn Treat Boxes
- Christmas Treat Boxes
- Halloween Treat Boxes
- Rainbow Treat Boxes
- Fruit Treat Boxes
- Valentine’s Day Treat Boxes
For more Christmas crafts check out my Christmas Crafts page and these fun free Christmas printables!

Get the Free Holiday Cut Out Boxes!
Fill out the purple form below with your first name and email address! The free file will be sent straight to your inbox! If you have already filled out the form below, don’t worry – you won’t be added to my list twice! This freebie is for personal use only. I hope you enjoy crafting something special. Please let me know if you have any questions :)





I am unable to locate the download despite getting a password to log in
Hi! The Christmas Box SVG files are located in two places in the library – under Christmas and under SVG Cut Files, Treat Boxes. If you still have trouble finding them, please send me an email at kimberly@craftingcheerfully.com and I’d be happy to email them to you :) Thank you!
Hello! I also only have the free silhouette software, if you were able to get a format you could use can you also send it to me? I would be super grateful.
Hi! I added a PNG file for each box to my Resource Library. Hopefully they work with the silhouette software! Please let me know if you have any trouble! :) Thank you!!
I am so excited about these! I cannot wait to make them!
Yay!! I hope you have fun crafting them! They are one of my favorites :)
Hi – I have tried to email you – I have had these pinned for so long – just about to make them and I can’t use the file as I have the basic silhouette software. Could you share them with me in the dxp format so I can use them? Thank you
Hi! Thank you for the message! – I haven’t received your email but I am happy to help! Can you email me at kimberly@craftingcheerfully.com? I only own a Cricut so I’m not able to test out the files on other machines but I think I can make a file you can use with your machine. Thank you! :) -Kimberly
Thank you
You’re welcome! I hope you had fun crafting these cute little boxes!
Love these boxes. Thank you soooooooooooo much for sharing the files with us.
Thank you! I’m so happy you like them :)
thanks, these are very nice
Thank you!! :)
Thanks you. These will make great gifts for hubby’s team at work
Yay I’m glad! Happy Holidays! :)
finally found the Christmas box for coffee friends treats. Thank You
Awesome! Have fun making them! Happy Holidays!
These are so cute, thank you!
Thank you! :) Happy Holidays!