DIY Wrapped Fabric Wreath for Spring
Create a beautiful wrapped fabric wreath for spring! A beautiful wreath that is charm pack friendly and can be enjoyed all season.
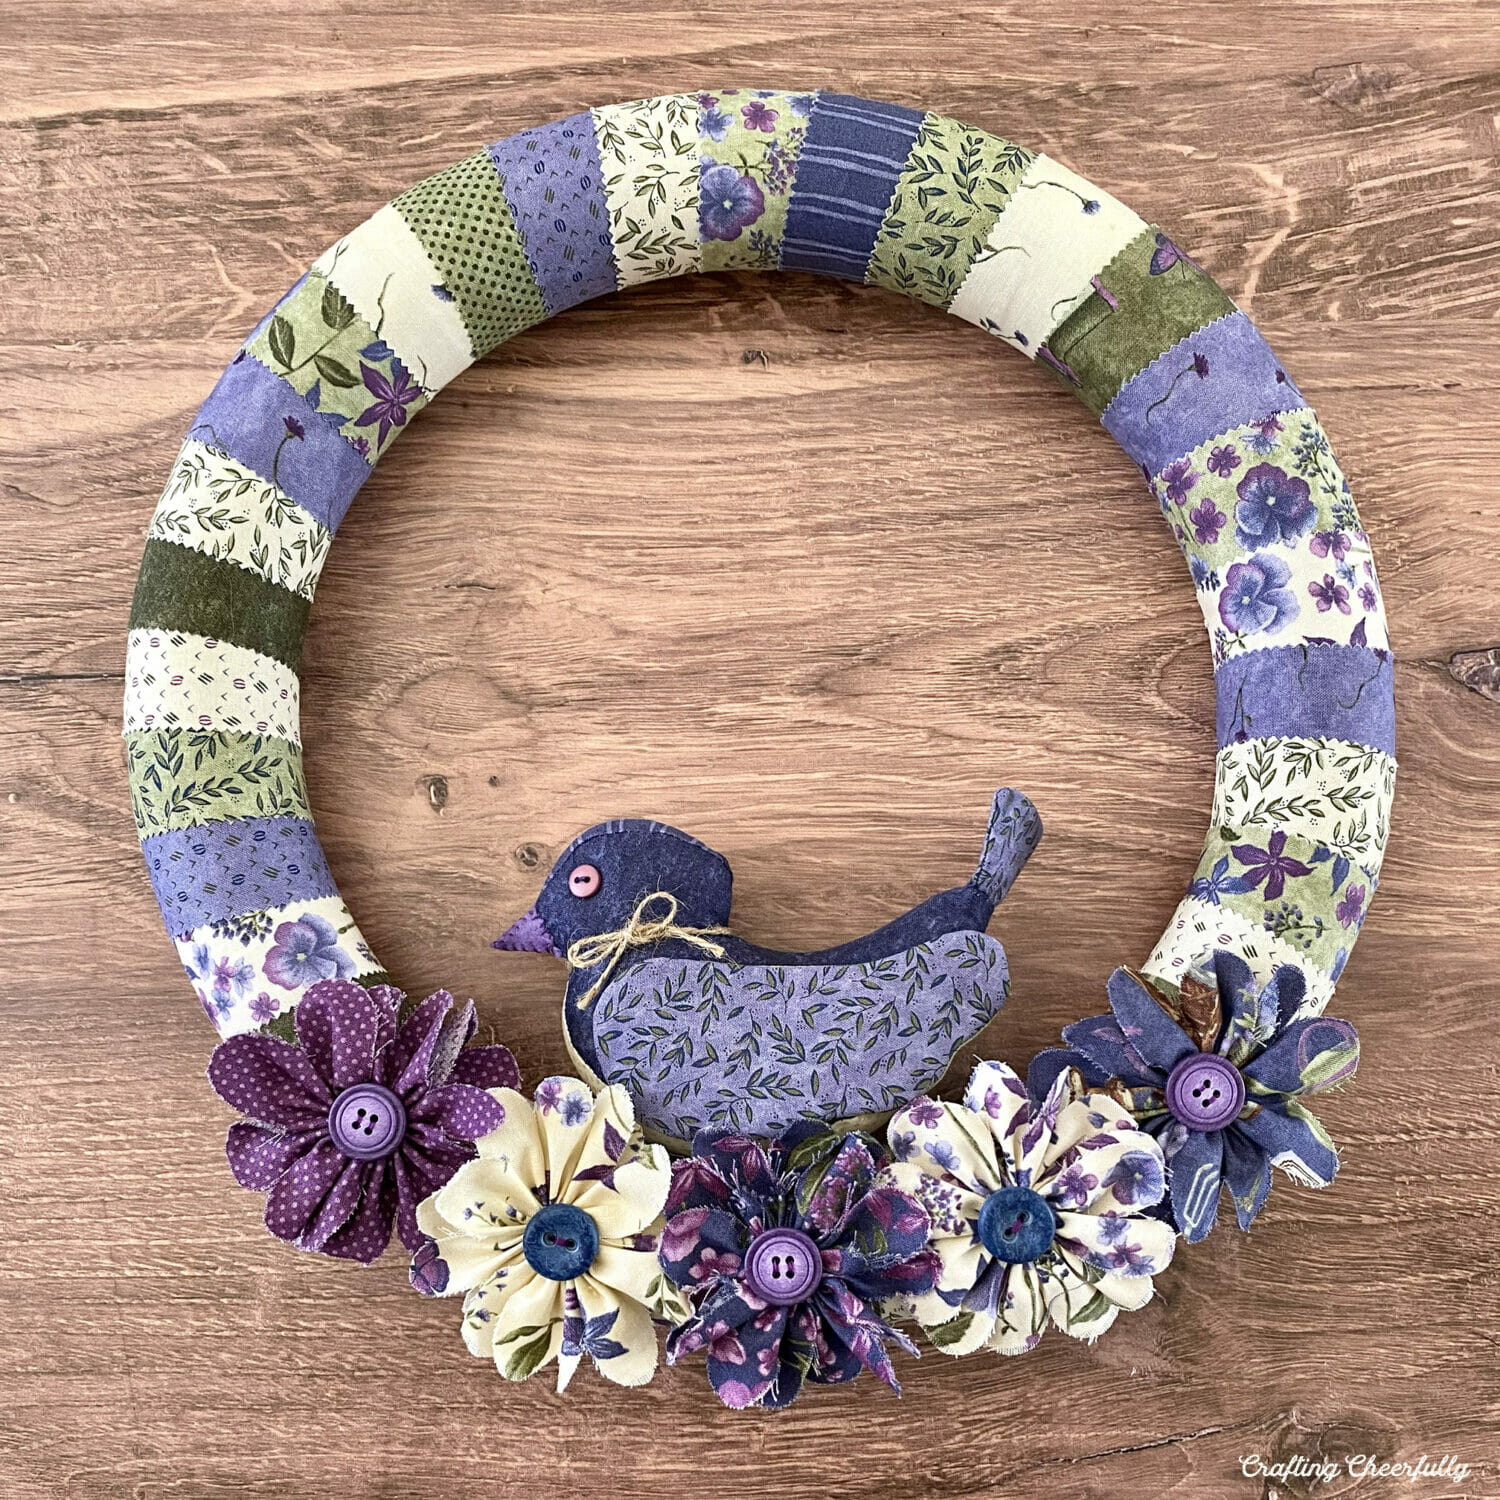
Hello Crafty Friends! Today I’m excited to share this wrapped fabric wreath with you. I made it for spring and love how it turned out. Everything, including the wrapped wreath, fabric flowers and cute bird, are all made from one charm pack!
I love using charm packs for projects. They are such a fun way to play around with an entire collection of fabrics. For this wreath, I used the charm pack Violet Hill by Holly Taylor for Moda Fabrics, but you can use any charm pack you’d like. This wreath can also be made with fabric yardage or fabric scraps.

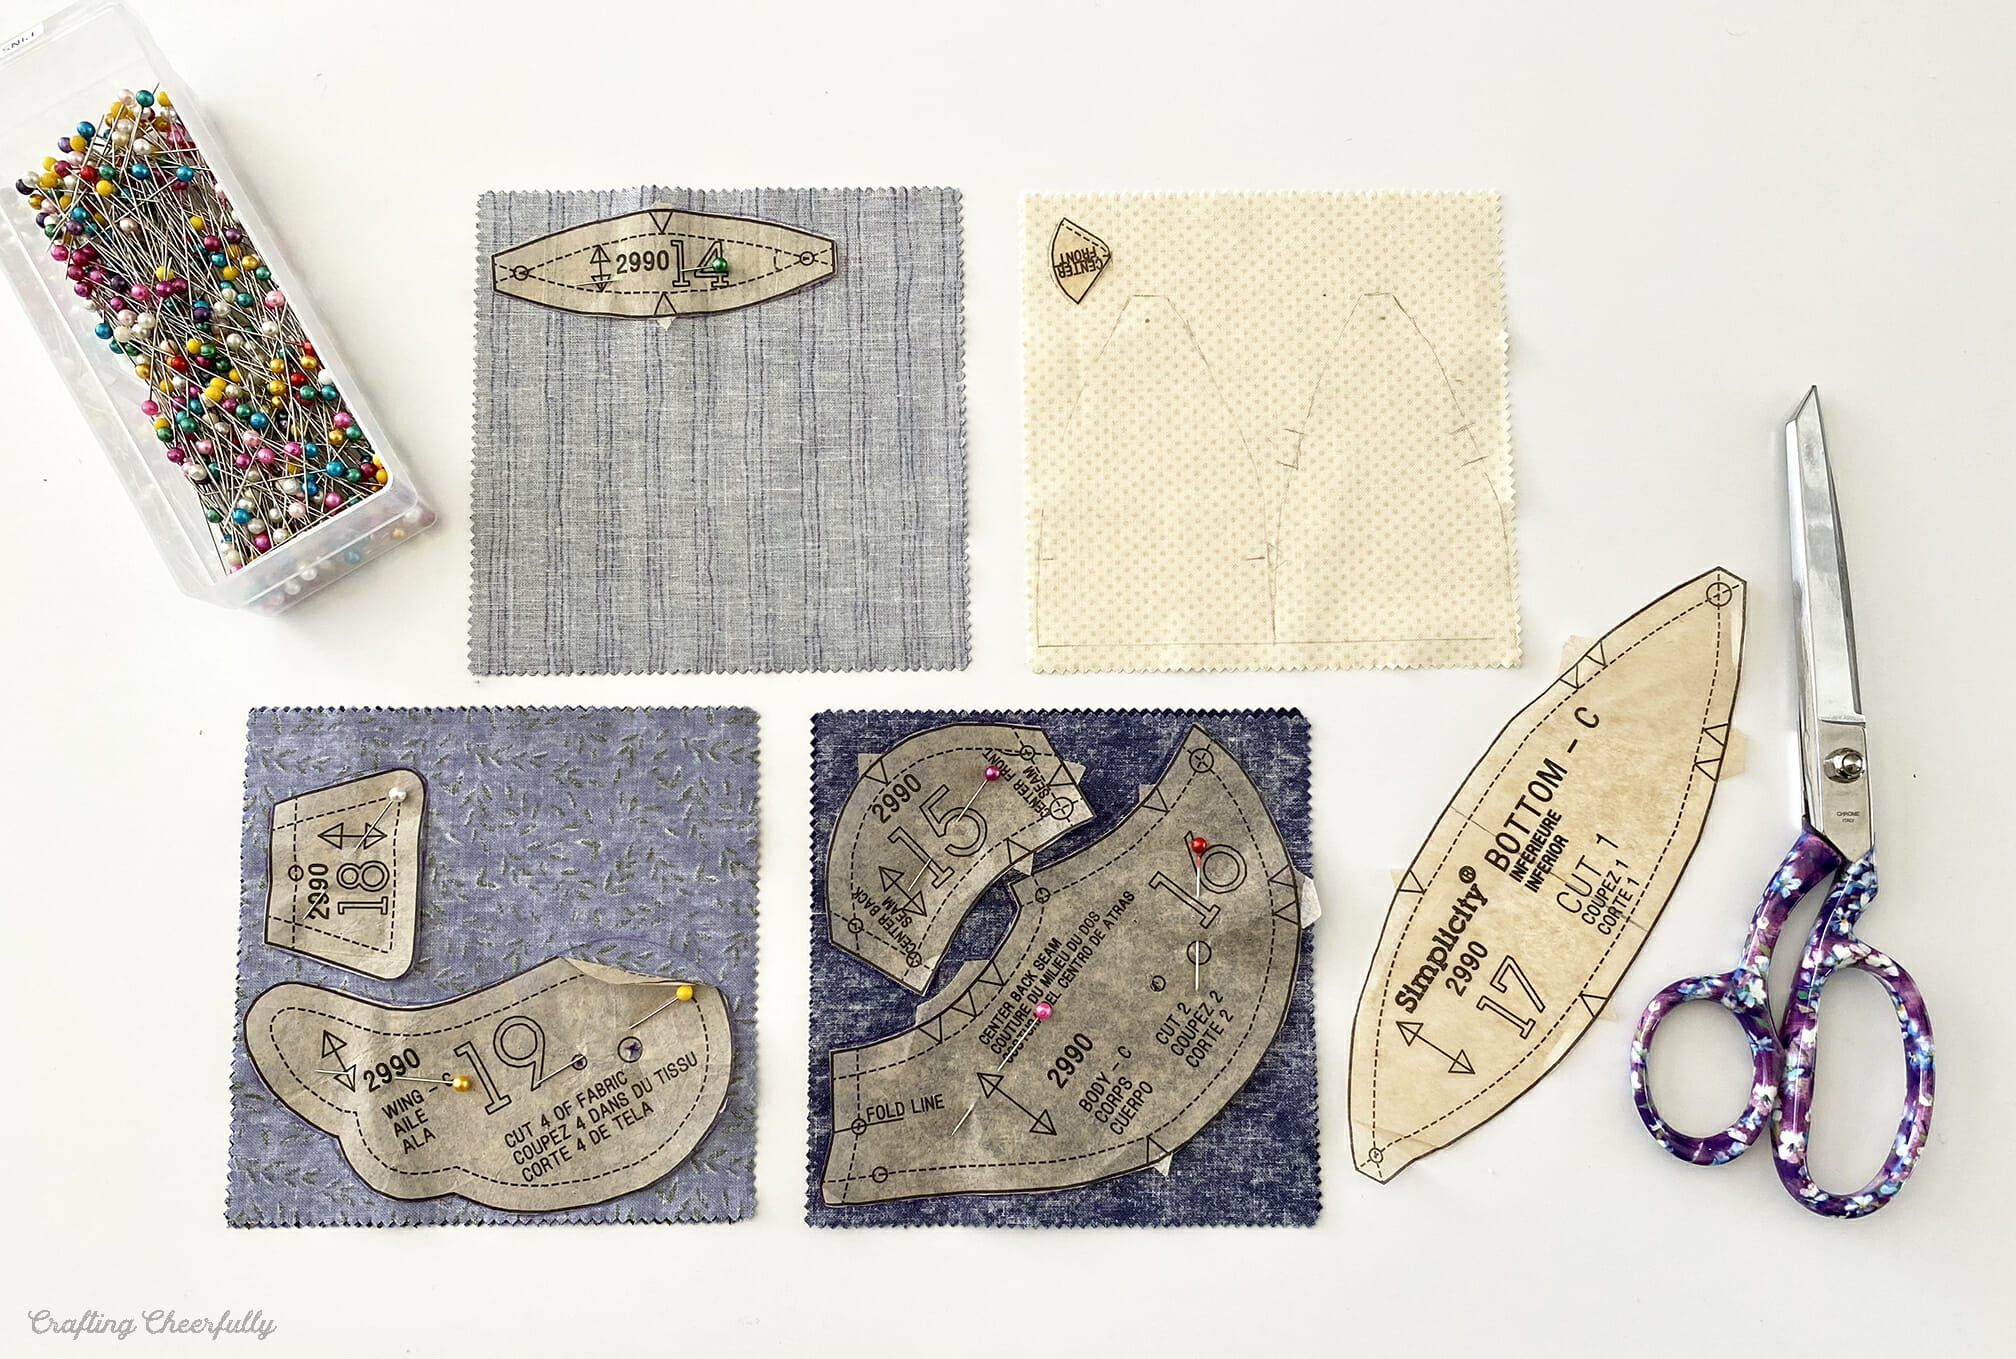
Making this wreath was a lot of fun, especially making the fabric bird. I used a Simplicity pattern my mom had in her stash for making cute pin cushions including a pin-cushion bird. The size of the bird was perfect for my wreath and I was able to make it using my charm pack.
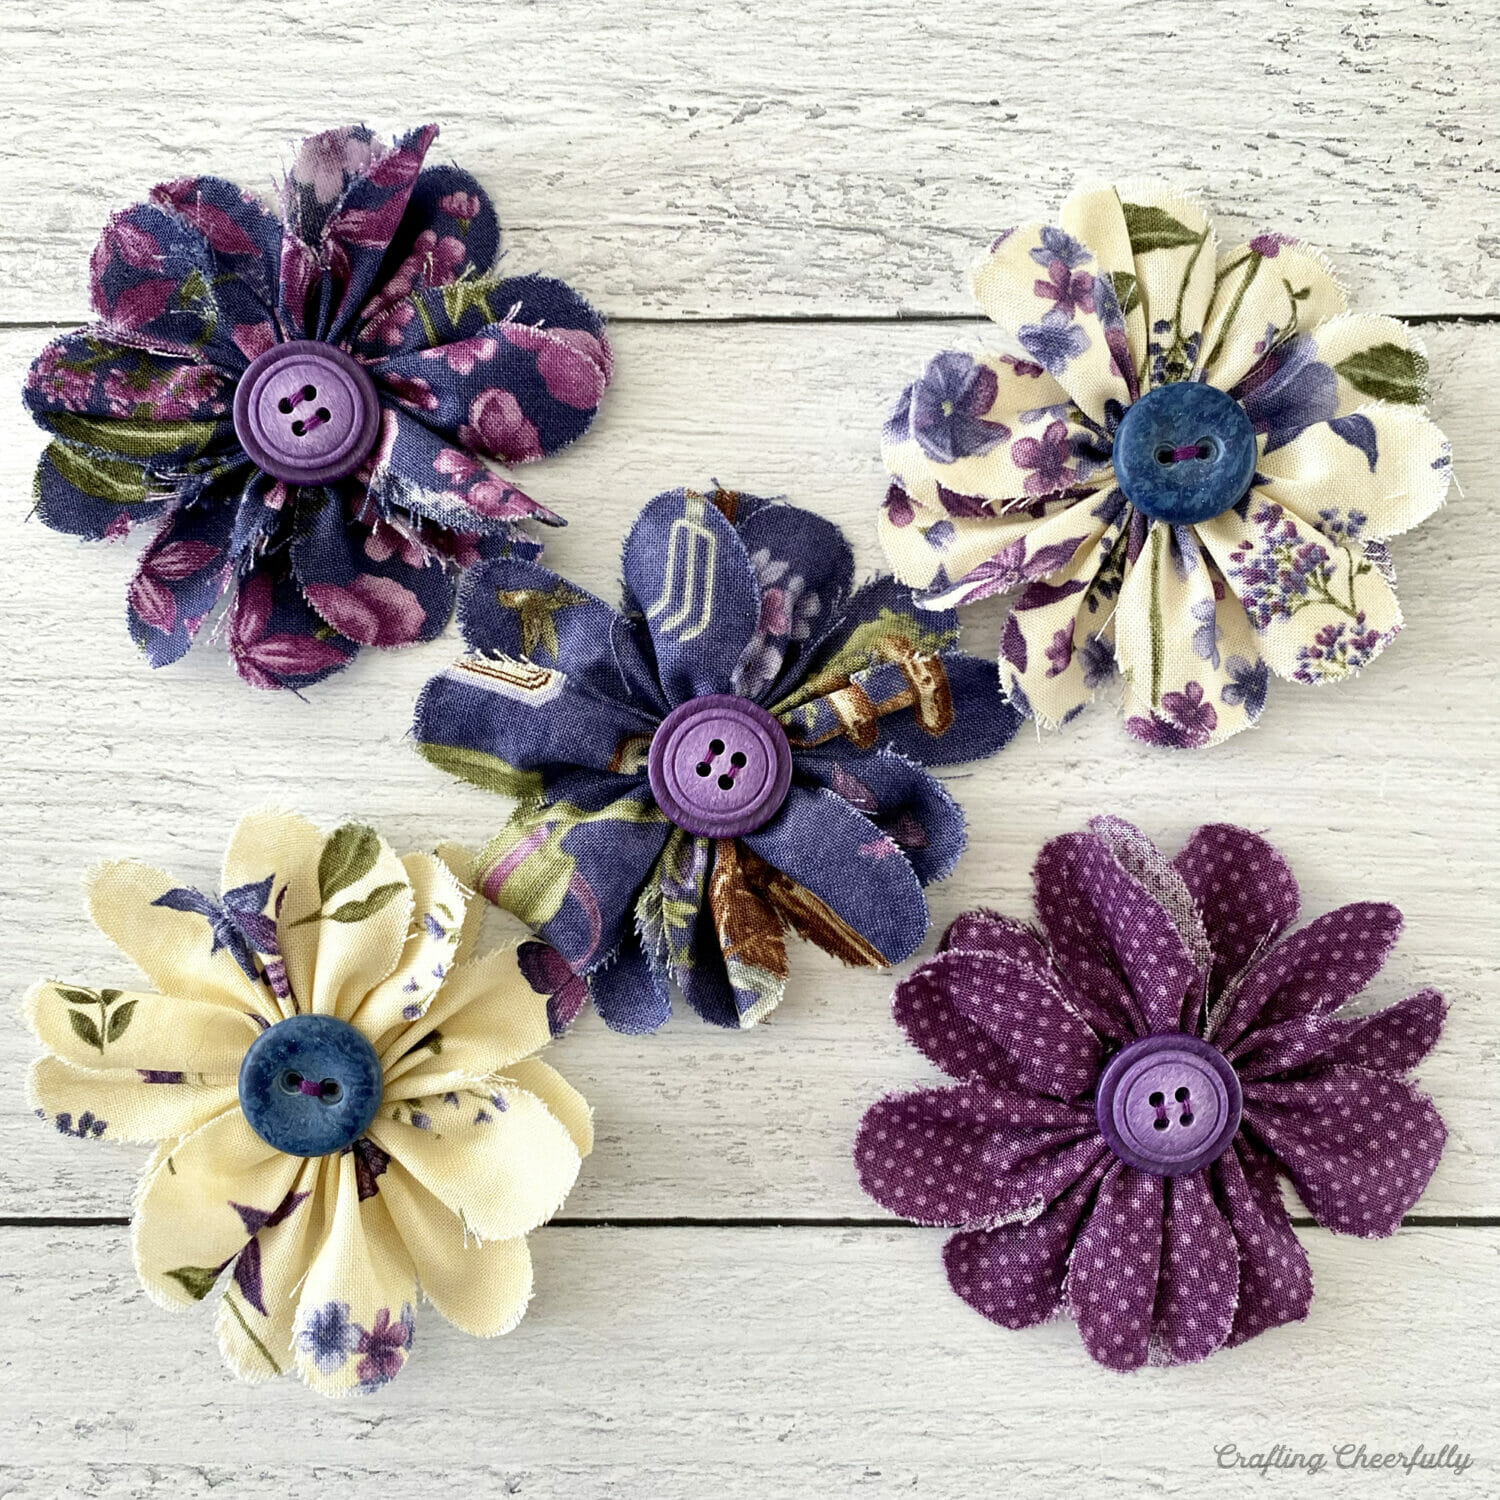
The flowers are also created using the charm pack and embellished with coordinating buttons. The flowers create a little nest at the bottom of the wreath for the bird to sit in.

What is a Charm Pack?
As I mentioned above, I love using charm packs for projects but you may wonder what is a charm pack? A charm pack is a bundle of fabrics that measure 5″ square. A mini charm pack usually measures 2.5″ square. Charm packs are a great way to play around with all of the fabrics included in a designer’s collection including the different colorways. A full collection often includes the same prints in multiple colors. In this Violet Hill charm pack, for example, many of the prints are repeated in violet, light green, dark green and cream.
I’ve used charm packs to create other projects too! My Charm Pack Pillow Wreath, Mini Charm Pack Pillow Wreath, and Holiday Ornaments are all made with a charm pack.

How to Make a Fabric Wrapped Wreath for Spring
Supplies Needed:
- 13.8″ Styrofoam Wreath
- 5″ Charm pack – I used a Violet Hill charm pack by Holly Taylor
- Buttons (five for the flowers and 1 for the bird’s eye)
- Simplicity Pattern 2990 to make the fabric bird
- Hot Glue
- Twine
- Fabric Scissors
- Sewing notions for the bird and flowers: needle, thread, straight pins, embroidery scissors

Step by Step Tutorial:
Choosing the Fabrics
Step One: Separate your fabrics. Decide which fabrics you want to use for the flowers, bird and wrapped wreath. The flowers are made with five squares of fabric. The bird used six fabric squares: two matching squares for the body and head, two matching squares for the wing and tail, one for the belly, and one for the top of the head. The beak can be made from fabric or purple felt as I did. The rest of the fabrics can be used to wrap the wreath.

Wrapping the Wreath
Step Two: Wrap the Wreath in strips of fabric. Start by cutting each charm square you want to use for your wreath into thirds.

Wrap one of the strips around the styrofoam wreath, securing the ends with a little bit of hot glue. The fabric strips will not meet in the back, but should wrap around the wreath enough that the ends are not visible from the front.

Continue adding strips of fabric until the entire wreath is covered. Try to place the strips so the fabrics with the same color or print are not right next to each other.

*TIP: You can use the center pieces from the cut fabric squares, the pieces that do not have pinked edges, along the bottom of the wreath where they will be covered by flowers. This way all of the visible fabric pieces will have a pinked edge.

Below you can see my wreath completely covered along with a view of the back. If you’d like, you can cover the areas where the styrofoam wreath is visible on the back with smaller pieces of leftover fabric. I left mine as is, since I made this wreath for myself and it would be against a door.


Creating the Fabric Flowers
Step Three: Create the flowers. Follow my tutorial on How to Make Fabric Flowers with a Charm Pack. They are simple to make and only require fabric and buttons.
Attach them along the bottom of the wreath using hot glue.


Making the Fabric Bird
Step Four: Create the fabric bird. Use a pattern like the one I used, Simplicity 2990, to create a cute fabric bird. You can of course skip the bird and just make a wrapped wreath with fabric flowers, but the bird is a fun addition.

All of my pattern pieces fit on the 5″ squares of fabric except the belly of the bird. I cut this pattern piece in half and added a 1/4″ seam allowance to each piece. I was then able to fit the two pattern pieces onto one charm square and piece them together. There is a seam in the belly piece but it isn’t visible once the bird is placed on the wreath.

For my bird, I only created one wing and attached one eyeball since the other side of my wreath would be against a door. I added a bow around its neck using jute twine.
Once the bird is complete, glue it to the wreath using hot glue.

Finishing up the Wreath
Step Five: Add the hanging loop. Use a little bit of twine and hot glue to add a hanging loop to the back of the wreath.

The wreath is finished! Hang it up and enjoy it all season long :)
I hope you enjoyed this wreath tutorial! It was so fun to use these beautiful fabrics and create something with just 5″ squares of fabric. :)