How to Make Text Cut Files in Photoshop for Cricut Design Space
Learn how to create text cut files in Photoshop that can be used in Cricut Design Space. This picture tutorial will walk you through how to create a text cut file, how to add decorative elements to it and then how to import it into Cricut Design Space to use with your Cricut cutting machine.

Today I have a bit of a different post for you! I’m sharing a tutorial on how I make text cut files in Photoshop to use with my Cricut Explore cutting machine. I get a lot of questions on how I create the stencils and vinyl images for some of my crafts, especially my Harry Potter directional sign I made last summer. All of the text images for that sign were created in Photoshop and then imported into Cricut Design Space where I cut them out of vinyl or Cricut Stencil Material.

Why use Photoshop?
You may be wondering why I even bother using Photoshop. After all, you can create text cut files right in Cricut Design Space. For me the answer is that I am faster and more comfortable in Photoshop. I have been using Photoshop for years, since I learned the program in undergrad. I can whip up a project quickly and then easily import it into Cricut Design Space. That’s not to say I don’t use Cricut Design Space to create text-based projects. Sometimes though, for one reason or another, I prefer to use Photoshop.
This process will create one cut layer once the file is imported into Cricut Design Space. The cut file will need to be cut all on one mat.
Below is the tutorial for how I create my text cut files in Photoshop and then how to import them into Cricut Design Space. The same process can be applied to picture images rather than text, but only if you plan to cut out all of the elements in your design on the same mat.
Projects I’ve Created Using this Process
Here are a few projects I’ve made by creating the text cut file in Photoshop first, then importing it into Cricut Design Space.
- Harry Potter Directional Sign
- DIY Farmhouse Sign
- DIY Reindeer Sign Using Adhesive Foil
- Oh Christmas Tree Fabric Scrap Wooden Sign
- Thanksgiving Wooden Pie Sign
Tutorial: How to Make Text Cut Files in Photoshop for Cricut Design Space
Part One: Creating the Text File in Photoshop
These are the Photoshop tools we will be using in this tutorial.

Step One: Create the text.
Start by opening up Photoshop and creating a new canvas. Make the canvas the size of your finished sign or canvas, for me this was 6″ x 18″. I like to use a resolution of at least 300 pixels/inch but often I use 400 pixels/inch for text files so the text is smoother and less pixelated.

Next, use the Type Tool to write your text. I wrote “The Smith Family” using the font Arabella. Size the font to fit your sign by using the Move Tool. Place your curser near the corner of the image and resize it by dragging it in or out. You may need to hold down your shift key to keep the text from distorting.

Step Two: Add the decorative elements.
Now is the time to make changes to your text or add decorative elements. For my sign, I wanted to underline the text and add hearts above the “i” in family and at the beginning of the line.
To do this, first created a new layer. Adding a new layer for each design element will make it easier to adjust your design as you work. Go to the Layer tab then select New from the dropdown and Layer. Name your layer. I named mine “Line”, and hit okay.

To create a line, use the Rectangular Marquee Tool to draw a long rectangle underneath the text.


Fill the rectangle in using the Paint Bucket Tool. To deselect the rectangle after filling it in, go to Select in the top menu bar, then choose Deselect from the dropdown.

Next, I wanted to add a heart to the “i” in family. I downloaded a heart image from Freepik and saved it to my desktop. I opened it in Photoshop and erased the background using the Magic Eraser Tool. The background will change to a checked pattern when it has been removed. I also changed the color of the heart to black using the Paint Bucket Tool.


Drag the heart into your project window by holding your curser on it and dragging it. You can also highlight the heart using the Rectangular Marquee Tool and copy it (Edit Copy or control C) then paste it (Edit Paste or control V) into the document with your text.

Resize the heart using by placing your curser on the corner of the heart and moving it inward to make it smaller. Place it over the “i” in family.

Next, you will need to remove the dot above the “i” that is part of the font. To change the text you will need to rasterize the type layer. I do this by highlighting the type layer in my layers panel and trying to using the paint bucket tool on the text. A window will pop up asking if you’d like to rasterize the type layer, select okay. This will turn the type layer into a regular layer and you will no longer be able to edit the text using the Type Tool.

In the Layers panel you will see the “T” type symbol is gone.

Make sure you are working in the correct layer, then use the Eraser Tool to erase the dot above the “i”.

I decided to add one more heart at the beginning of my line. To easily do this, I selected the heart layer in the Layers panel, then went up to Layer on my menu bar and selected Duplicate Layer from the dropdown.

Move the new heart layer (Heart copy) to the beginning of the line.
Save the file as a PSD (Photoshop file) to your desktop. This will be your working copy with all of the different layers separate so you can edit it easily in the future. I always recommend saving a Photoshop file before compressing or merging any layers.

Step Three: Turn the file into a PNG before importing it into Cricut Design Space.
Once the design is complete and it is saved as a Photoshop file (PSD), it is time to turn it into a PNG. You could save this file as a JPEG and import it into Cricut Design Space, you would just then need to remove the background, including all of the background areas inside the letters. To save time, we can easily remove the background in Photoshop.
Highlight all of the layers of your project except the background and merge these layers. Choose Layer from the Menu bar and then scroll down in the dropdown to “Merge Layers”. You don’t need to do this in order to save the file as a PNG. I like to do it because I can then turn the single layer on and off and make sure everything is as I want it.


Highlight the Background Layer in the Layers Panel and delete it or hide it by pressing on the eye icon. The background will go from a solid white background to a checked background.

Save the file as a PNG and it is ready to be imported into Photoshop! This is the closest way I have found to creating an SVG in Photoshop. Like an SVG, the PNG file will not have a background but there are some key differences. The PNG will not retain its size when transferred into Photoshop and will need to be resized. The PNG will also not allow multiple layers that can be sorted onto different mats once imported. The entire design will be on one layer.
Part 2: Importing the Text File into Cricut Design Space
Step One: Start a new project in Cricut Design Space.
Open Cricut Design Space and start a new project. Create the background of your sign in Design Space. Choose a square shape and resize it, making sure the lock is unlocked. I made my rectangle 6″ x 18″ and made it white using the Color Selector tool next to the Operation box in the top menu bar.


Step Two: Import the file into Cricut Design Space.
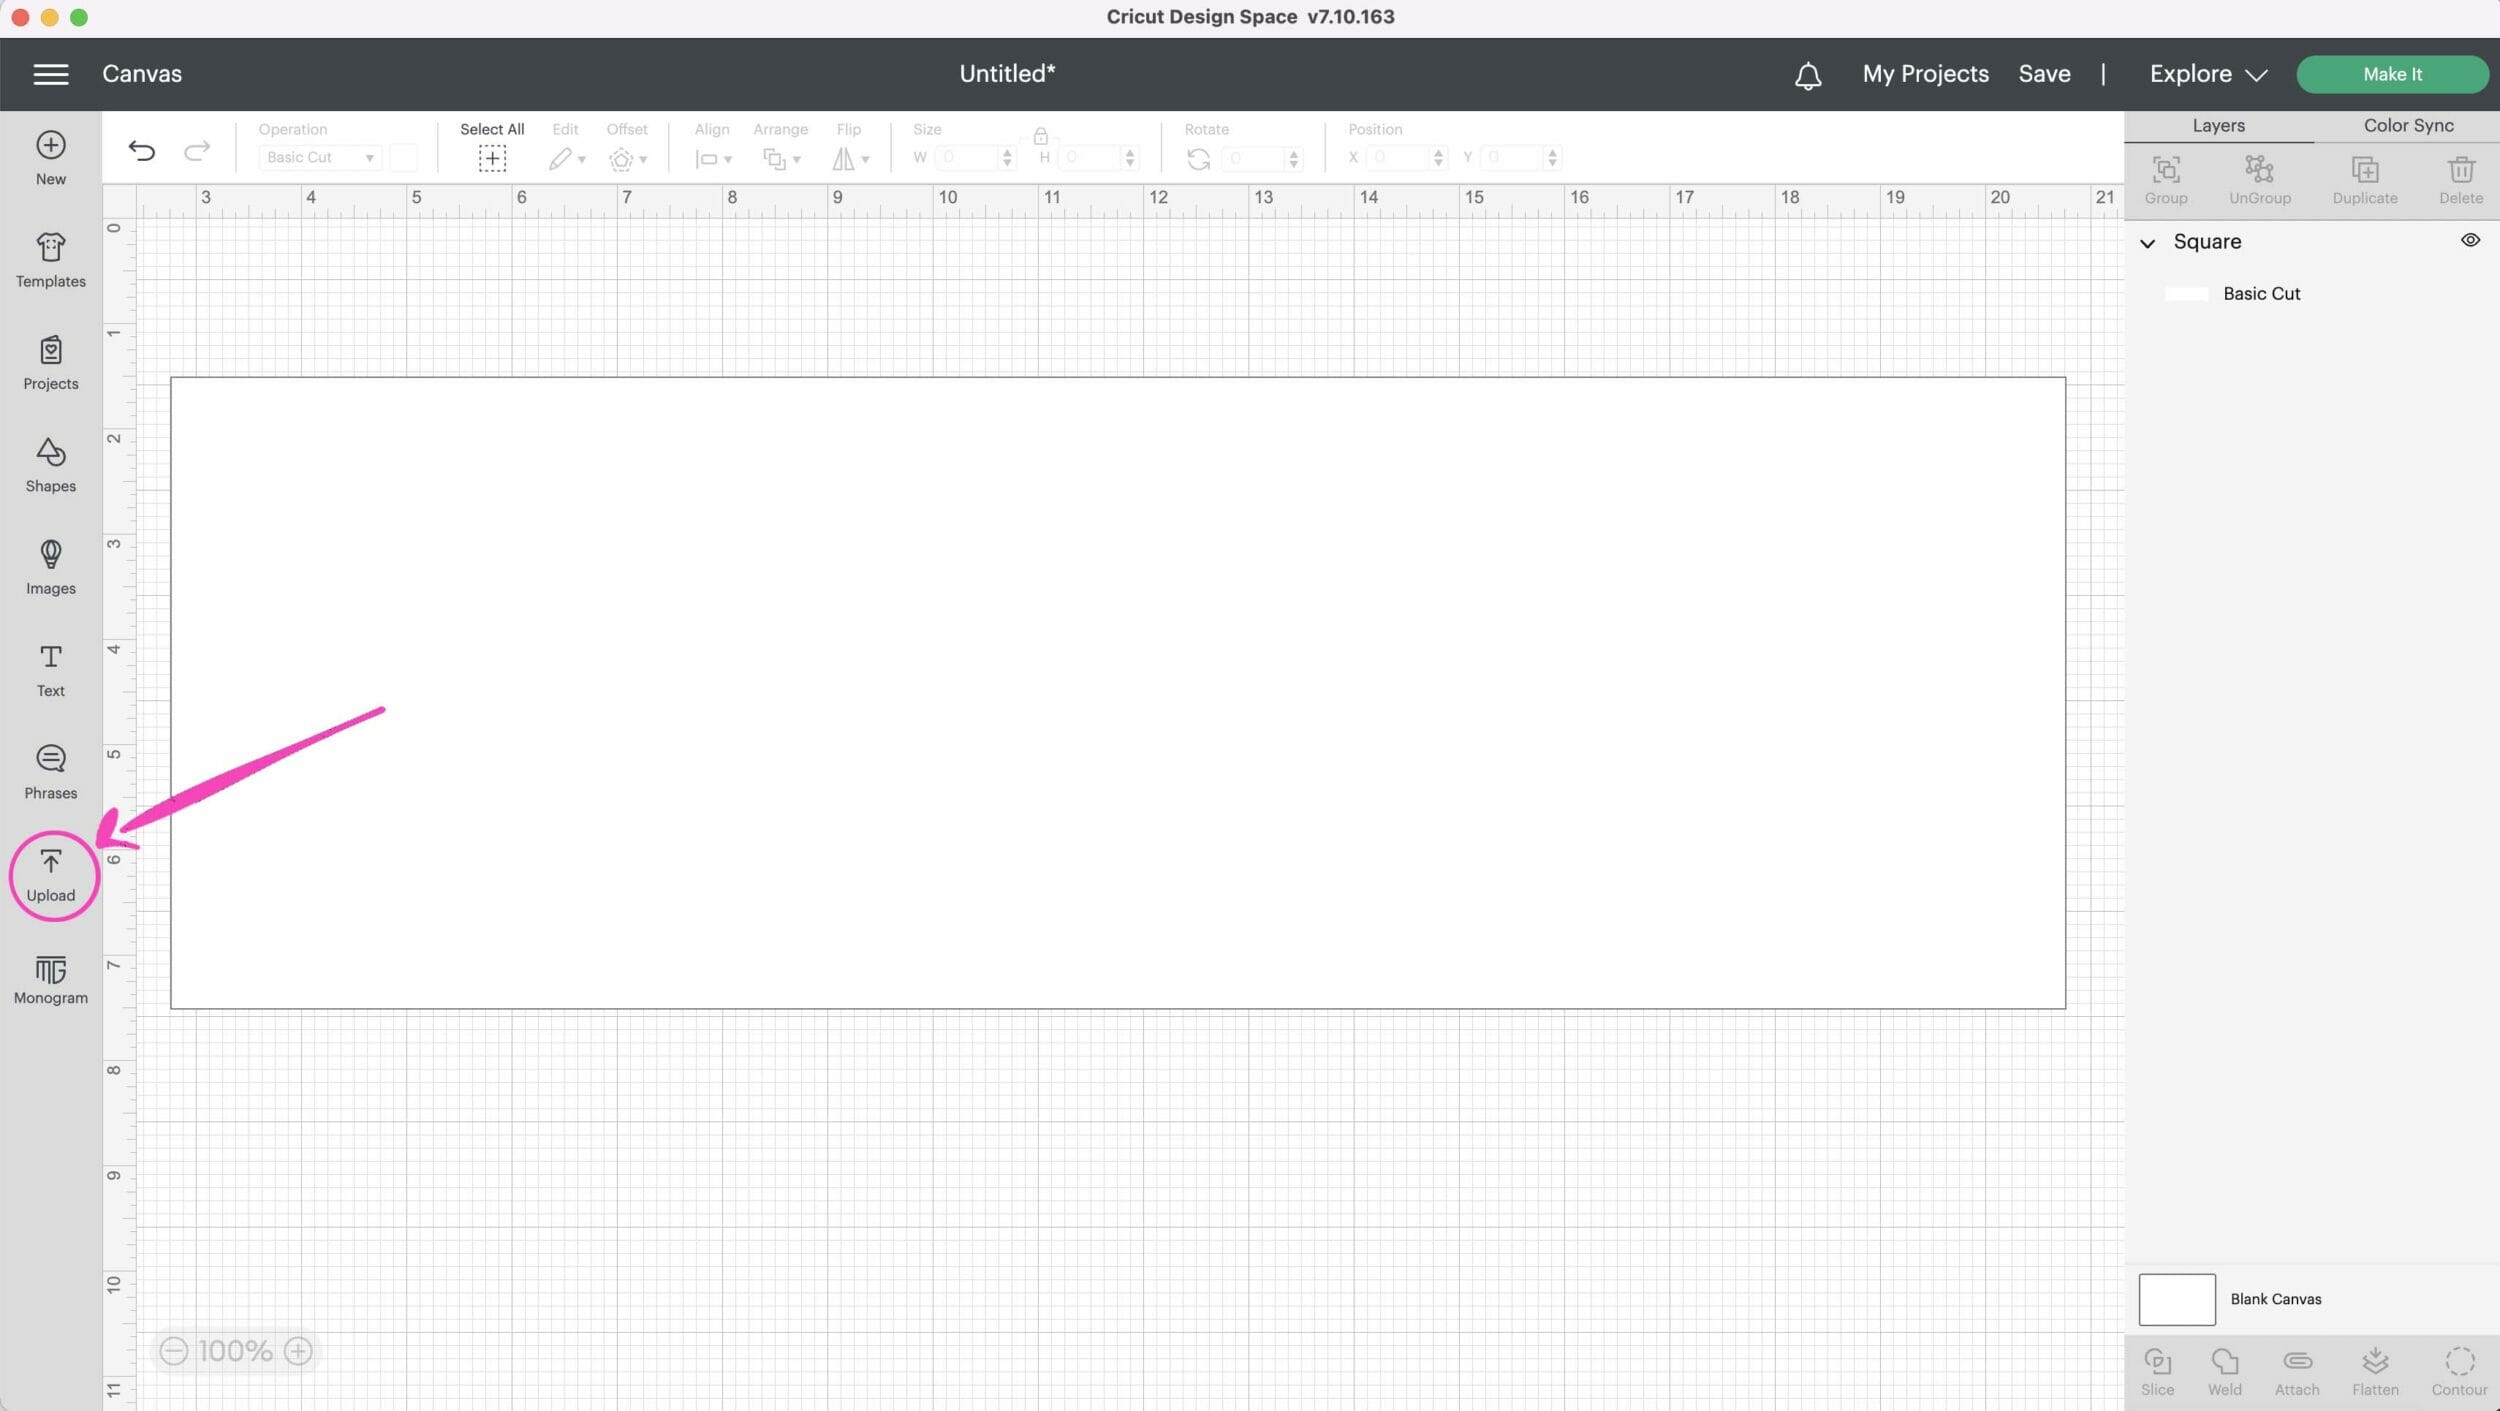
Choose Upload from the left menu bar and find your saved PNG file.

Select the Image Type, I usually choose Moderately Complex, and Continue. On the next screen, you will not need to remove any of the background if you saved your text file as a PNG, so simply click “Save and Continue”.

On the following screen, select the Upload Type “Cut Image” and then the green Upload button.

The file will now be in your project but it will be very large! The text may be hiding behind your rectangle. To fix this, select the rectangle then find Arrange from the top menu and choose Send to Back from the dropdown. Change the size of the image to something that will fit your sign, making sure the lock is closed above the width and height boxes.

Once you are happy with how the cut file looks, make sure to hide the rectangle by clicking on the eyeball next to it in the layer panel. You are now ready to cut!
I use my Cricut Explore to cut my text files from either Vinyl or Stencil Vinyl. For larger text files, you will need to use an extra long Cricut mat that is 12″ x 24″.

Quick Summary
Start a new project in Photoshop that is the size of the sign or canvas the text will be applied to. Create text in Photoshop and add design elements to it by creating new layers. Merge the layers together and hide the background. Save the file as a PNG. Import the PNG into Cricut Design Space. Since the PNG doesn’t have a background the file is ready to be used. It will need to be resized to fit your project and then it is ready to be cut!
I hope you found this tutorial helpful! As I mentioned at the beginning, you can create text files in Cricut Design Space but sometimes there may be occasions where you prefer to work in Photoshop first. This is one way you can create a text file in Photoshop and then use it with your Cricut cutting machine!


One Comment